Seom2
This is the Frequently Asked Questions (FAQ) page for the SEO Suite Ultimate extension made by MageWorx. In case you find the answer to your question here - that's absolutely fantastic. If not, please do not hesitate to drop us a line and we'll be happy to assist you.
Please note that we'll gradually update this section.
How to set custom redirects for deleted products?
The website management requires permanent updates. When the owners create some product, they wish this page to be indexed by the search engines as quickly as possible. However, as time goes, the product may become unavailable or the store owner may observe some mistakes that were made when the product was created. In this case, deleting the product is the most common solution. Therefore, it is highly important to understand how to avoid the situation when some product is indexed, yet not available on the website.
This is done by means of setting redirects. The redirect is a way to send both users and search engines to a different URL from the one they originally requested. The correct setup of the redirects is very important and helps to avoid possible sales loss.
Log into the Magento Admin panel and go to STORES ⟶ Configuration ⟶ MAGEWORX ⟶ SEO. Select the SEO Redirects tab and open the For Deleted Products drop-down.
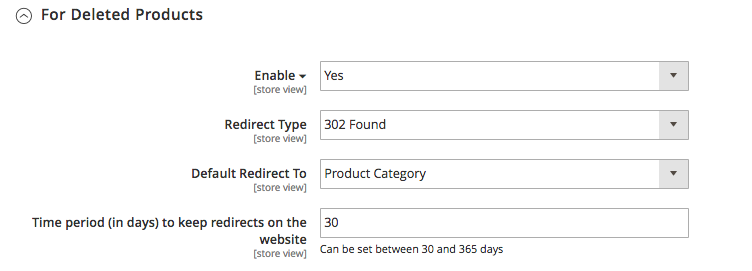
These settings enable the redirects for deleted products.
The Redirect Type configuration allows setting either 301 Moved Permanently or 302 Found. By using the 301, the store owner tells the search engine robots that this page is no longer available in this location, that it should no longer be indexed.
It should be used only if the store owner is sure that the old URL will never be used again. If we need to use the URL again, a temporary (302) redirect should be created. When using the 302, you are telling the search engine crawlers that your content is just temporarily offline.
Default Redirect To allows selecting the destination of the redirect: product category or priority category.
The difference between product category and priority category can be explained and best understood through this example:
If a product was assigned to a single category A - subcategory A1, and the setting is applied to redirect to a product category, the redirect will be created for the subcategory A1 despite the set priorities.
If a product was assigned to both category A - subcategory A1 AND to category B - subcategory B1, and the setting is applied to redirect to a product category, the redirects will be created to both subcategory A1 AND to the subcategory B1:
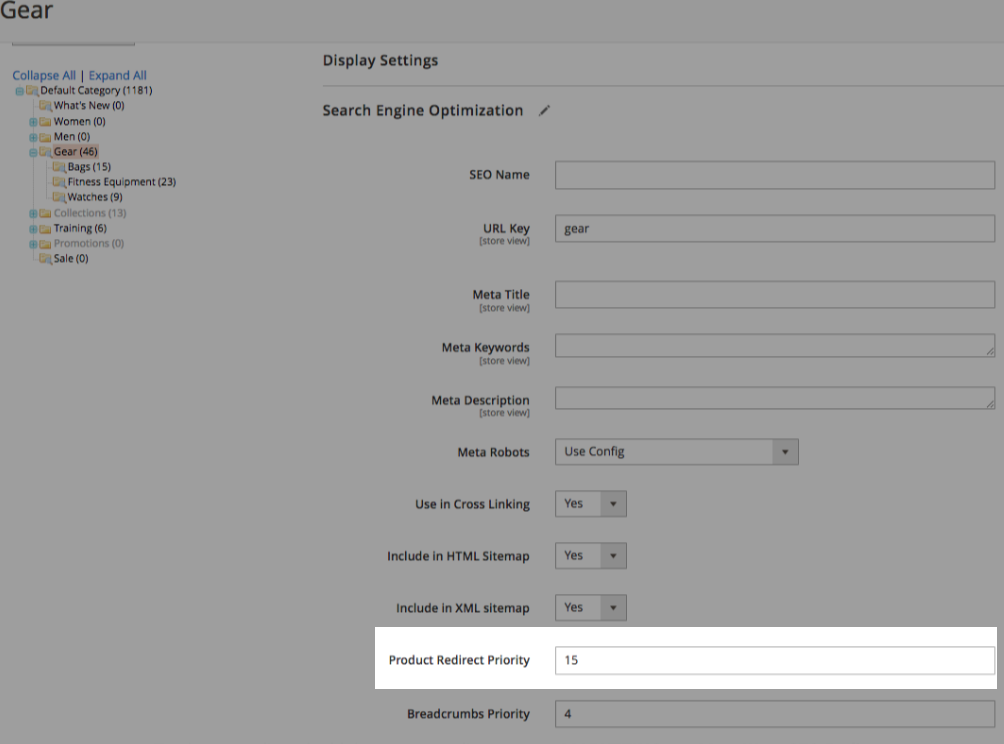
If the setting is applied to redirect to the priority category, the redirects will always be set to the one with the higher priority. The priority of the category can be set up in the Category Configuration. For this, go to PRODUCTS ⟶ Inventory ⟶ Categories, select the desired Category and open the Search Engine Optimization tab.
Why we have 2 canonicals on one page?
Magento 2 itself has a rather limited mechanism to set the canonicals. The store owner may use some third-party extensions that may automatically set up the canonicals. This is the reason why the pages may have several canonicals visible on some particular page. This can be avoided by tweaking some settings as described below.
For Magento itself, the store owner needs to disable the standard canonical in STORES ⟶ Configuration ⟶ CATALOG ⟶ Catalog ⟶ Search Engine Optimization:
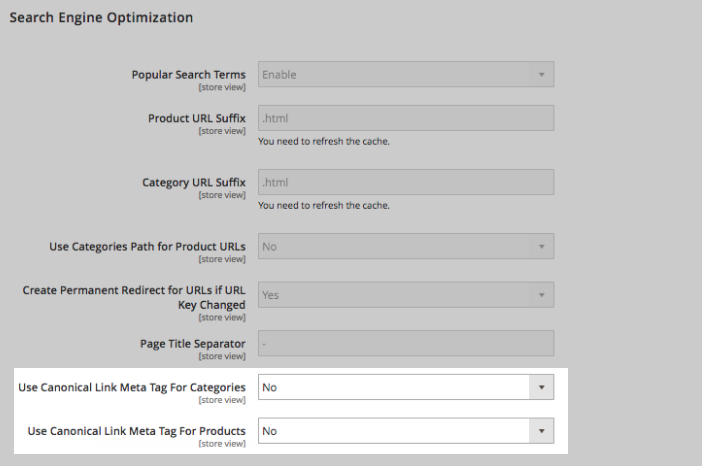
Disabling these 2 settings will disable the second canonical that is created by Magento.
One can find dozens of extensions that have similar functionality and we strongly recommend you contact the support of these modules for further details and instructions on how to solve this.
Can we import/export our templates?
Currently, this feature is not available in our extension.
Why our sitemap is not generated by CRON?
CRON is a time-based job scheduler. Several Magento features require its correct setup in order to schedule activities that occur in the future.
Our extension has the ability to generate the sitemaps automatically. It uses the default Magento mechanism for creating the sitemap cronjobs.
If the website successfully generates scheduled sitemaps with out-of-the-box Magento functionality, then it should work with our extension enabled as well. If you face some difficulties only after you enable our software, please contact our support.
Otherwise, please follow these steps:
1) First of all, check that the CRON is running correctly on your website. Follow this guide to check.
2) If you have a lot of pages and the CRON operates simultaneously with some resource-intensive tasks, it may lead to the sitemap generation issues. In this case, the error will be added to the cron_schedule table in your database.
Knowing the possible errors help us find the correct steps for you to overcome this problem.
How can we set the canonical for individual URLs?
Currently, it is not possible to set the canonical for individual URLs by means of our extension.
How could we check that XML sitemap generation is working properly?
The XML sitemap can be generated either automatically by CRON or manually. To observe the sitemaps generated by means of our extension, go to MARKETING ⟶ SEO & Search ⟶ Sitemap by Mageworx.
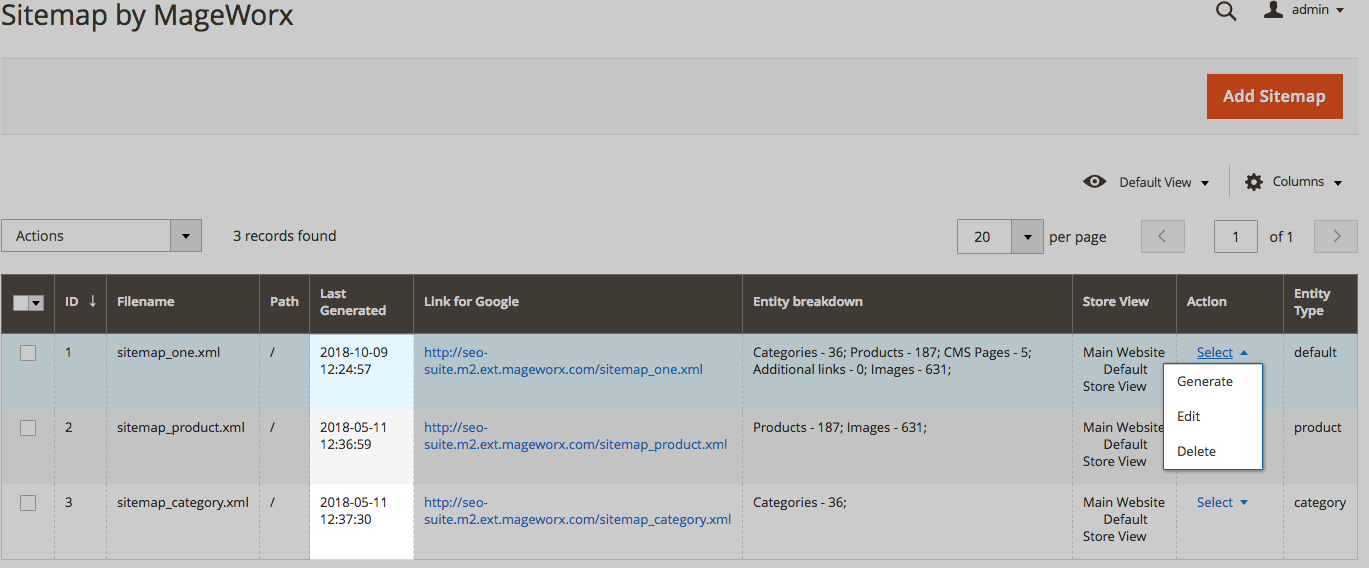
Each template has the Select action link that allows you to regenerate the sitemap. The sitemap generation time can be found in the Last Generated table.
If you set the CRON to generate the sitemaps on a daily basis, yet the last generated timestamp is reasonably old, you may have some problems with the sitemaps generation.
Please check this question in our FAQ section for the CRON-related issues.
How could we generate a new sitemap instead of the current one, from scratch?
After the customer installs our extension, the default XML templates that are done by means of core Magento configuration will be overwritten. The guide for the sitemaps generation and the configuration settings explanation can be found here.
What information should be included in robots.txt file or should it be empty?
robots.txt file is used for communicating with the search engines. This file defines how to inform the bots about the pages of your site that should be excluded (or, vice versa, opened) for crawling.
By default, Magento 2 allows the store owner to generate and configure robots.txt files. You can prefer to use the default indexation settings or specify custom instructions for different search engines.
To configure the robots.txt file, go to CONTENT ⟶ Design ⟶ Configuration. Select the desired website or store view and open the Search Engine Robots tab.
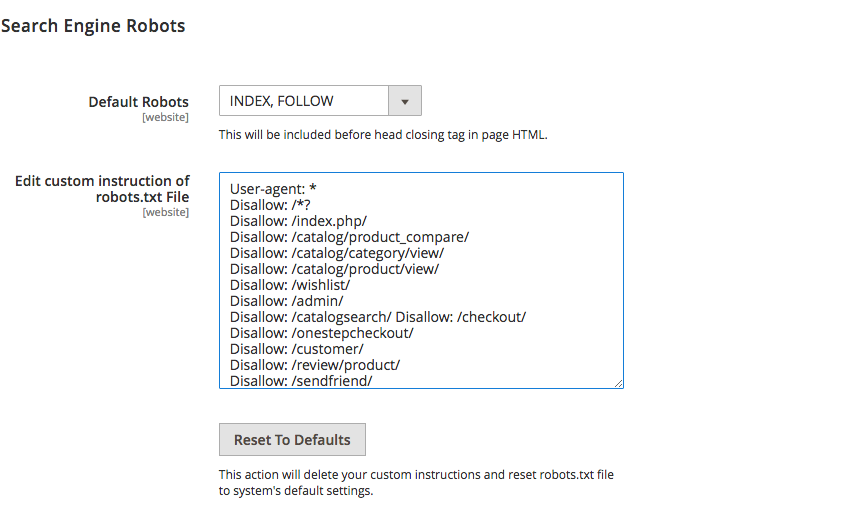
The Edit custom instruction of robots.txt file section gives the possibility to add the desired rules. We recommend using the following custom robots.txt for your Magento 2 store:
User-agent: *
Disallow: /*?
Disallow: /index.php/
Disallow: /catalog/product_compare/
Disallow: /catalog/category/view/
Disallow: /catalog/product/view/
Disallow: /wishlist/
Disallow: /admin/
Disallow: /catalogsearch/
Disallow: /checkout/
Disallow: /onestepcheckout/
Disallow: /customer/
Disallow: /review/product/
Disallow: /sendfriend/
Disallow: /enable-cookies/
Disallow: /LICENSE.txt
Disallow: /LICENSE.html
Disallow: /skin/
Disallow: /js/
Disallow: /directory/
sitemap.xml and robots.txt issues when docroot is set to /pub
When using /pub as docroot, you can face the following issues:
-
sitemap.xml:
The file sitemap.xml is solely created in the Magento root directory. In the column ‘Link for Google’ it incorrectly says:
http://example.com/sitemap.xml</a>. Further on, after clicking on the sitemap entry in the table, changing the path to /pub, and ‘saving and generating’, sitemap.xml is created in the pub directory and you once again see incorrecthttp://example.com/pub/sitemap.xmlin the same column. -
robots.txt:
The file robots.txt is solely created in the Magento root directory, but not in the /pub directory, which makes it not accessible for web requests.
MageWorx developers offer the following issue solution options
First Option: Problem Solution Without any Additional Settings (Not Advisable)
-
for XML Sitemap
First, you must specify the path /pub/. Then you will see ‘Link for Google’ in the admin panel as
http://example.com/pub/sitemap.xml. However, xml sitemap will be available via URLhttp://example.com/sitemap.xml) - this is exactly what should be entered in the Google Search Console. -
for robots.txt
First, store 2 robots.txt files on the server, one file must be stored in
<your Magento install dir>, another one - in<your Magento install dir>/pub.Each and every time you make changes in
<your Magento install dir>/robots.txt, make sure to duplicate the file in pub/.
Second Option: Use nginx Configuration
Add the following code lines to nginx config for your website:
php
location ~ ^/(robots\.txt|sitemap.*\.xml)$ {
    alias <your Magento install dir>/$1;
}
Third Option: Use Symlinks
This will fail if a symlink already exists.
1) To create a new symlink, complete the following actions:
sh
ln -s <your Magento install dir>/robots.txt <your Magento install dir>/pub/robots.txt
ln -s <your Magento install dir>/sitemap.xml <your Magento install dir>/pub/sitemap.xml
2) To create or update a symlink, complete the following actions:
sh
ln -sf <your Magento install dir>/robots.txt <your Magento install dir>/pub/robots.txt
ln -sf <your Magento install dir>/sitemap.xml <your Magento install dir>/pub/sitemap.xml
When using clauses number 1 and 2, the symlink ownership will remain the same as in the source file.
You can use chown to change the symlink’s ownership manually. To change the ownership of a symlink, complete the following actions:
sh
cd <your Magento install dir>/pub
chown -h <Magento file system owner>:<owner group> robots.txt
chown -h <Magento file system owner>:<owner group> sitemap.xml
MageWorx hopes that the offered solutions will be of help when dealing with the above stated issues.