Magento 2 Store Locator & In-store Pickup Manual
Introduction
Magento 2 Store Locator & In-store Pickup extension allows showing the customizable, responsive and well-designed store locator page with all the extra information about any particular store (like the small thumbnail image, opened hours, Facebook page, website URL, phone, etc.). The store locator pop-up is shown on the products page for the convenience of the client, and the customer can select the particular store during the checkout for pickup.
For the developer, we provide the web API to use the web services that communicate directly with the Magento system.
The 'Store Locatore & In-store Pickup' is fully compatible with Shipping Suite, Delivery Date & Shipping Calculator extensions.
Requirements and Installation
Store Locator & In-store Pickup supports Magento 2 Open source (Community), Commerce (Enterprise) and Commerce Cloud.
Store Locator & In-store Pickup has 3 separate ways of installation:
1) Copy the code (ready-to-paste package);
2) Use MageWorx Repository;
3) Use local Composer.
Uninstall The Extension
To check the full general guide for the extension uninstall on Magento 2, click here.
For our extension, we recommend you to follow this guide:
Please note that this process is possible to achieve only if the extension was installed via the composer. If not, or this manual didn't work for you, please feel free to submit a ticket from https://www.mageworx.com/support/
-
Connect to the server via SSH, navigate to the root Magento folder. Switch your user to the Magento file system owner. Perform this command:
ssh
php bin/magento module:uninstall MageWorx_Pickup MageWorx_StoreLocator MageWorx_Locations MageWorx_GeoIP --backup-code --backup-media --backup-db
where
--backup-codebacks up the Magento file system,
--backup-mediabacks up the pub/media directory,
--backup-dbbacks up your database. -
Perform the command to remove the Meta File:
ssh composer remove mageworx/module-storelocatormeta -
Run the setup:upgrade command, then clear the cache and generated folders:
ssh php bin/magento setup:upgrade rm -rf var/cache var/generation var/di var/page_cache generated/* -
Run the reindex process to update your indexers
ssh
php bin/magento indexer:reindex
Extension Setup
GeoIP Database Type
The GeoIP extension uses the country and city IP database to detect the location of the customer. Before the usage of the extension, it is necessary to select the desired database type, save it and update the database.
If you wish the more precise detection, change the Database Type to City. Note that in case you wish to use the Country type (Default one), you'll still need to update the DB.
Log into the Magento Admin panel and go to STORES ⟶ Configuration ⟶ MAGEWORX ⟶ GeoIP Extensions.

Due to new MaxMind policy, you should register an account at MaxMinde site and generate a new license key for GeoLite2 database and enter it in the "MaxMind License Key" field.
Note: You should save the configuration after adding a license key first. If you click the Update Database button before saving the configuration, it will update the database of the previous type with the previous license key.
Google Maps API Key
To show the map with the locations of the stores, you'll need to obtain the Google API. For this, please do the following:
To use the Google Maps API key, you must enable billing in the Google Cloud Platform. For this, please use this guide.
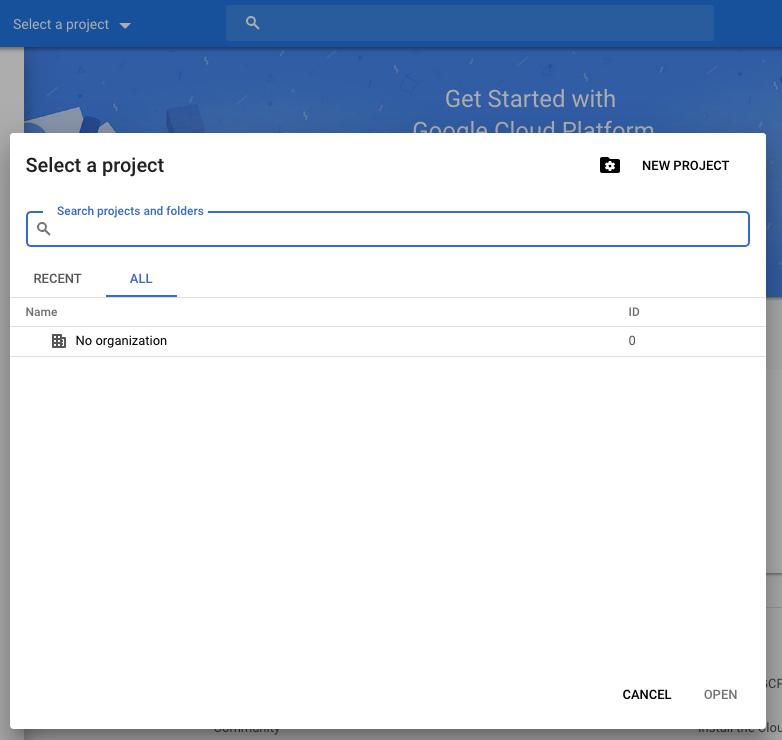
1) Go to Google Cloud Platform and log in using your credentials.
2) If you already have some Google Cloud project associated with your website, select it in the Select a project dropdown. Otherwise, click the NEW PROJECT link:
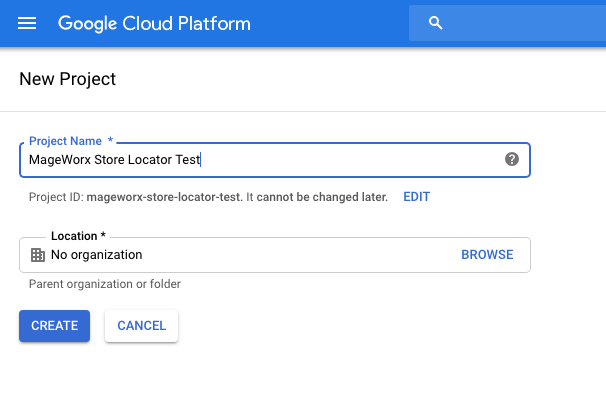
3) Add some Project Name and click the CREATE button:
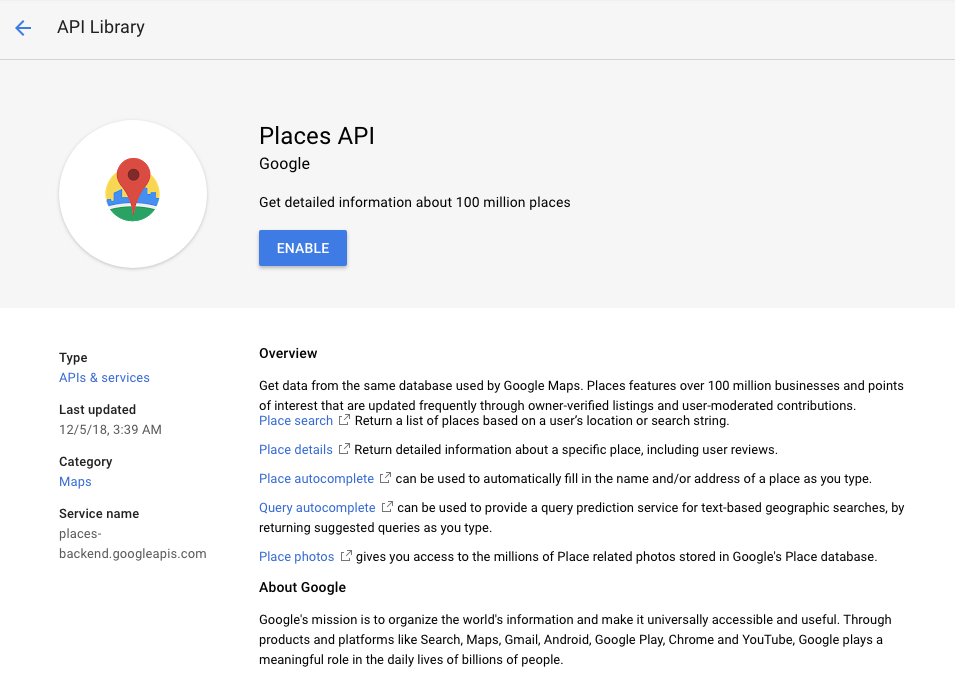
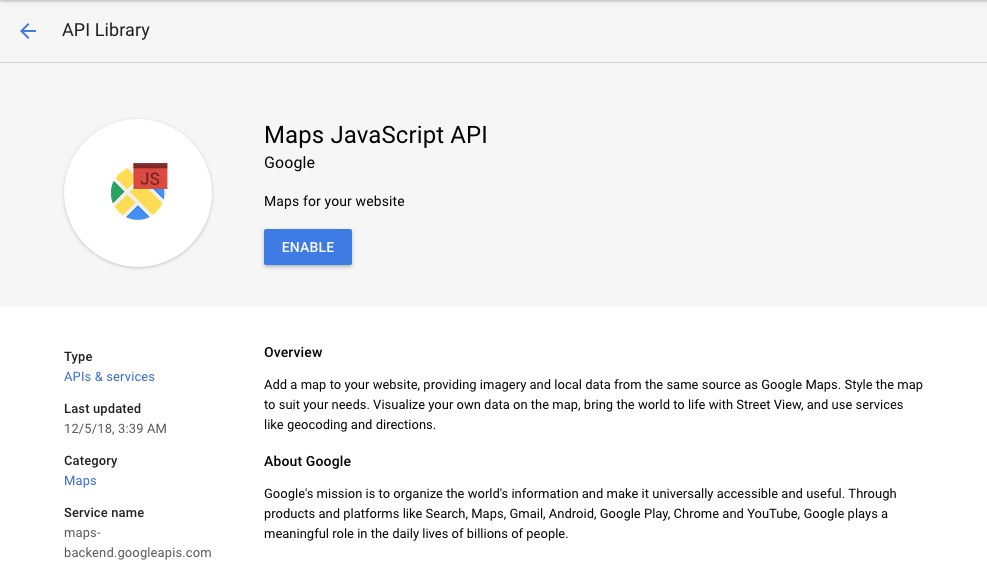
4) Go to Google Places API and click the Enable button:
5) Go to Maps JavaScript API and click the Enable button:
6) Go to APIs & Services > Credentials, click the Create Credentials dropdown and select the API Key option:
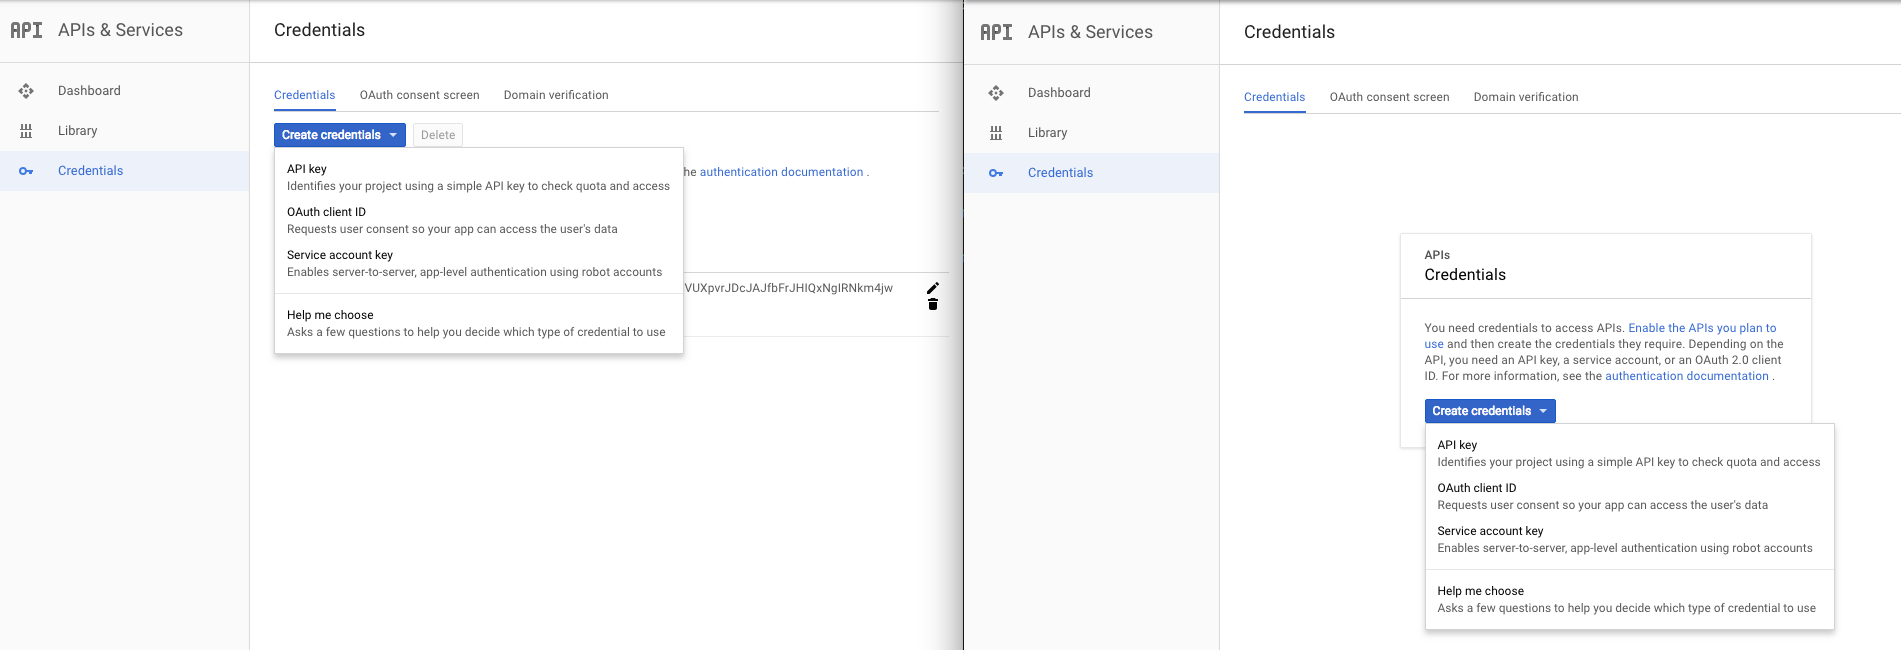 The left screenshot shows the workspace if you already have some APIs for your current project, the right screenshot is for the new one.
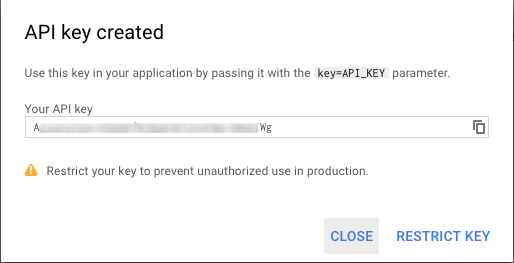
7) This creates the new API key that you need to restrict in order to avoid any potential misuse. Click the RESTRICT KEY link:
8) In the Application restrictions tab select the HTTP Referrers (web sites) and add your website name. Note the yellow triangles above the tabs informing you that the restrictions are not set until you initiate the restrictions:
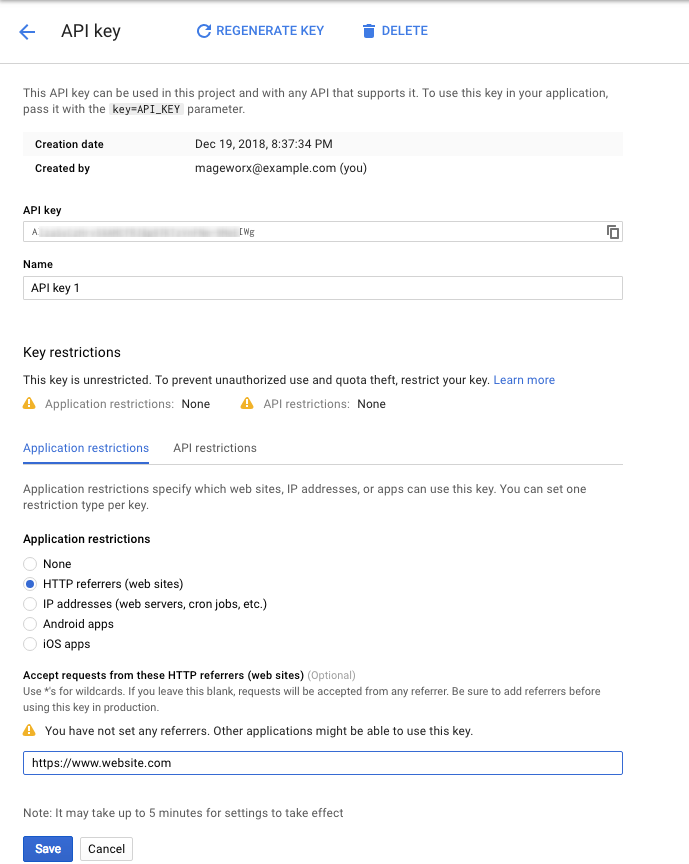
9) In the API restrictions tab select the Maps JavaScript API and Places API.
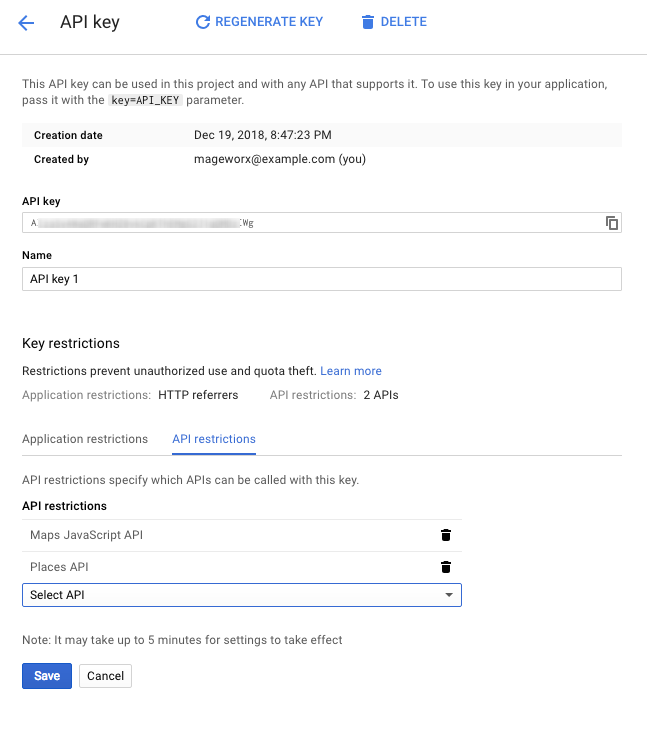
Note that both triangles are gone now. Click the Save button.
10) On the Credentials workspace, copy the created API key by clicking the ⧉ button.
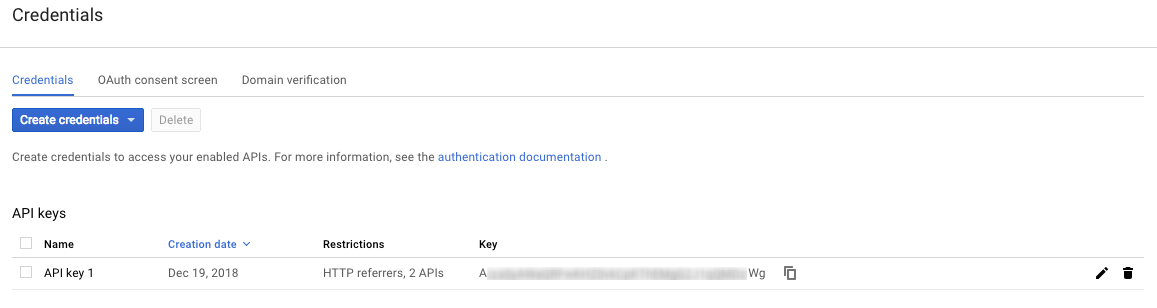
11) Here is your Google Maps API key that you can use for the correct functionality of the Store Locator extension.
Google API
Log into the Magento Admin panel and go to STORES ⟶ Configuration ⟶ MAGEWORX ⟶ Google API.
-
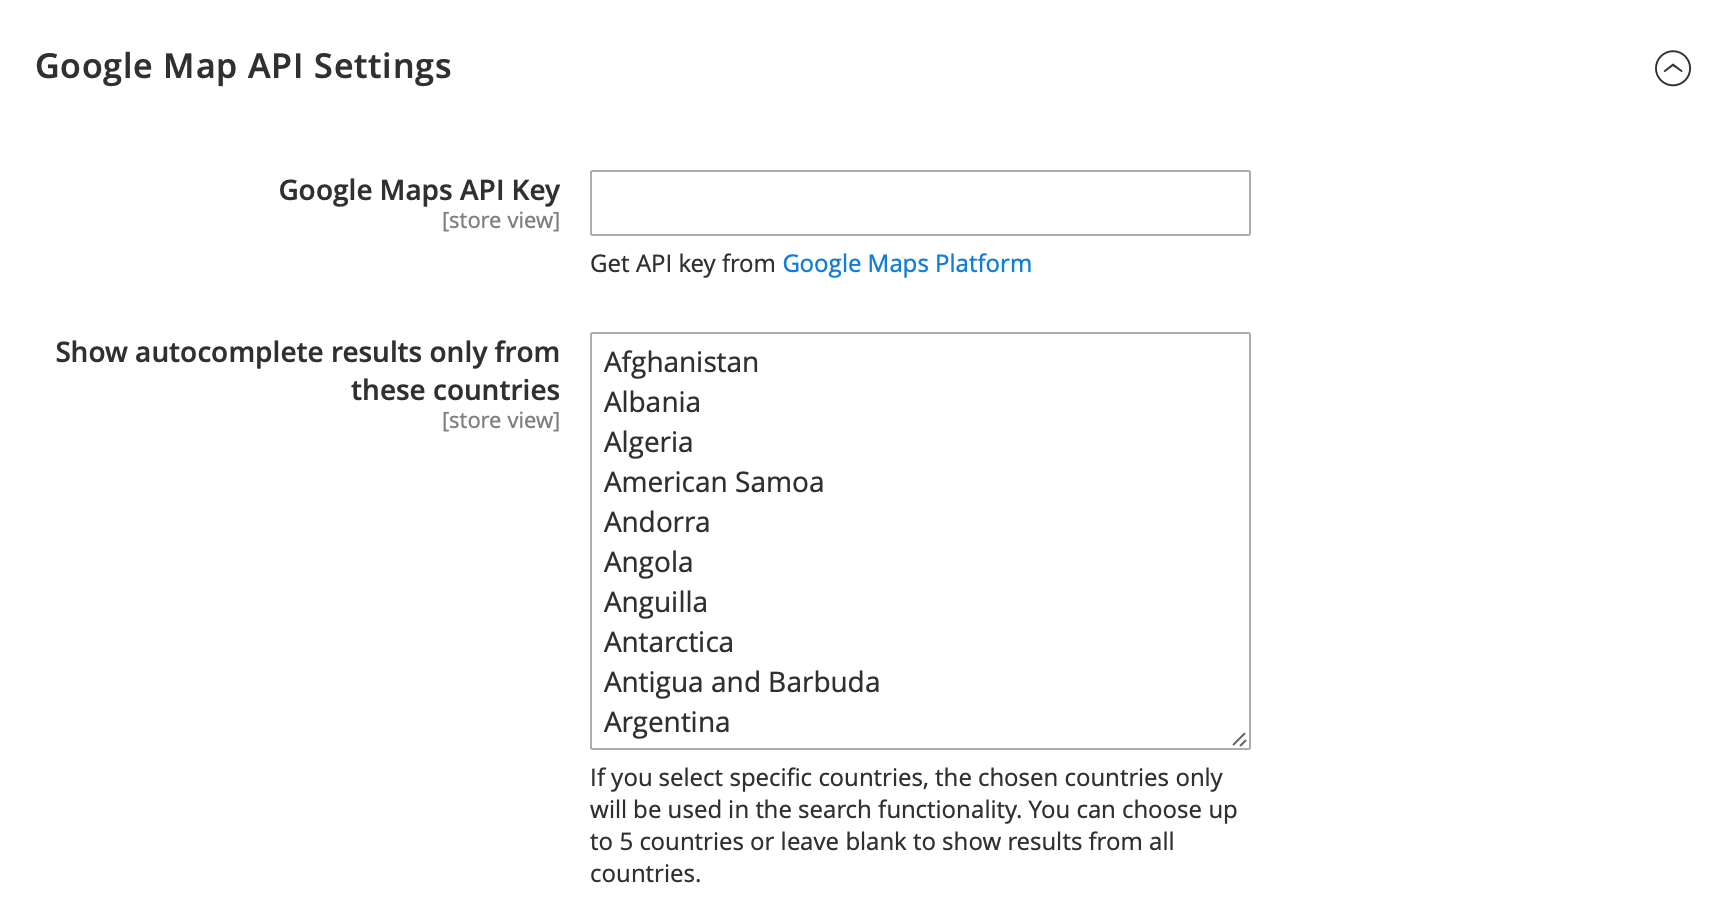
Google Maps API Key - the Google Maps key you should copy from your Google Cloud Platform.
-
Show autocomplete results only from these countries - this setting allows you to choose the countries, where you have the stores in order to show the addresses from these countries by Google Autocomplete feature. It is used for the Search stores feature:
Extension Configuration
Log into the Magento Admin panel and go to STORES ⟶ Configuration ⟶ MAGEWORX ⟶ Store Locator. Alternatively, this page can be opened via STORES ⟶ MageWorx Stores ⟶ Settings.
General
-
Default map view - this setting sets the default view of the map on the front-end. If the 'Default location' is chosen, the map will show the location selected in the setting below. If the 'Customer location' is chosen, the map will show a customer's location detected by GeoIP. If a customer's location cannot be determined, a default location will be shown on the map.
-
Default location - this setting allows you to select a default location directly on the map.
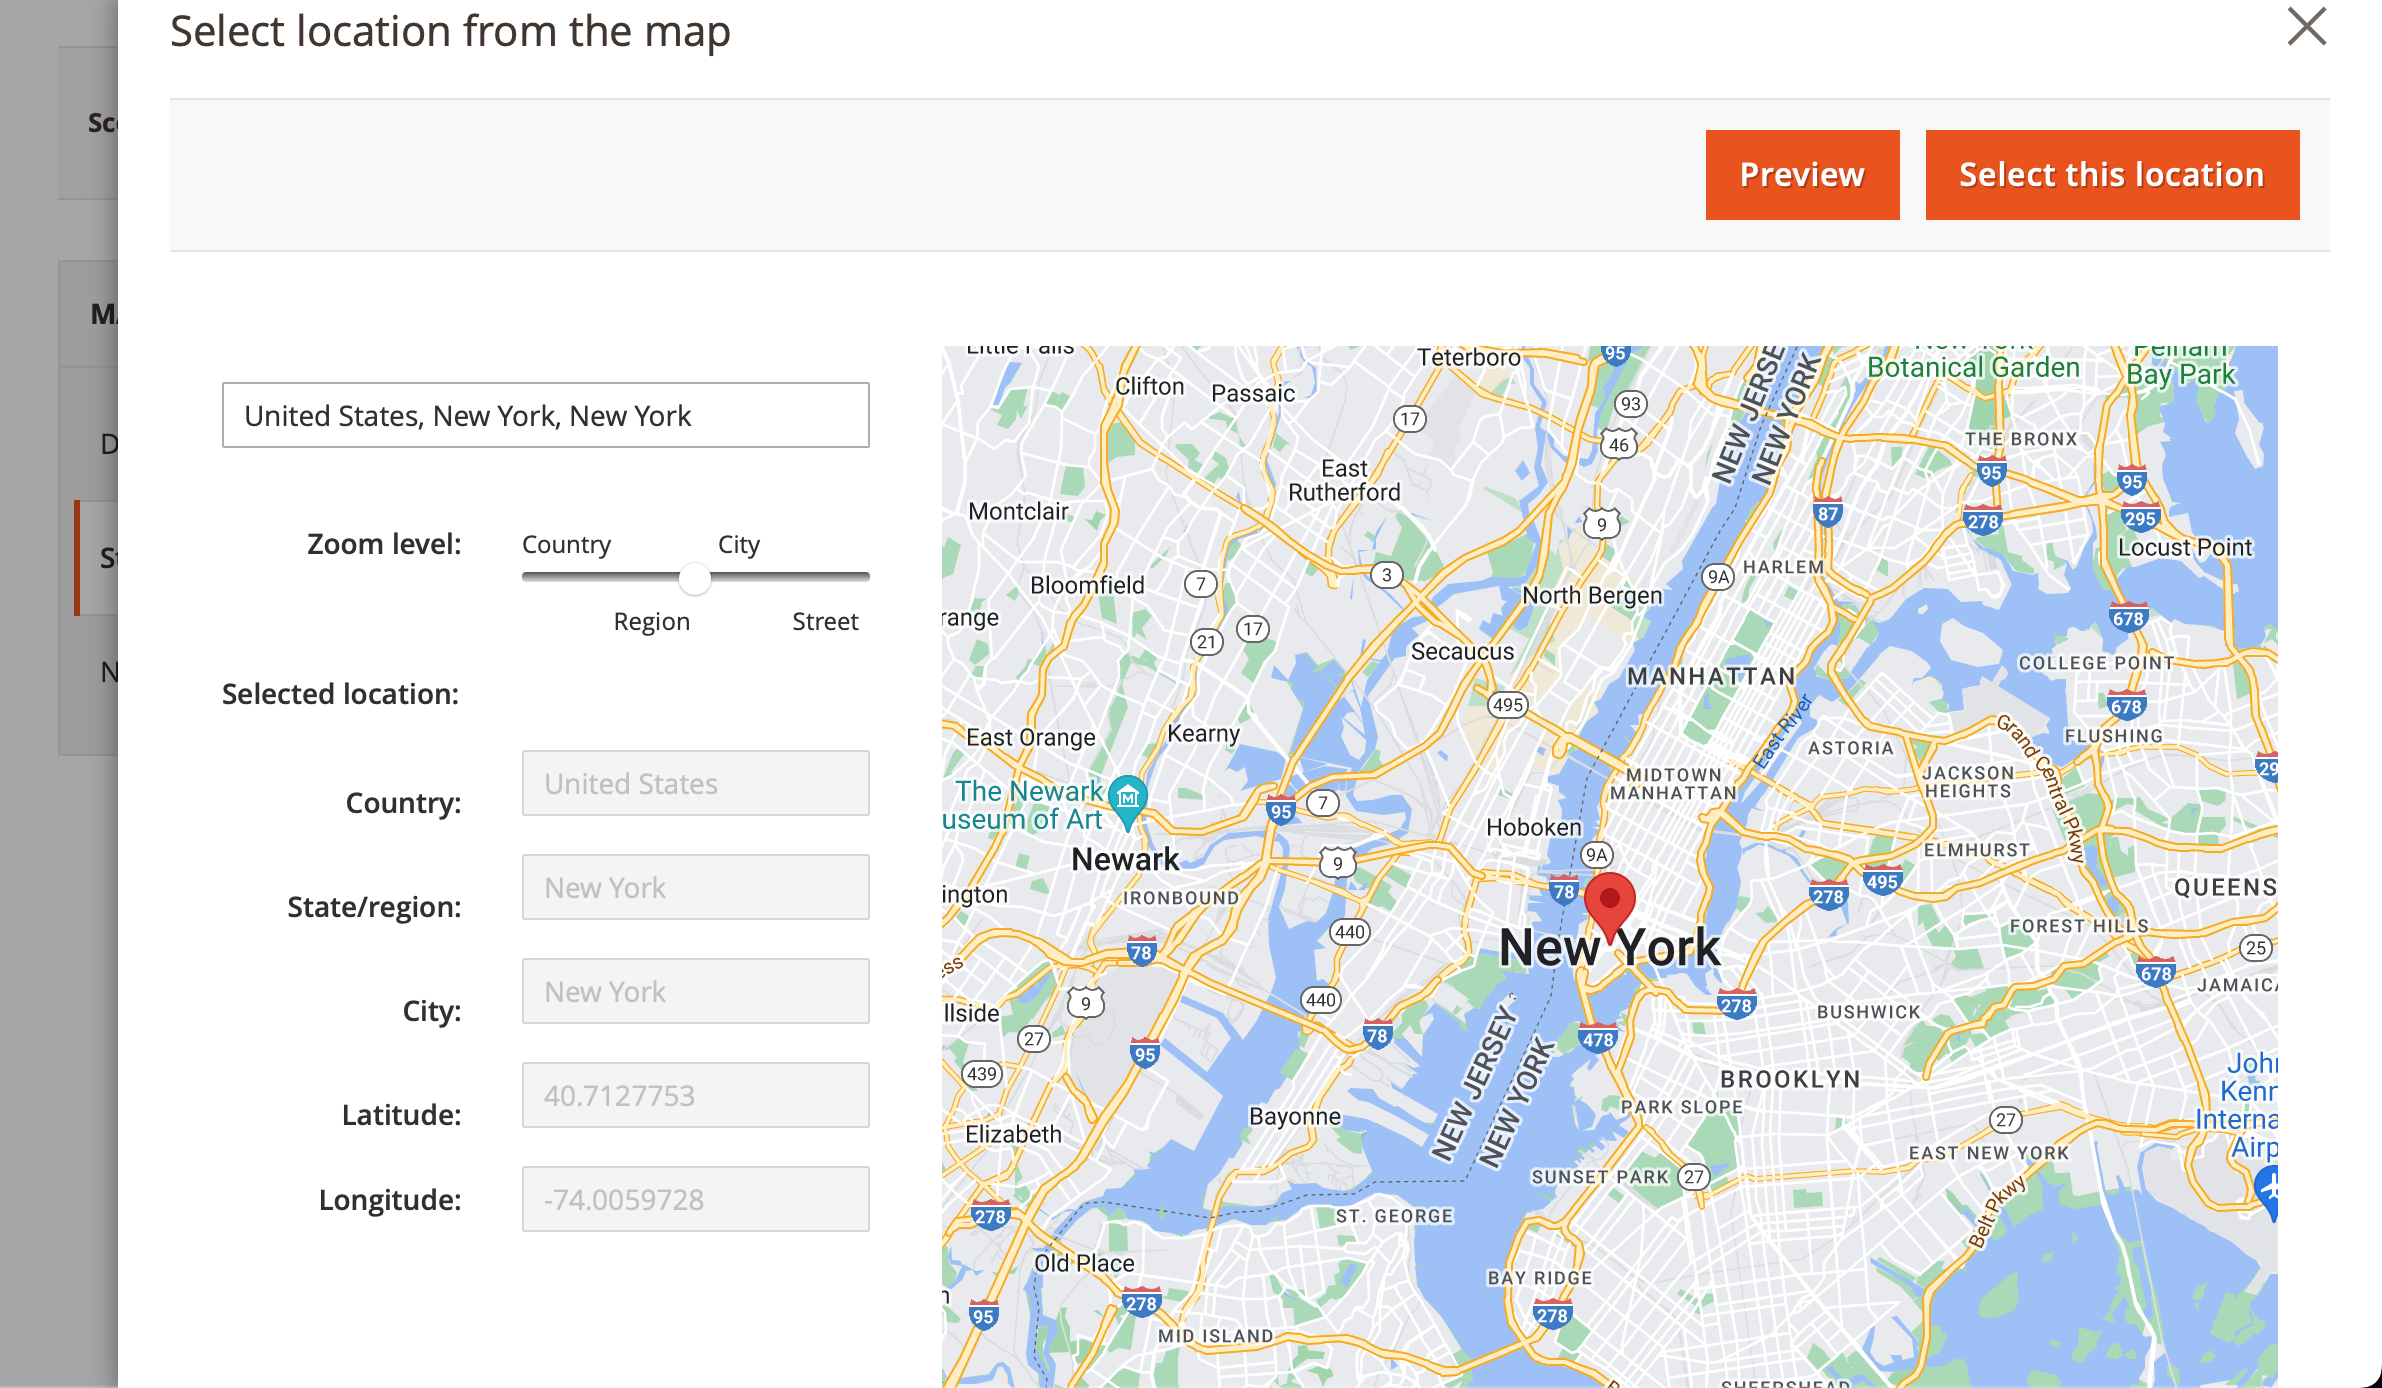
The Zoom level allows you easlily adjust the zoom of the map.
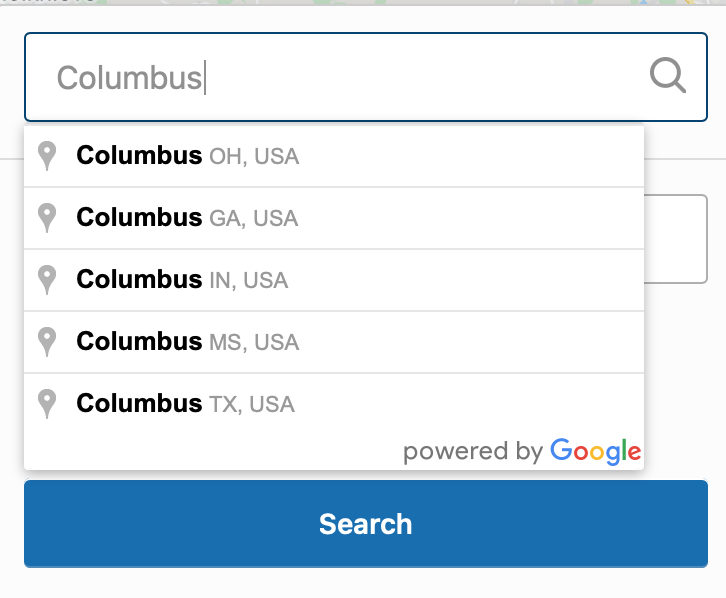
The search field allows you to find an exact location using Google Address Autocomplete functionality.

- Email Template for Pickup Orders - this setting allows you to assign a separate order confirmation email template, which will be sent to your customers, if the place the order with Pickup method. This email will be sent instead of the standard email. Leave empty to disable this feature.
Tip
You can use the following variables in the email template:
- {{var mw_store_name}}
- {{var mw_store_description}}
- {{var mw_store_phone_number}}
- {{var mw_store_skype}}
- {{var mw_store_email}}
- {{var mw_store_website}}
- {{var mw_store_whatsapp}}
- {{var mw_store_working_hours}}
- {{var mw_store_facebook}}
- {{var mw_store_prepared_address}}
- {{var mw_store_page_url}}
-
Enable Working Hours - this setting allows you to show/hide the store's working hours. You also can hide working hours per each store.
-
Static Block for Success Page - this setting allows you to choose a static block, which will be shown at "Thank you" page, if the Pickup method is used. Leave empty to disable this feature.
Tip
You can use the following variables in the email template:
- {{var mw_store_name}}
- {{var mw_store_description}}
- {{var mw_store_phone_number}}
- {{var mw_store_skype}}
- {{var mw_store_email}}
- {{var mw_store_website}}
- {{var mw_store_whatsapp}}
- {{var mw_store_working_hours}}
- {{var mw_store_facebook}}
- {{var mw_store_prepared_address}}
- {{var mw_store_page_url}}
-
Enable 'Ready For Pickup' - this setting allows you to enable the 'Ready for pickup' functionality for the orders. You will be able to send a notification to your customers, when their orders are ready for pickup.
-
Email Template for 'Ready For Pickup' - this setting allows you to select a template for the email, which will be sent to the customers, when you click on "Ready for pickup" button.
Tip
You can use the following variables in the email template:
- {{var mw_store_name}}
- {{var mw_store_description}}
- {{var mw_store_phone_number}}
- {{var mw_store_skype}}
- {{var mw_store_email}}
- {{var mw_store_website}}
- {{var mw_store_whatsapp}}
- {{var mw_store_working_hours}}
- {{var mw_store_facebook}}
- {{var mw_store_prepared_address}}
- {{var mw_store_page_url}}
-
Send Email to Store - this setting enables the order email notifications to the store, which was selected for the pickup. The notification will be sent to the store's email address.
-
Store Email Notification - this setting allows you to set the email template, which will be sent to the store, if new order with the pickup option is placed.
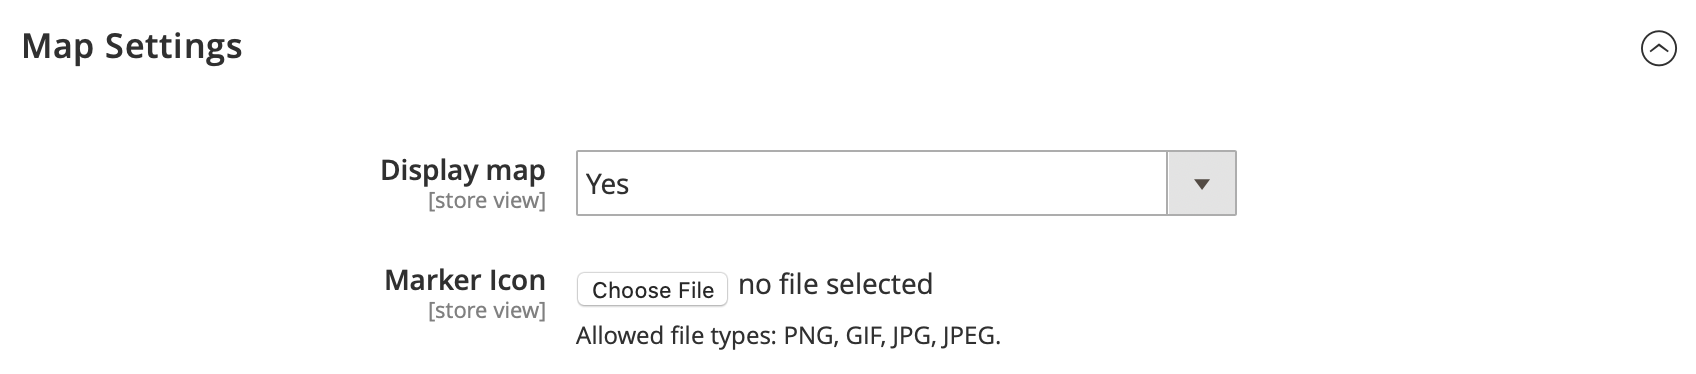
Map Settings
-
Display Map - this setting allows you to disable the Google Maps on your Find a store page and in the find a store pop-up.
-
Marker Icon - it allows you to change the default marker on the map.
-
Get Coordinates For Store Filter - this setting helps reducing the number of requests to Google API by filling the missing coordinates for your filters by location from Google. These coordinates will be used to center the map on the front-end instead of retrieving them each time upon page load from Google.
Example
When your customers open the map with the stores and click on the filters, the request is sent to Google API to get the coordinates of the chosen country/city/region to display it on the map. With this option the system can fill the coordinates for all current filters according to the scale settings and use these coordinates to display the chosen filters instead of sending the requests each time.
Filter Settings
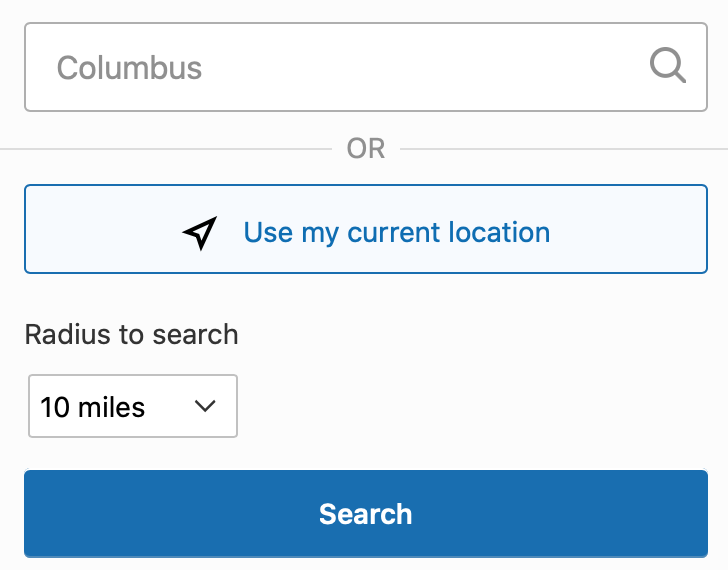
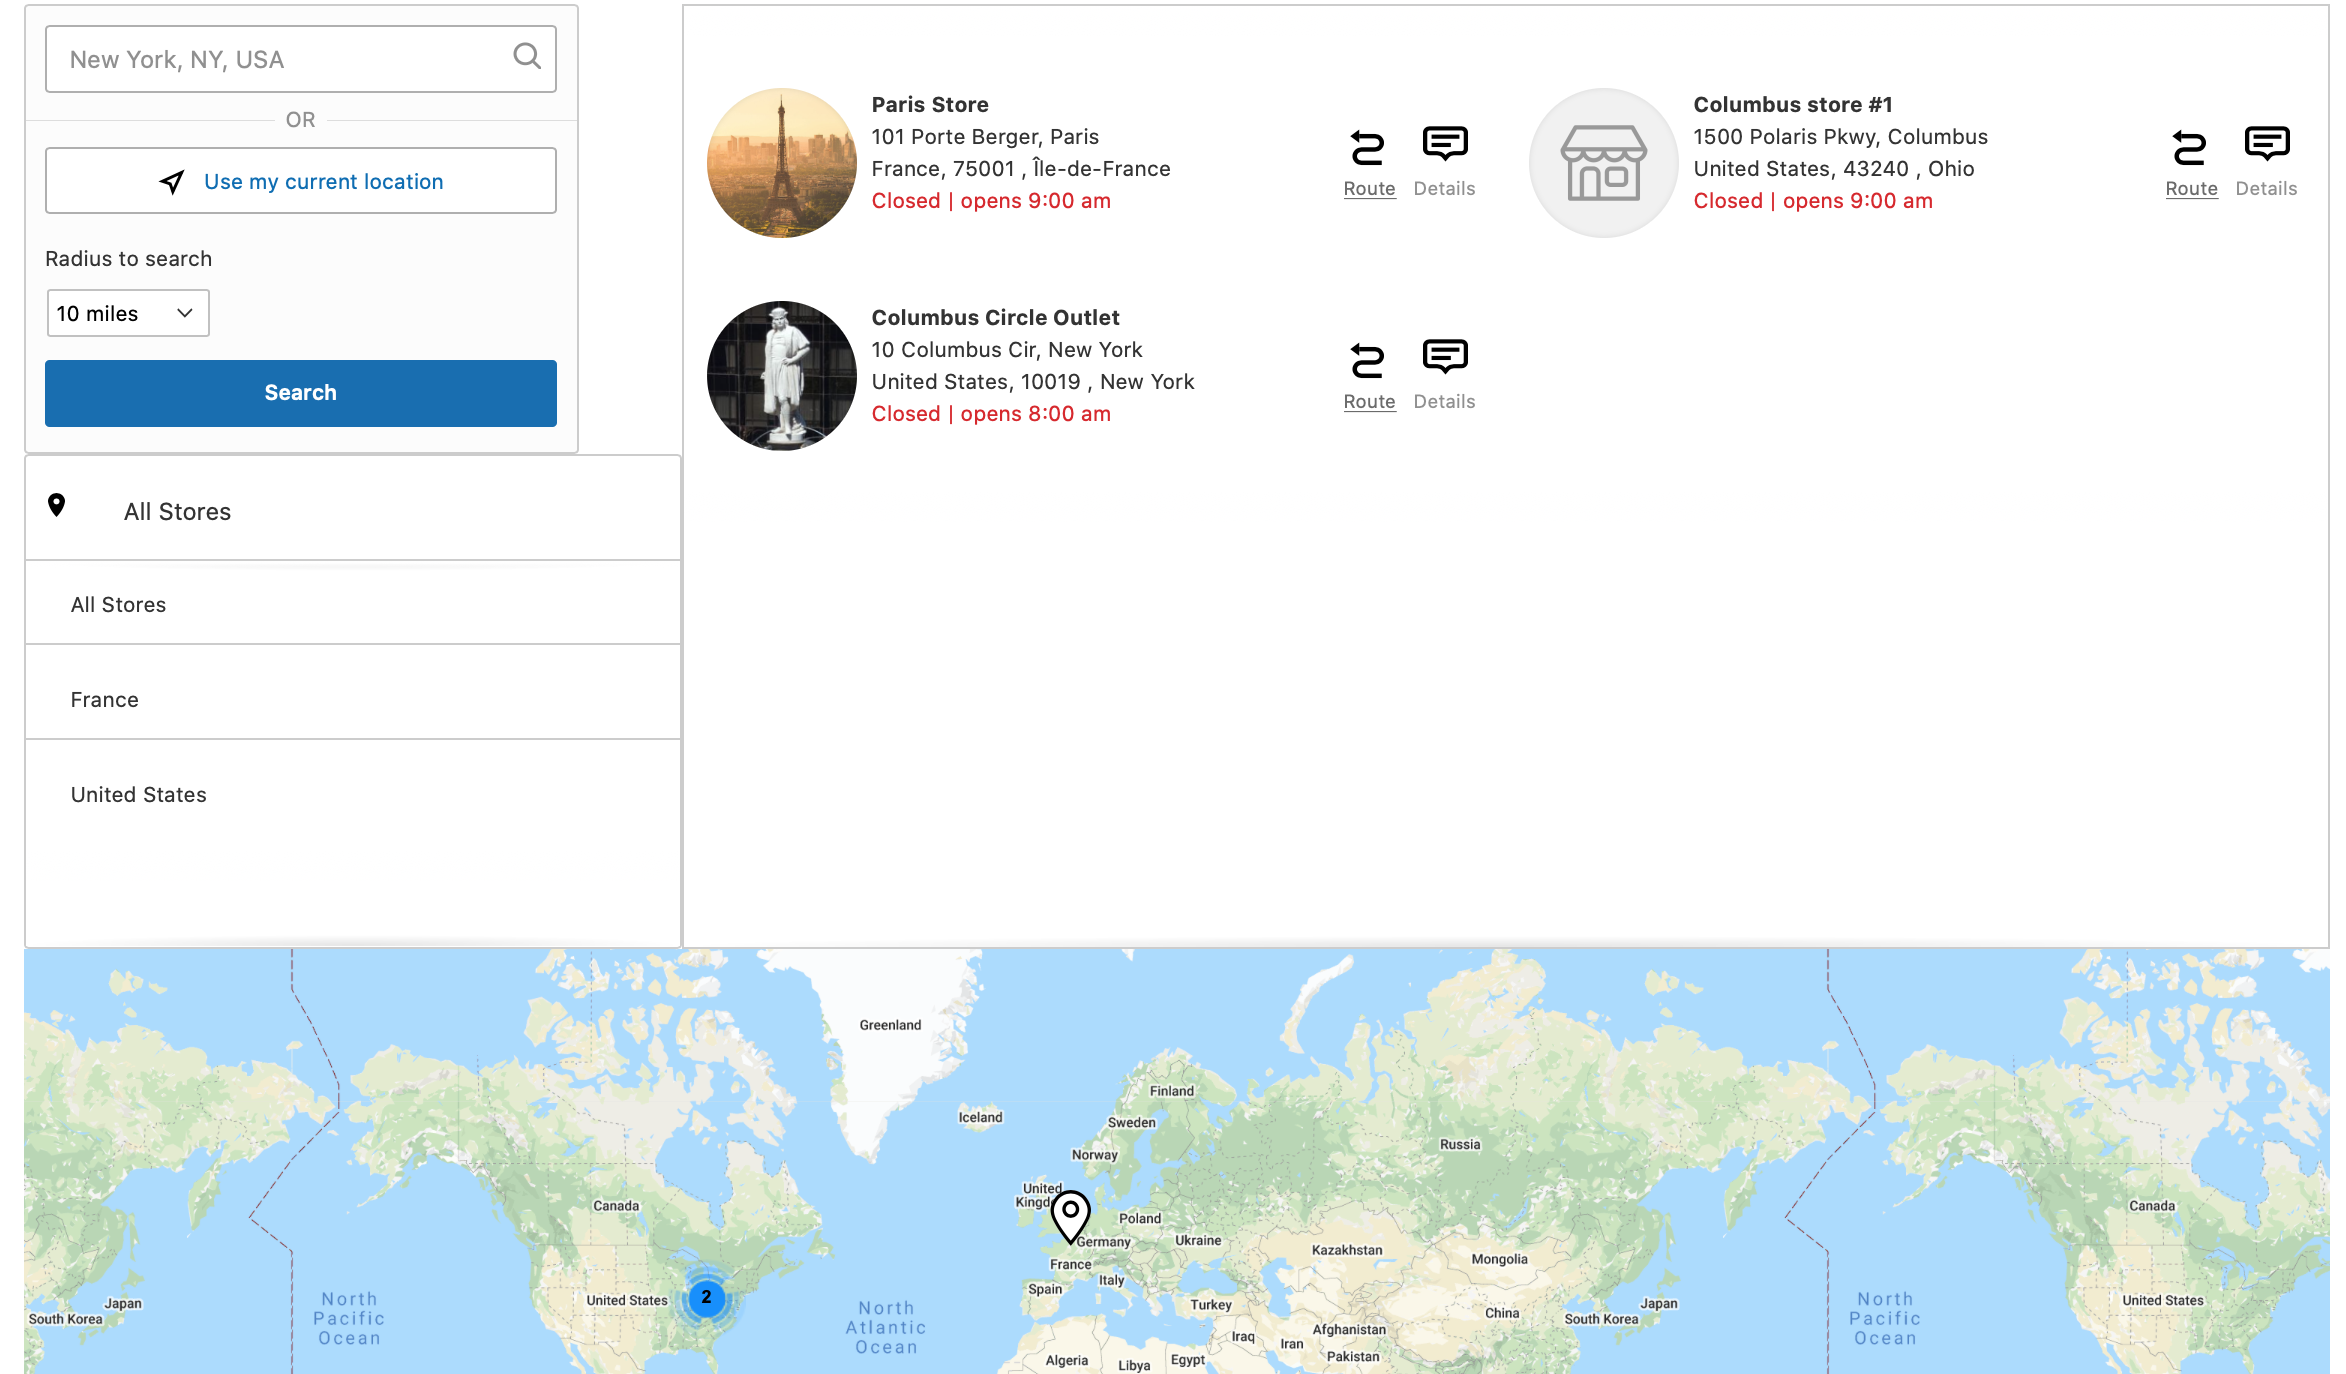
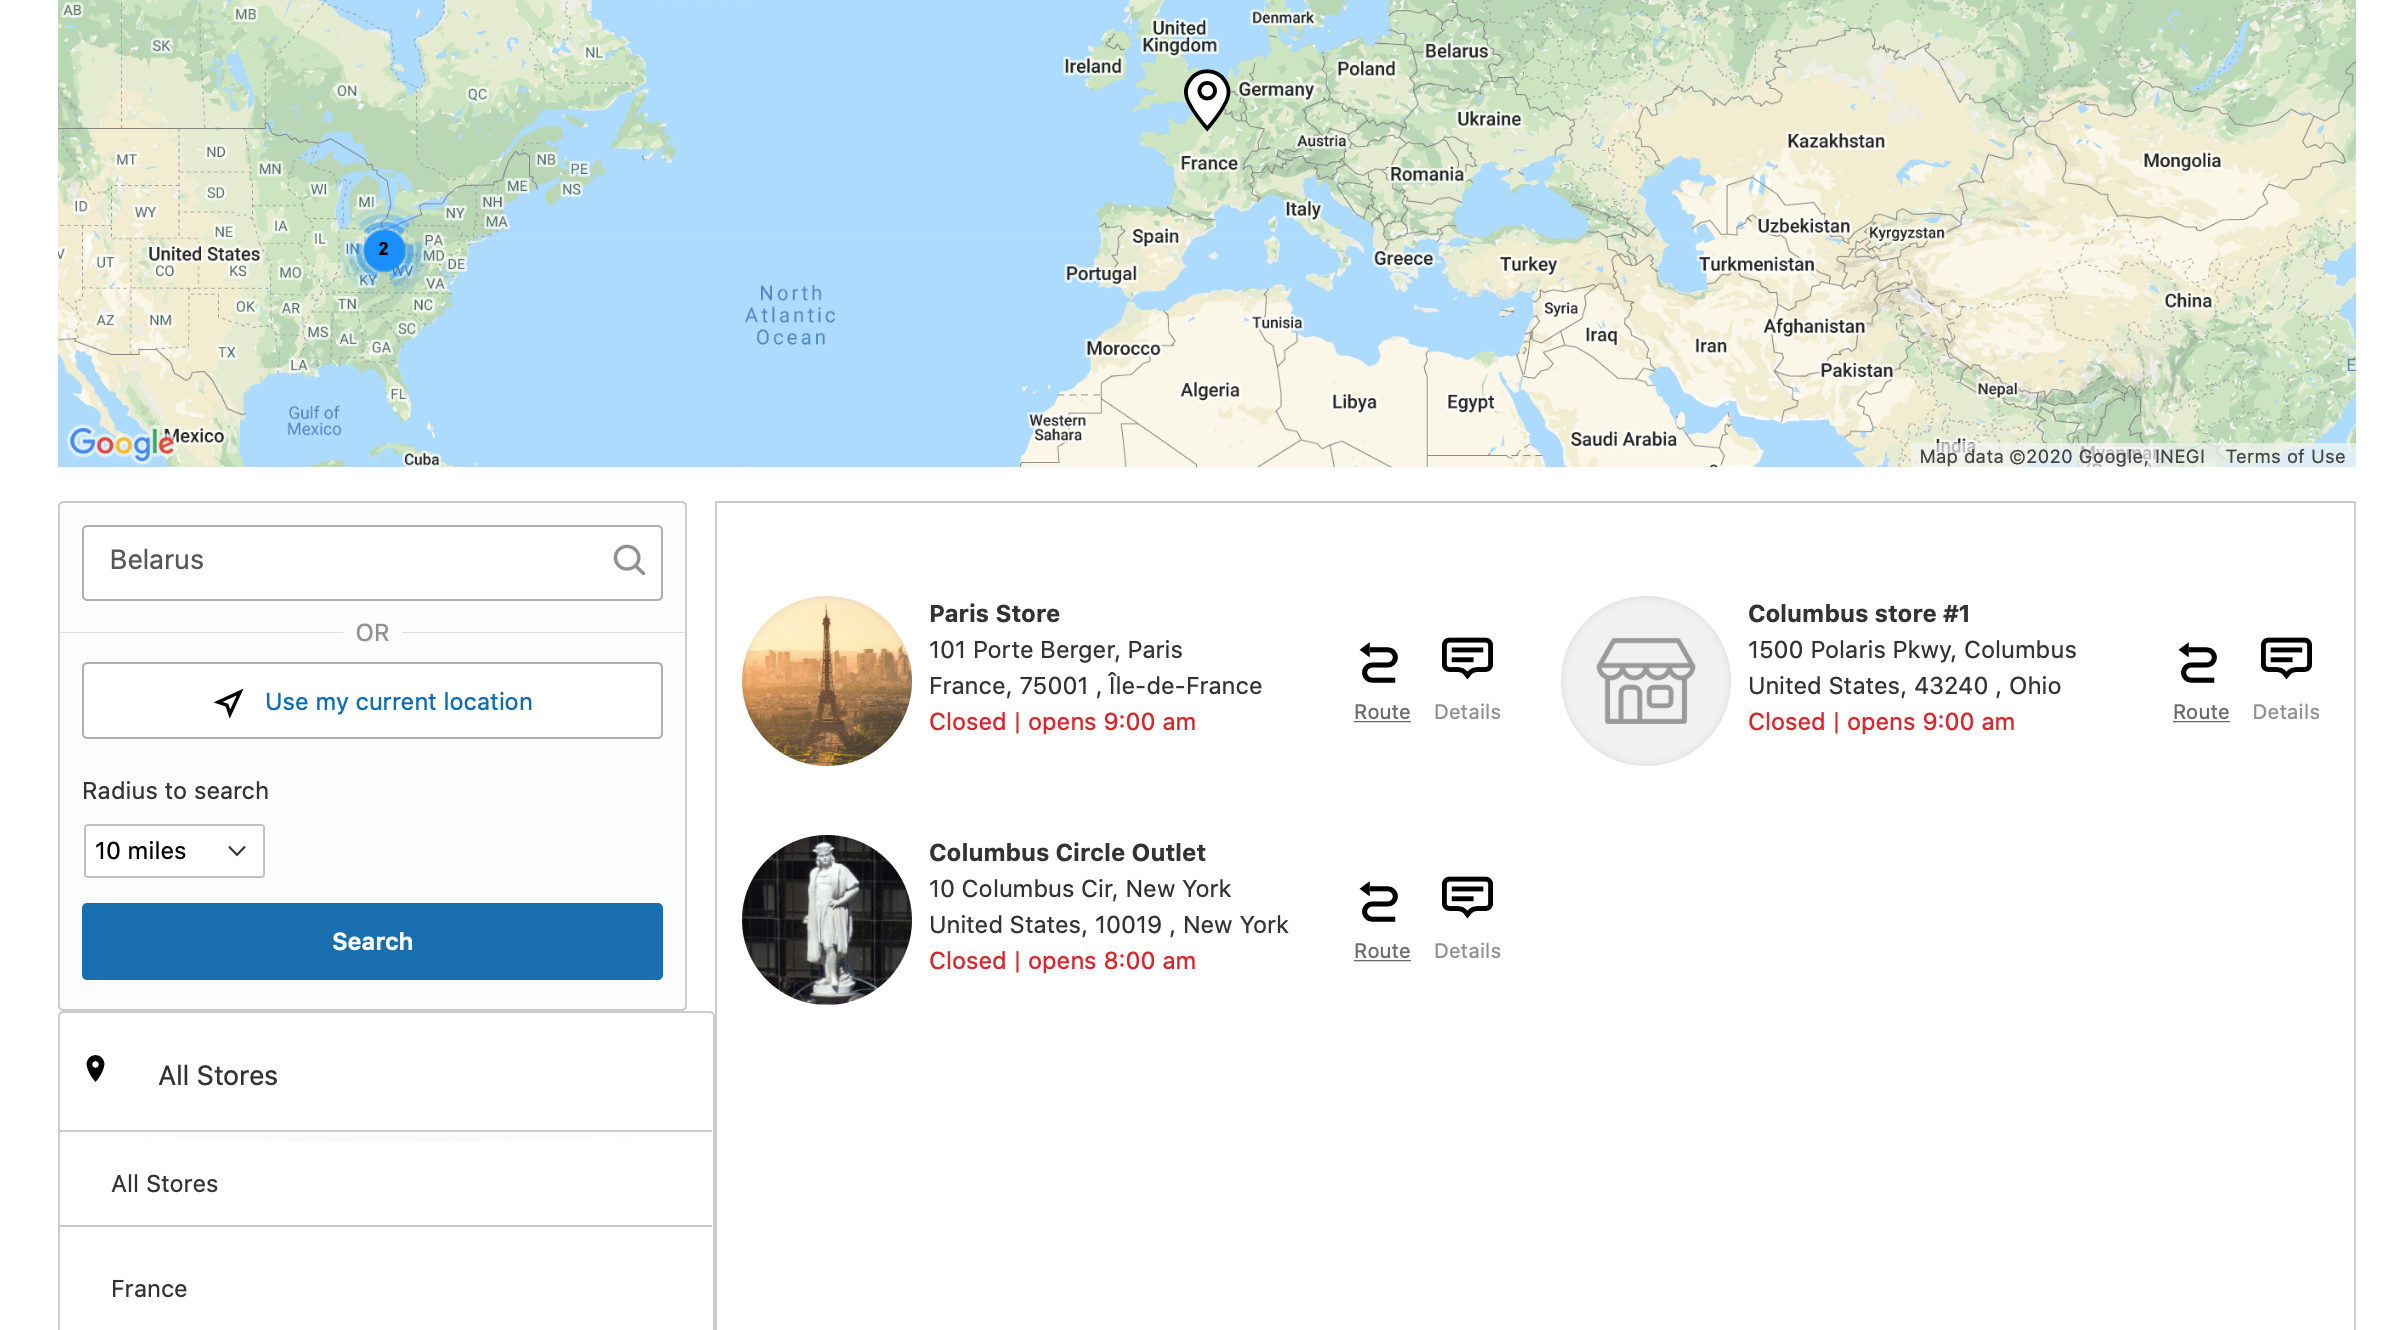
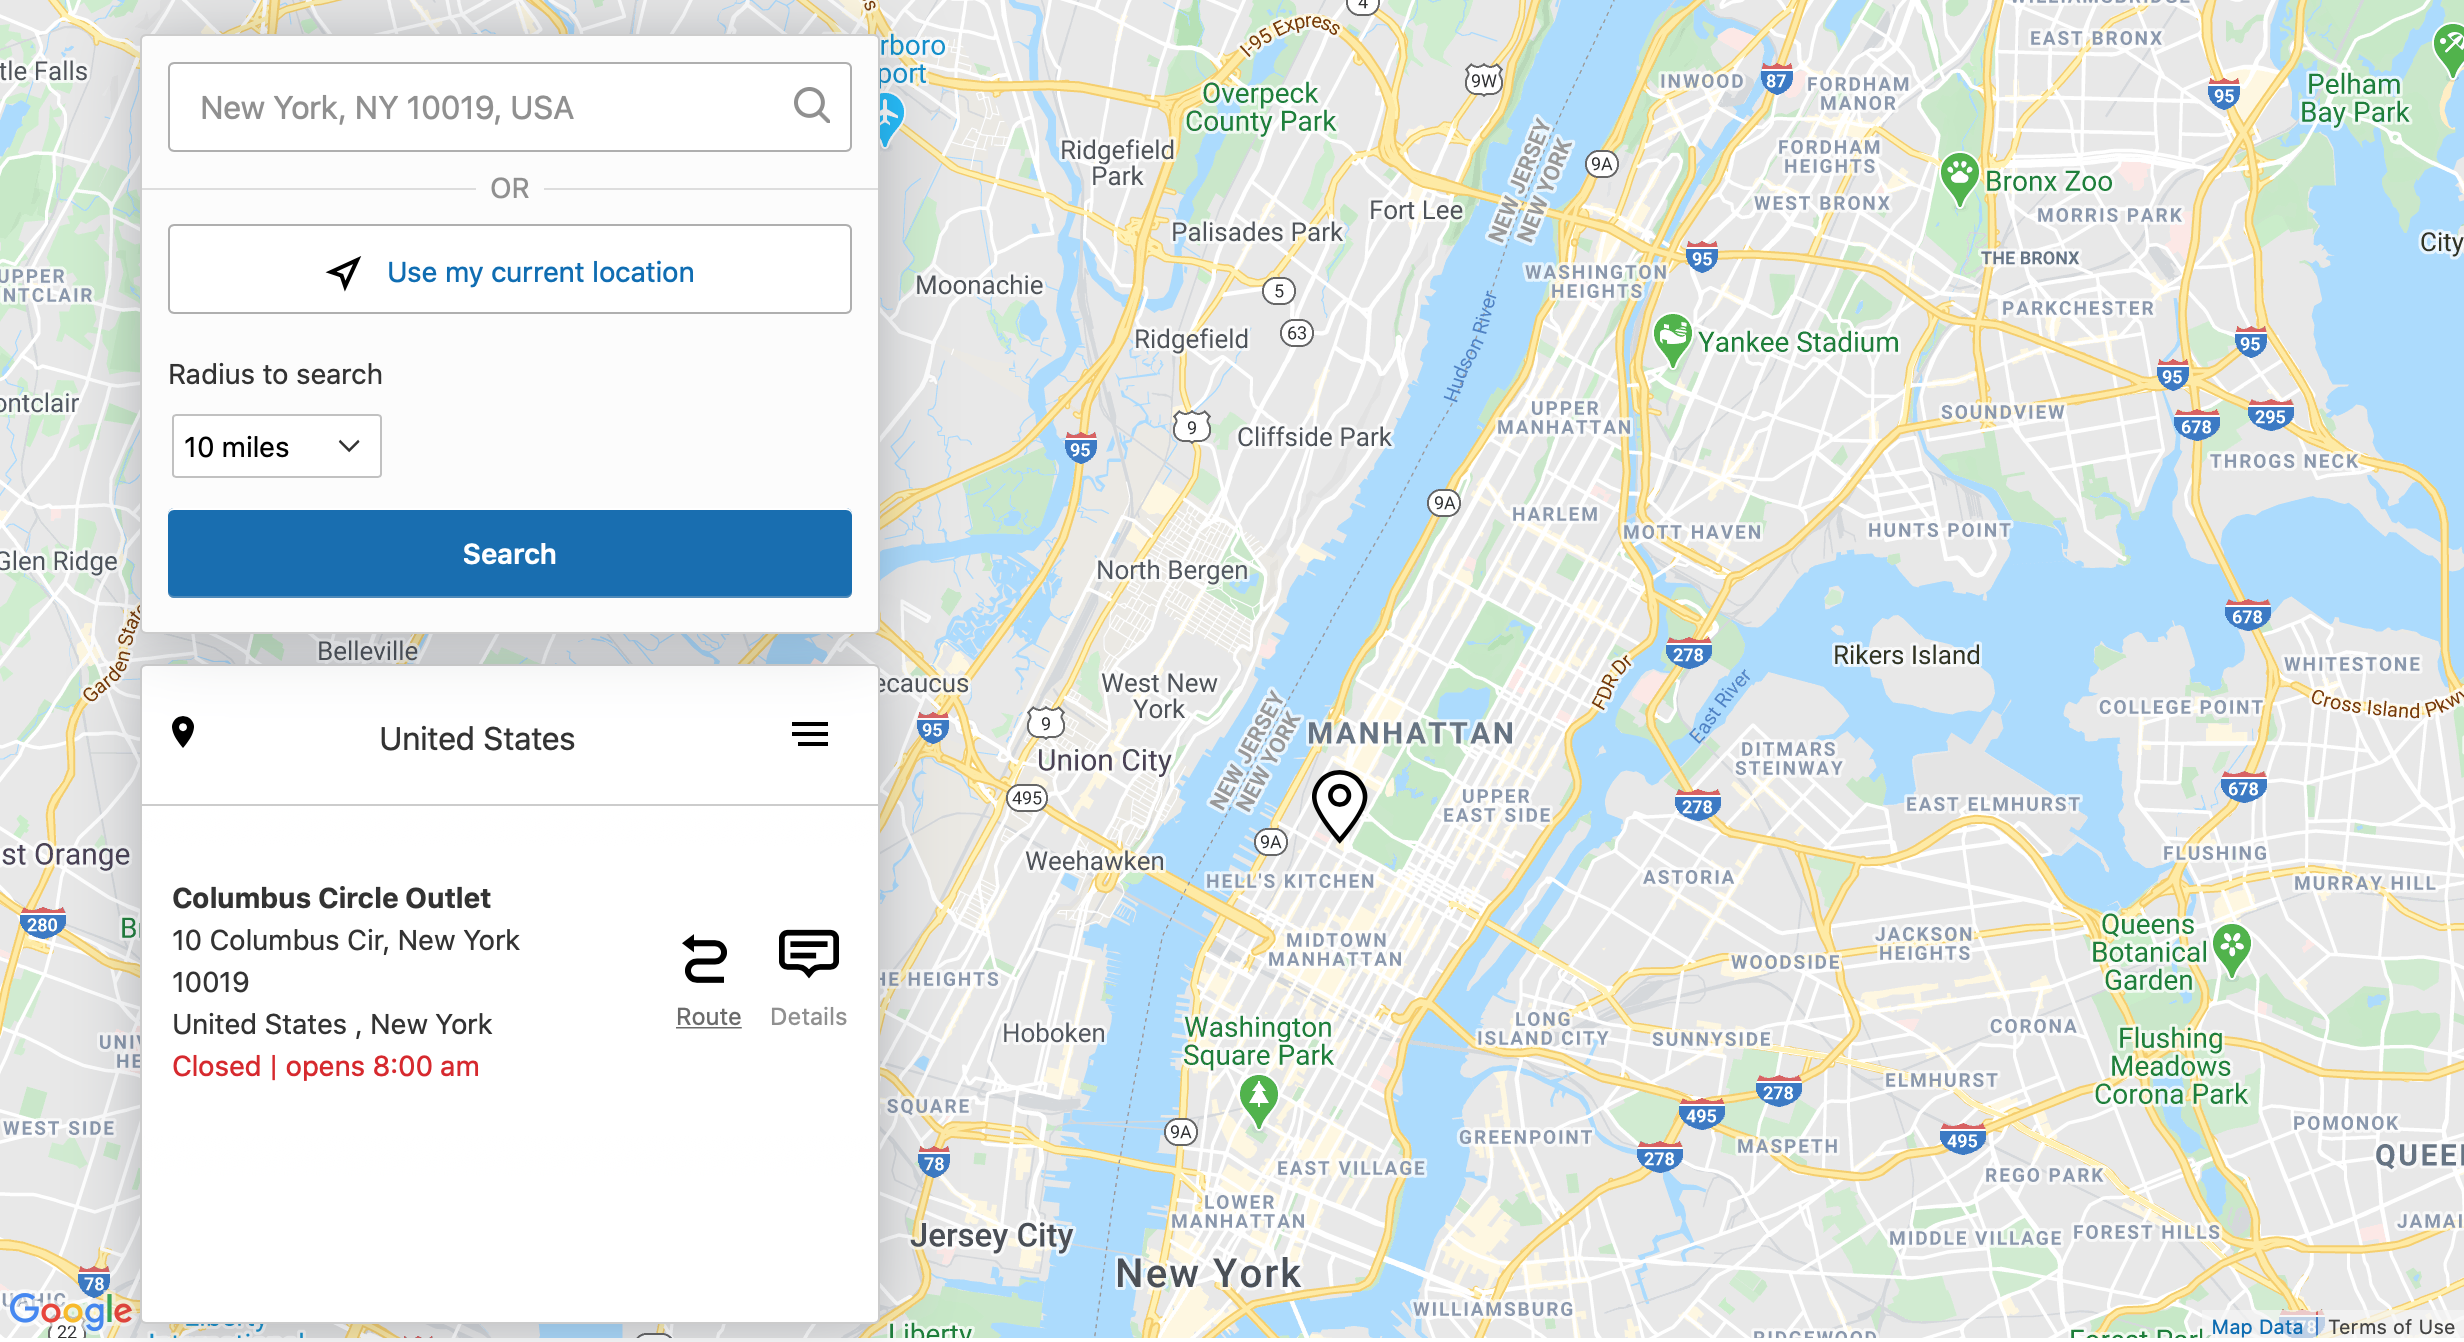
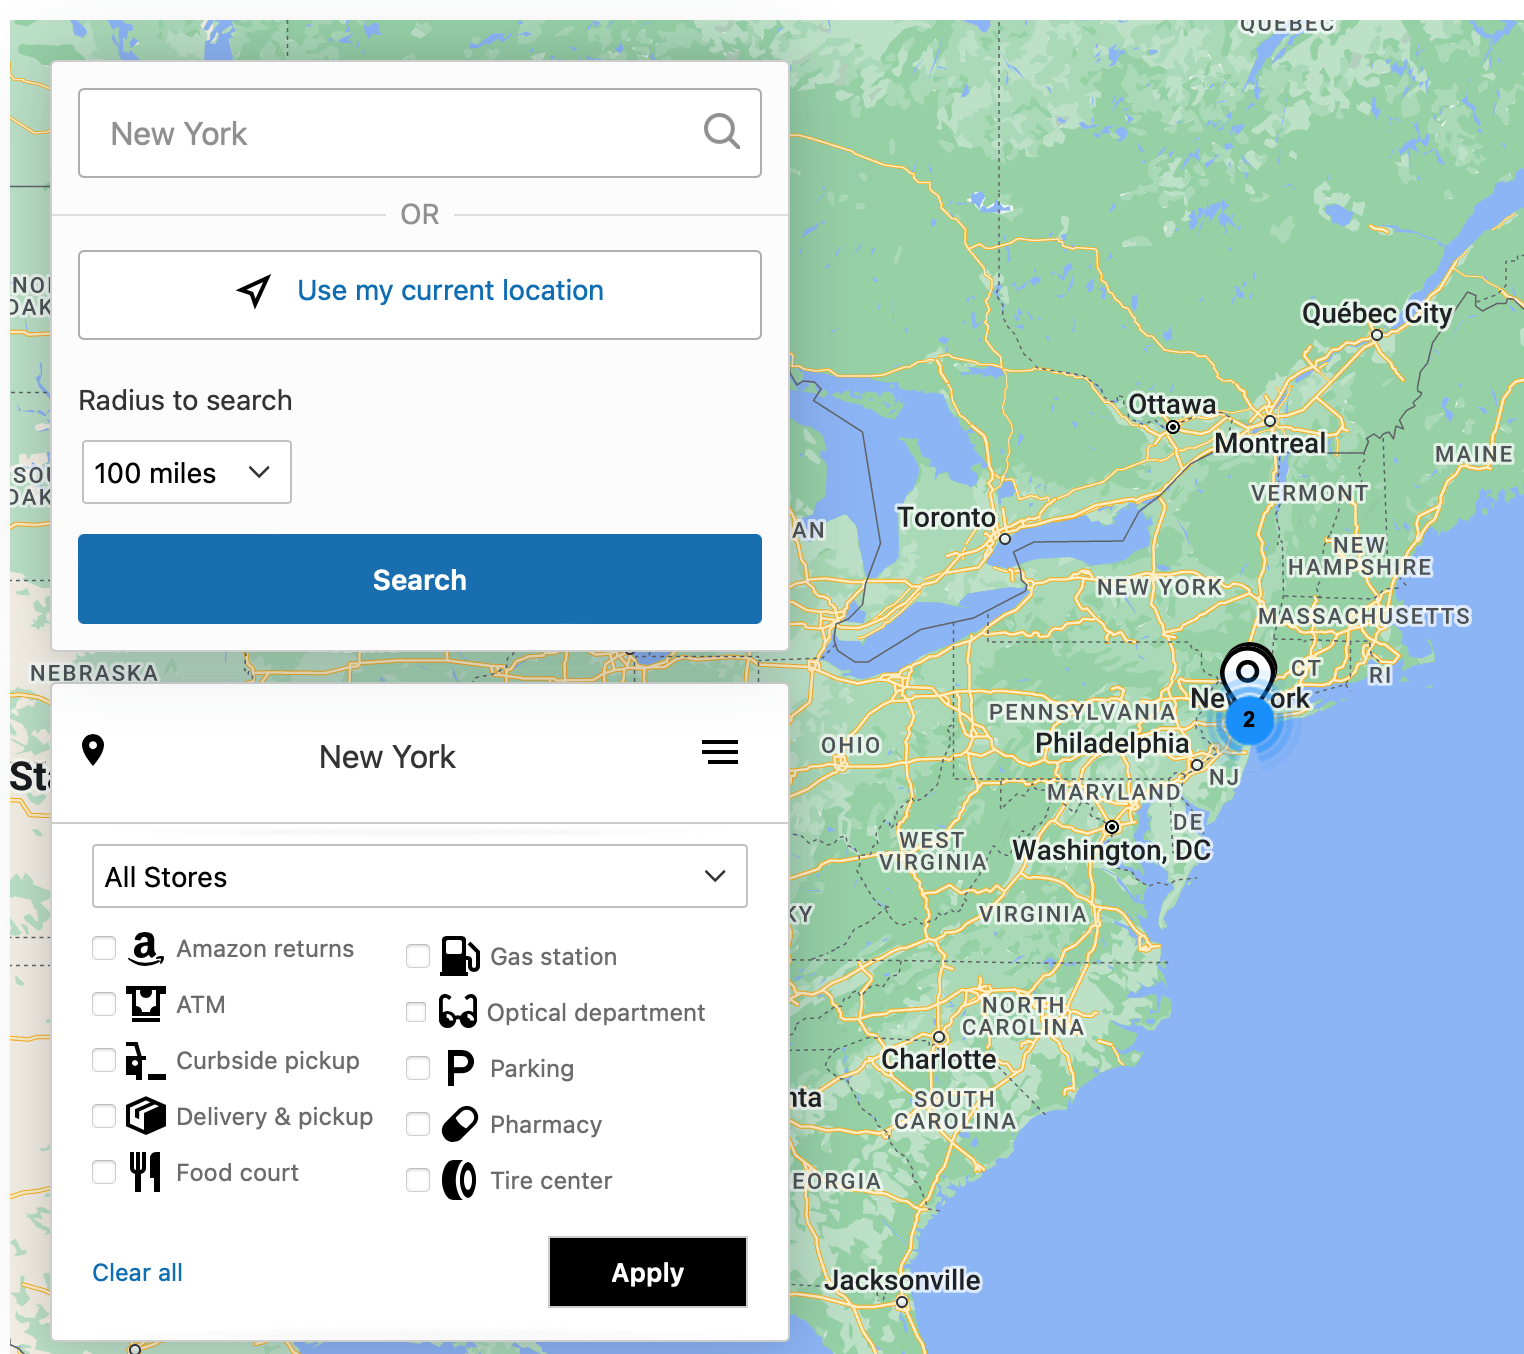
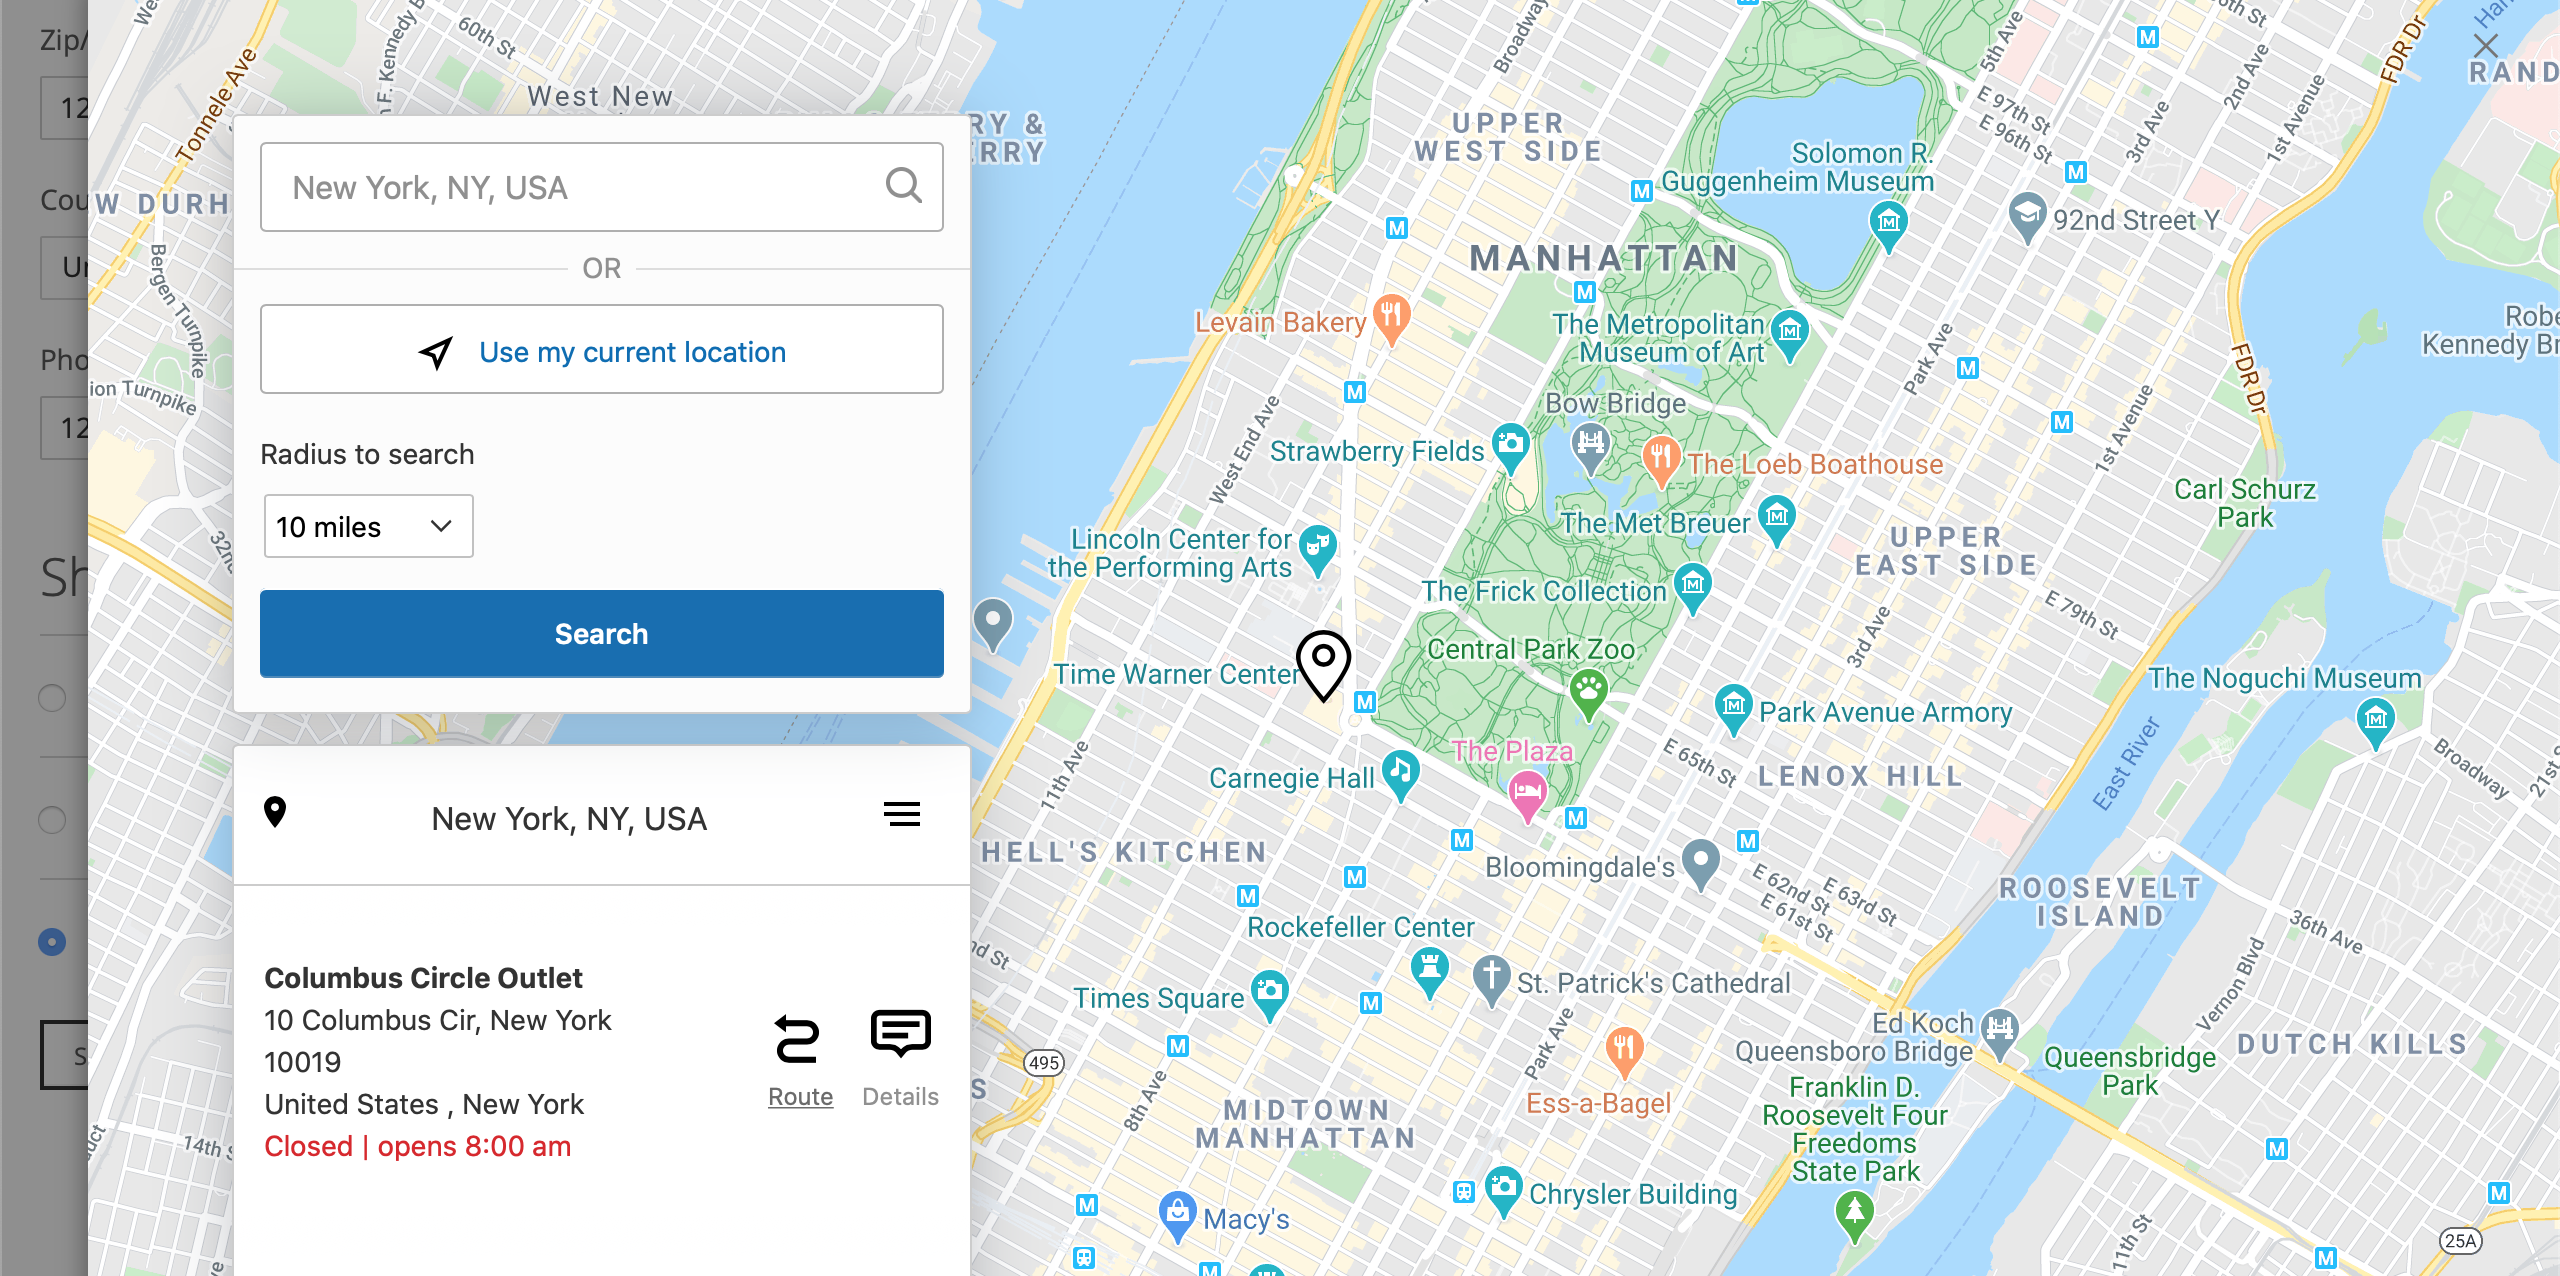
- Enable "Use my current location" - this option adds the 'Use my current location' option for your customers to filter the stores. It uses the current location from a customer's browser (if this is allowed by the privacy settings) as starting point to search the stores from.
-
Predefined Radius Values - this setting allows you to specify the predefined radius values for the search feature. The values should be separated by the comma here. This option works for 'Use my current location' only.
-
Radius Unit - this setting sets the distance unit for the setting above.
-
Default Radius - this value determines the default radius to display the available store. It helps to improve the front-end performance if there are many stores in the system. Leave empty or '0' to show all stores by default. The default radius is calculated from a customer's location or a default location (set in the configuration) in the following order:
--- Customer location by IP
--- Customer location from browser
--- Default location from configuration if unable to determine a customer's location using two options mentioned above.
Example
Let's assume you set this setting to 50 miles and a customer loads the Find a store page. In order to filter the stores loaded by default, the extension will try to determine a customer's locationn using the built-in GeoIP functionality. If it succeeds, the stores within 50 miles from the customer's location are shown by default.
If the GeoIP cannot determine the location, the extension tries to check the location from the customer's browser.
If the browser's location is not available either, the extension uses the default location, which is set in the configuration to display the stores by default.
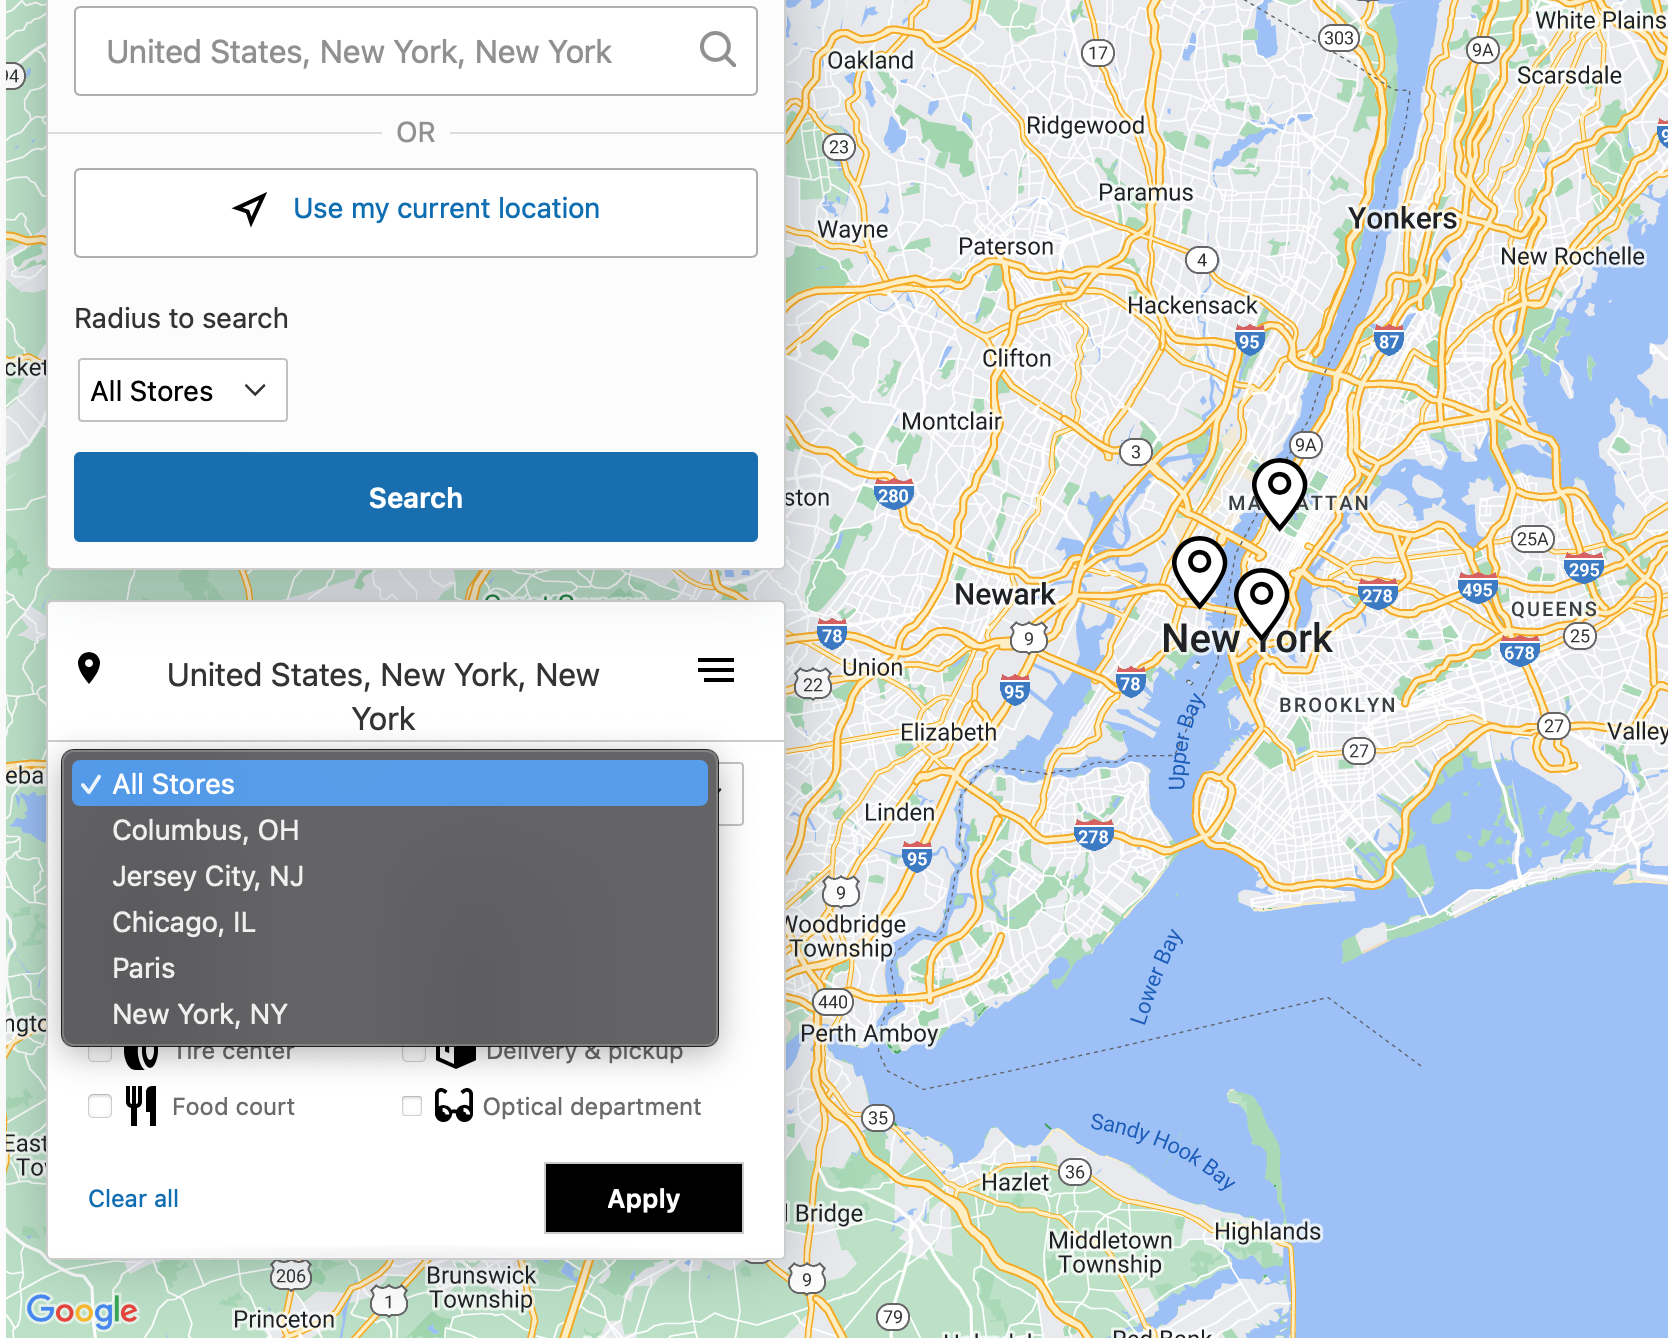
- Filter by - this setting defines the filters on the map on the front-end.
Example
-
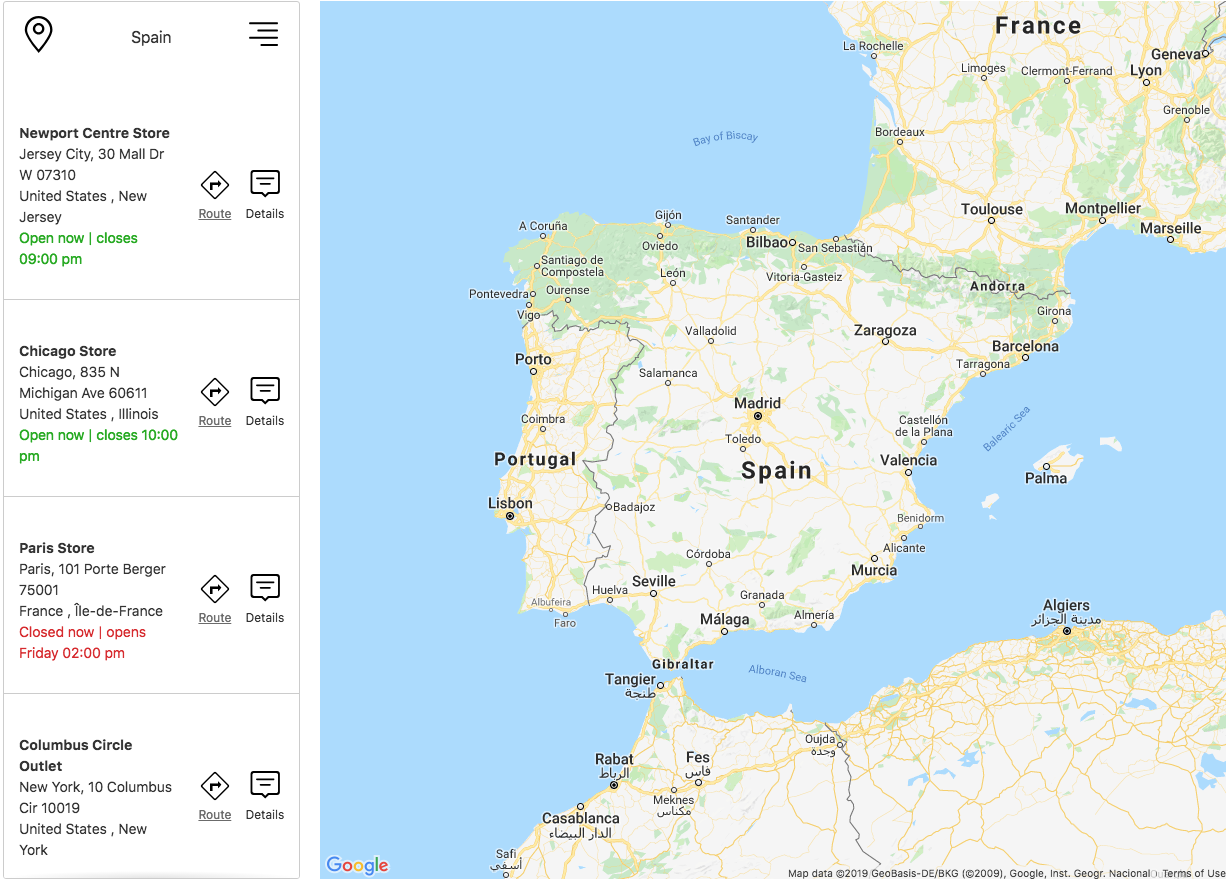
City - the filters will have all the cities of the stores, which are available in the given search results withing the given radius.
-
Region - the filters will have all the regions/states of the stores, which are available in the given search results withing the given radius.
-
Country - the filters will have all the countries of the stores, which are available in the given search results withing the given radius.
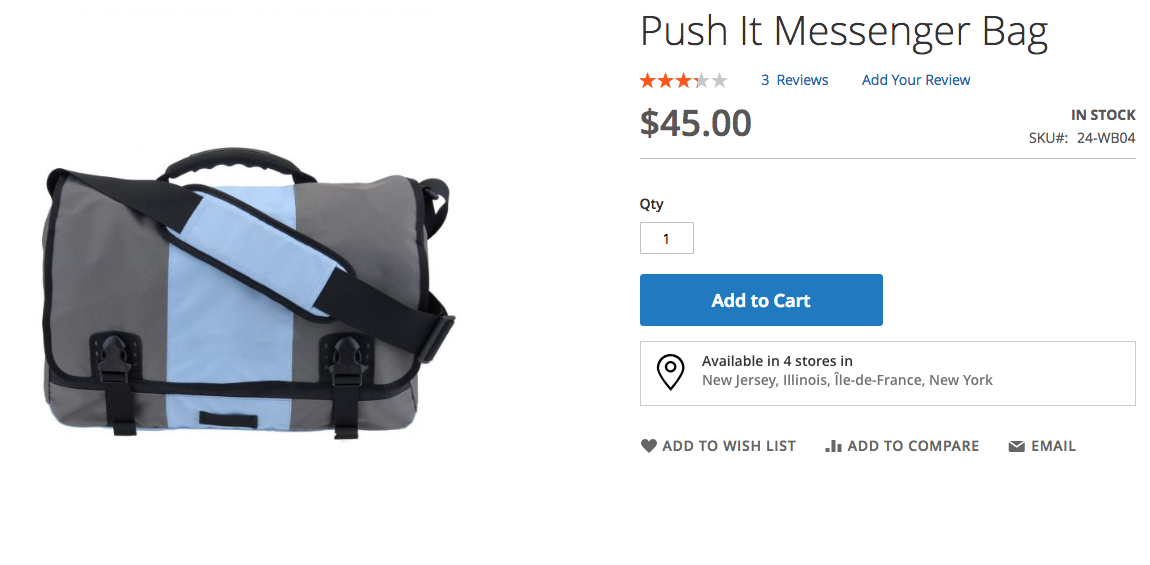
Product Page
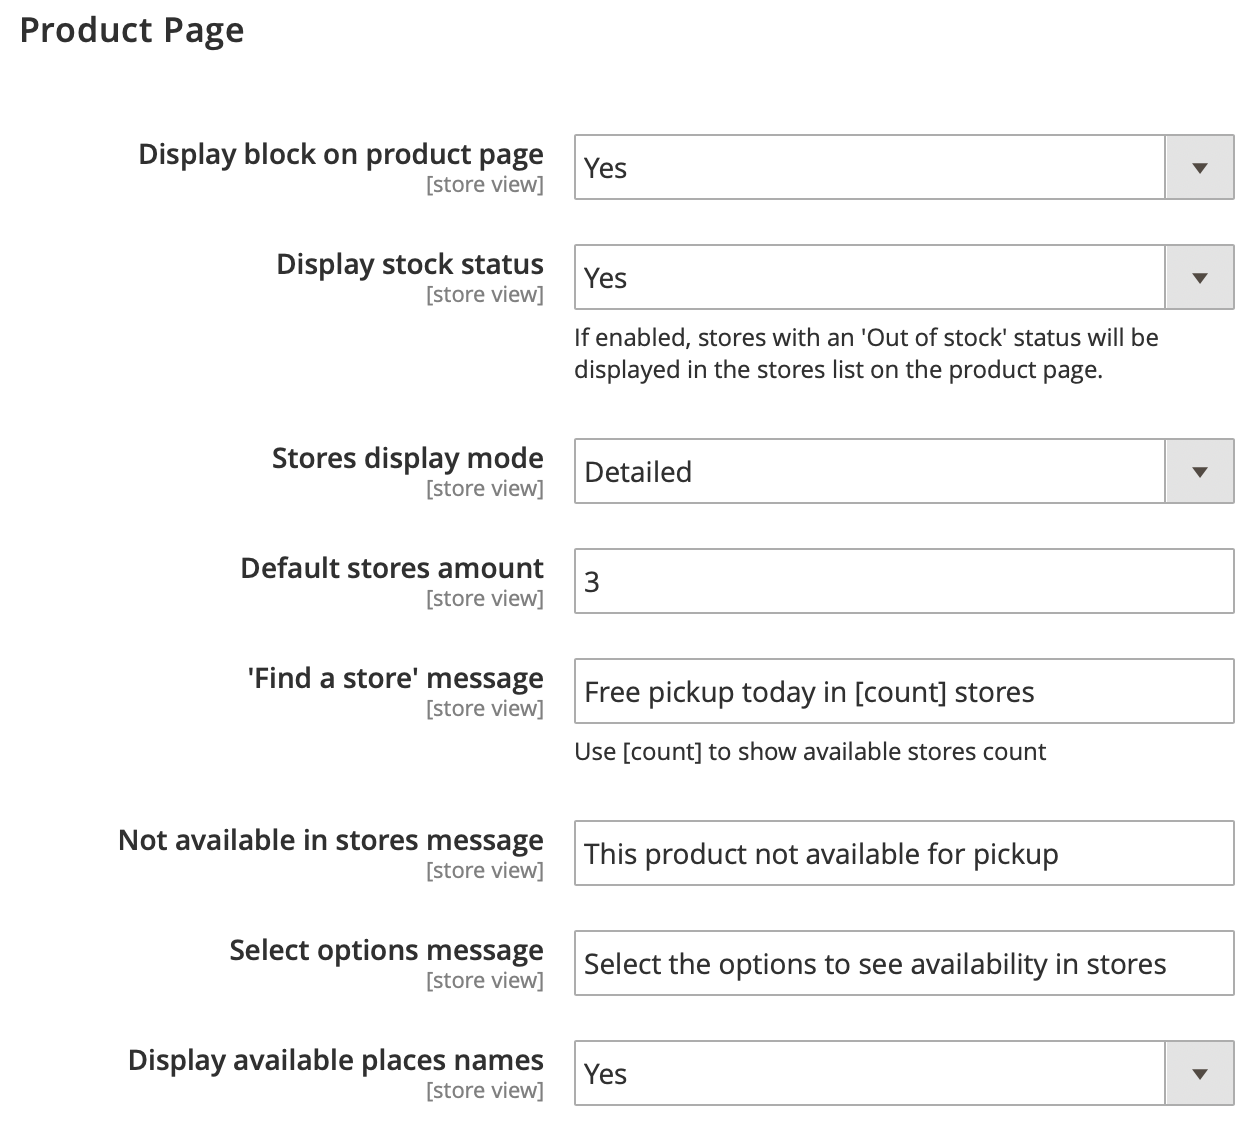
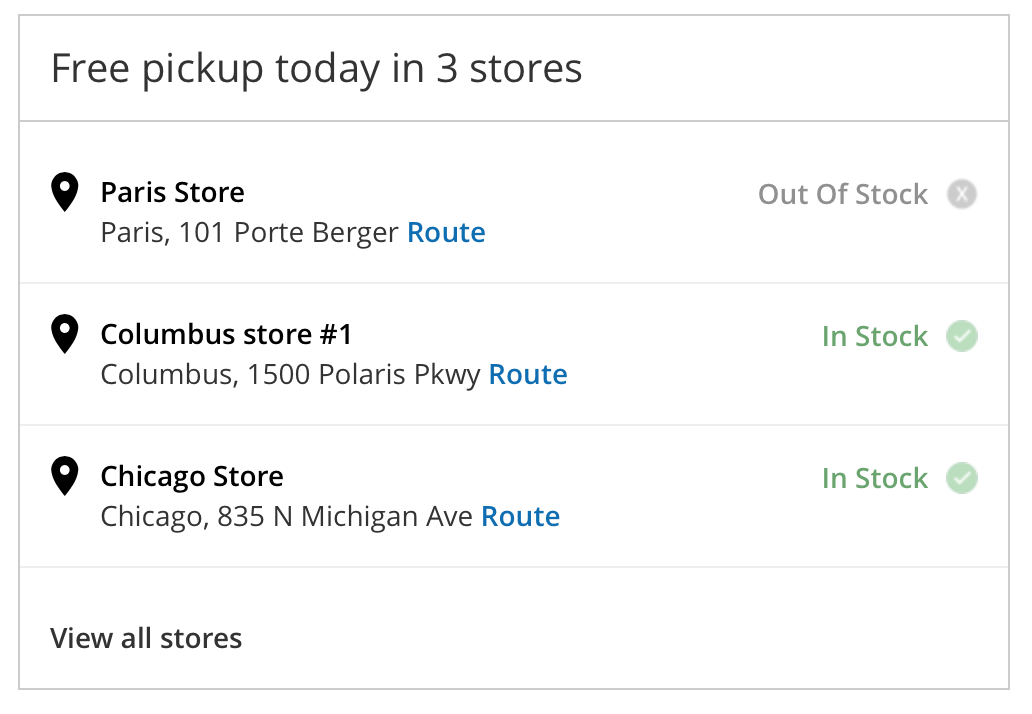
- Display block on product page - this setting allows you to hide the available stores block on the product page.
- Stores display mode - this setting changes the layout of the available stores block on the product pages.
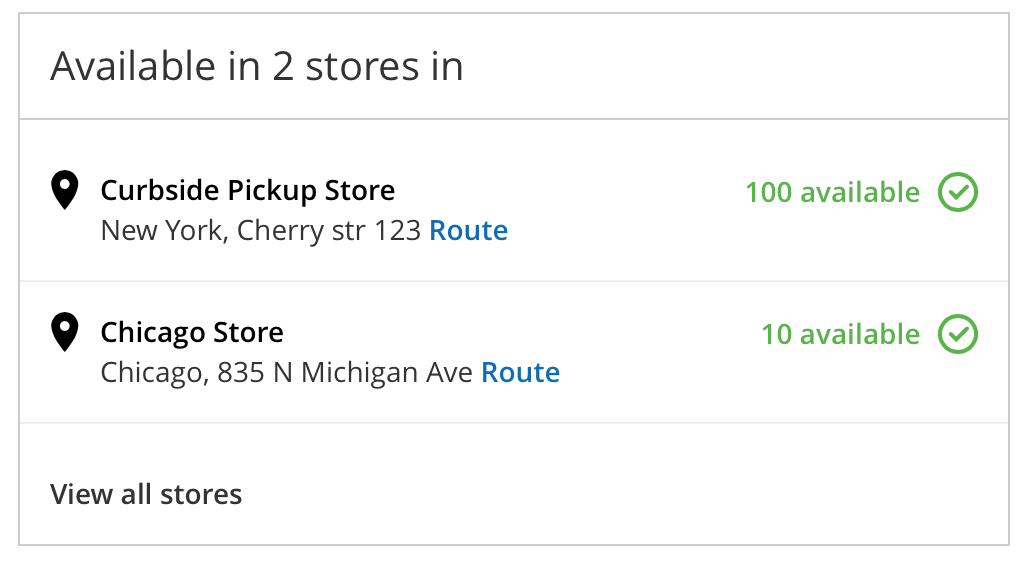
- Display stock status as - this setting allows you to display either the stock status (in stock, out of stock) or the available quantity of the product in the store. It might be helpful to display that the product is currently sold out in some stores and unavailable for pickup.
Note
This option is applicable to 'Stores display mode' = 'Detailed' only.
- Quantity message - еhis setting allows you to change the message to display the available quantity of the current product in each store. If the product is out of stock in the certain store, "out of stock" status will be displayed. This setting appears if "Display stock status as" is set to 'Available Quantity'.
- Default stores amount - this setting defines a number of stores shown in the block by default. Other stores will be available following the "View all stores" link.
- 'Find a store' message - this setting allows you to change the title of the stores block. You can use the [count] variable to outputs the number of stores, where the current product is available.
- Not available in stores message - this setting allows you to add a message, which will appear if a product is not available for pickup.
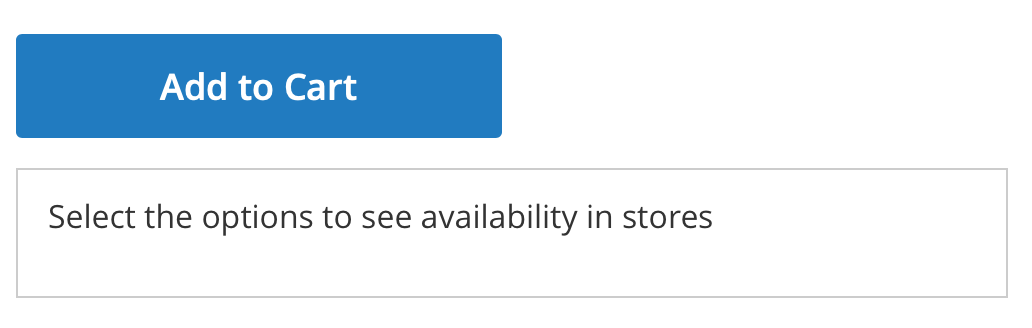
- Select options message - this setting allows you to add a message, which appears in the stores block on configurable and grouped products if the configurations are not chosen yet and the list of available stores cannot be shown.
Explanation
The extension supports the configurable and grouped products and can update the available stores using AJAX, if the customers change the configurations. I.e. in most cases the parent configurable products are not assigned to the stores. Their associated products are assigned instead. The associated products are the final configurations selected by the customers. In order to see the stores, where the chosen configuration of the product is available, the customers should choose these options first. Untill then, the message specified in this setting will be shown, notifying your customers that they should configure the product to see its avaialbility for pickup.
-
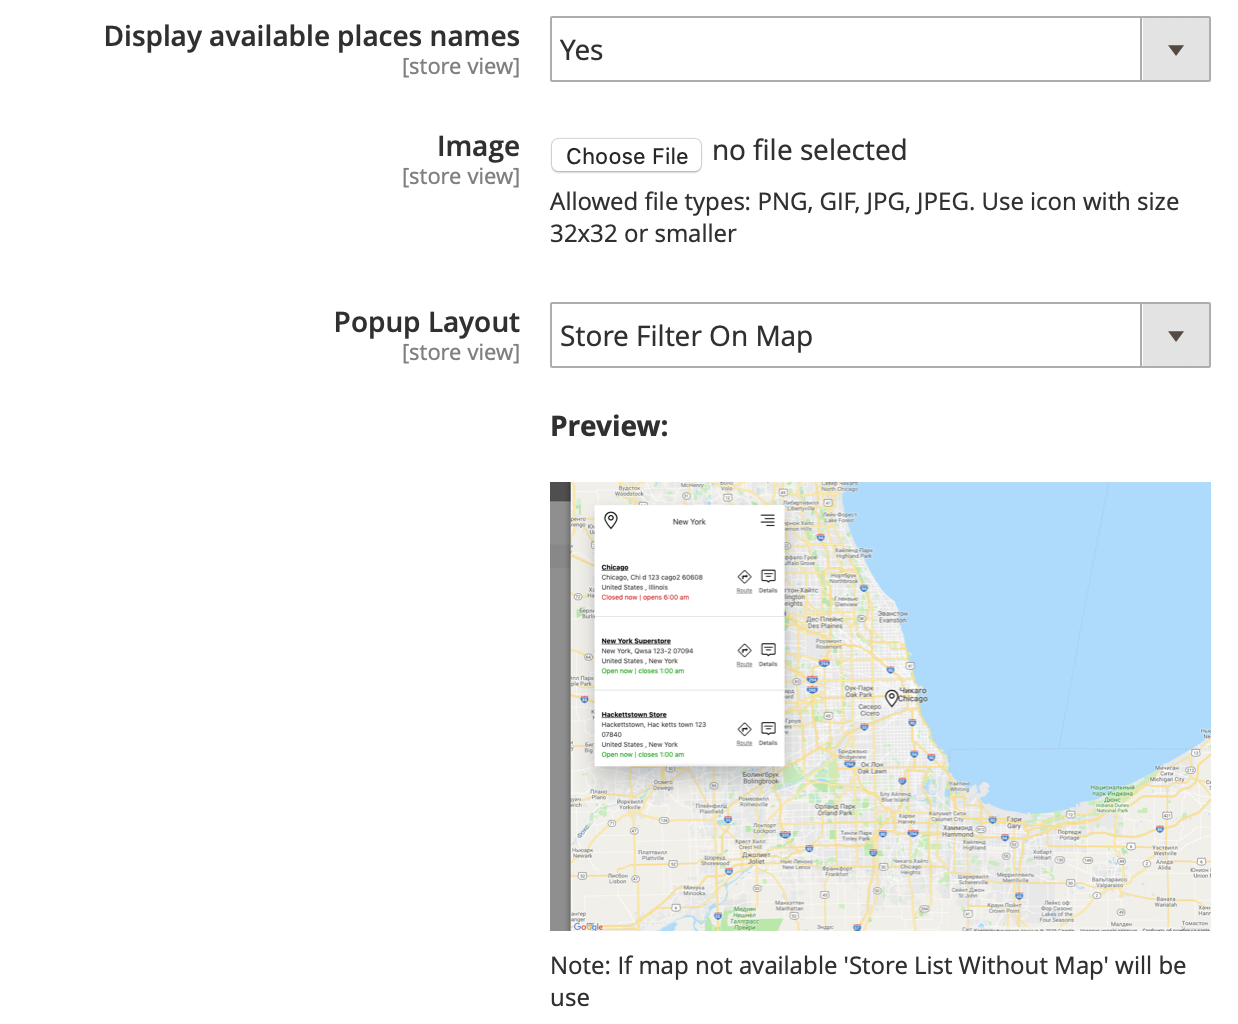
Display available places names - this setting allows you to hide the list of available stores and display the message added in the ''Find a store' message' setting only.
-
Image - this setting allows you to change the marker image shown on the product page.
Note
This setting doesn't change the marker image on the map, which can be edited in the Map Settings configuration.
- Popup Layout - this setting manages the layout of the store locator popup, which appears when the customers clicks on the 'View all stores' link.
1) The Store List Without Map provides the basic functionality of the extension. This option is the only one that will be shown if no API Key was added in the Map Setting configuration:
2) The Store List Before Map shows the map below the store list:
3) The Store List After Map shows the map above the store list:
4) The Store Filter On Map shows the store filter block directly on the map.
5) The Store Filter on the Left Side shows the store filter block to the left of the map.
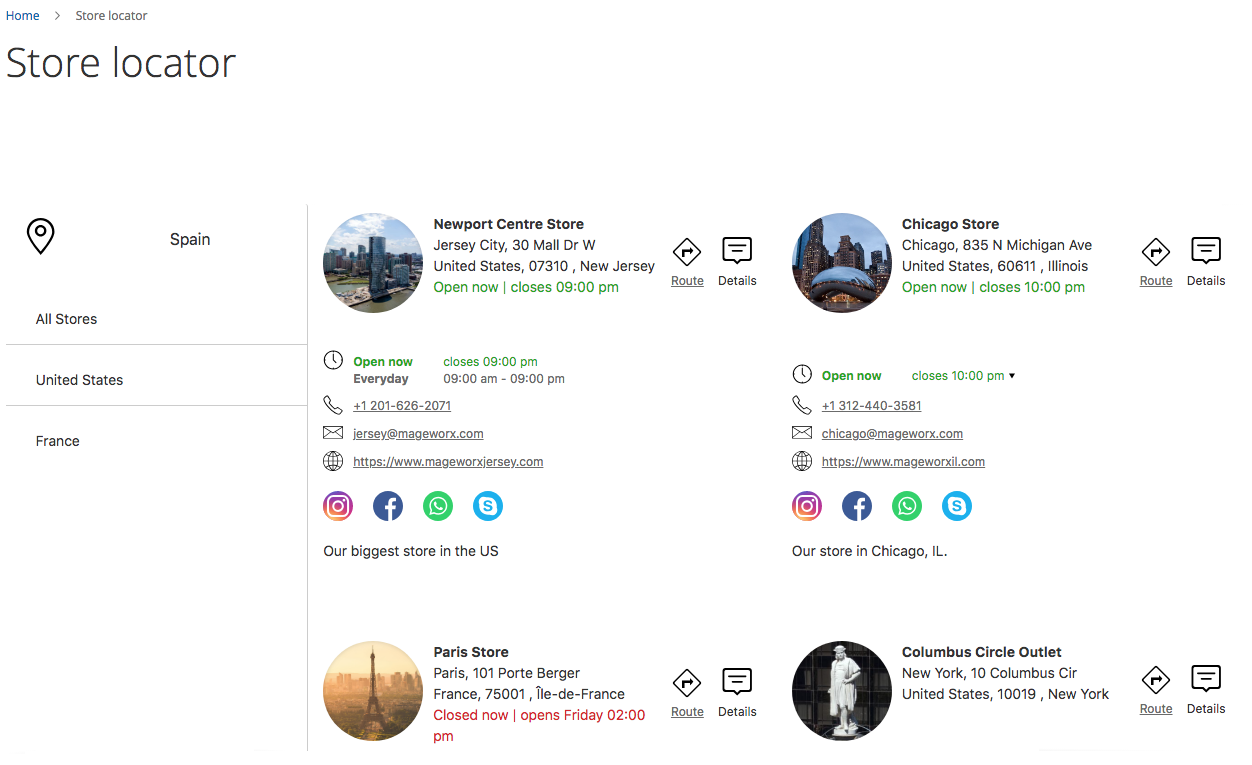
Find a Store Page
These settings manage the store locator CMS page. That is the page that is created automatically when you install the extension. On this page, the customer can observe all the stores that are created on this store view. To view and edit this page according to your design and business needs, go to CONTENT ⟶ Elements ⟶ Pages. The default title of this page is Store locator.
The configuration of this page can be done in the Find a Store Page tab.

- Display link in header - it allows you to add the 'Find a store' link to the header section of the store.
- Link title - this setting allows you to change the 'Find a store' link title, which is added to the header of the store.
-
Link URL - the URL of the link. It should be always equal to the URL of the 'Find a store' CMS page. If you change the URL of the CMS page, you should change the link URL here as well and vice versa. This setting is added in order to allow you to add the link to another CMS page if necessary (just specify the URL key of the necessary CMS page).
-
Page Layout - this setting manages the layout of the store locator page.
1) The Store List Without Map provides the basic functionality of the extension. This option is the only one that will be shown if no API Key was added in the Map Setting configuration:
2) The Store List Before Map shows the map below the store list:
3) The Store List After Map shows the map above the store list:
4) The Store Filter On Map shows the store filter block directly on the map.
5) The Store Filter on the Left Side shows the store filter block to the left of the map.
Store pages
These settions configure the separate pages of each store, which are created automatically for all stores.
-
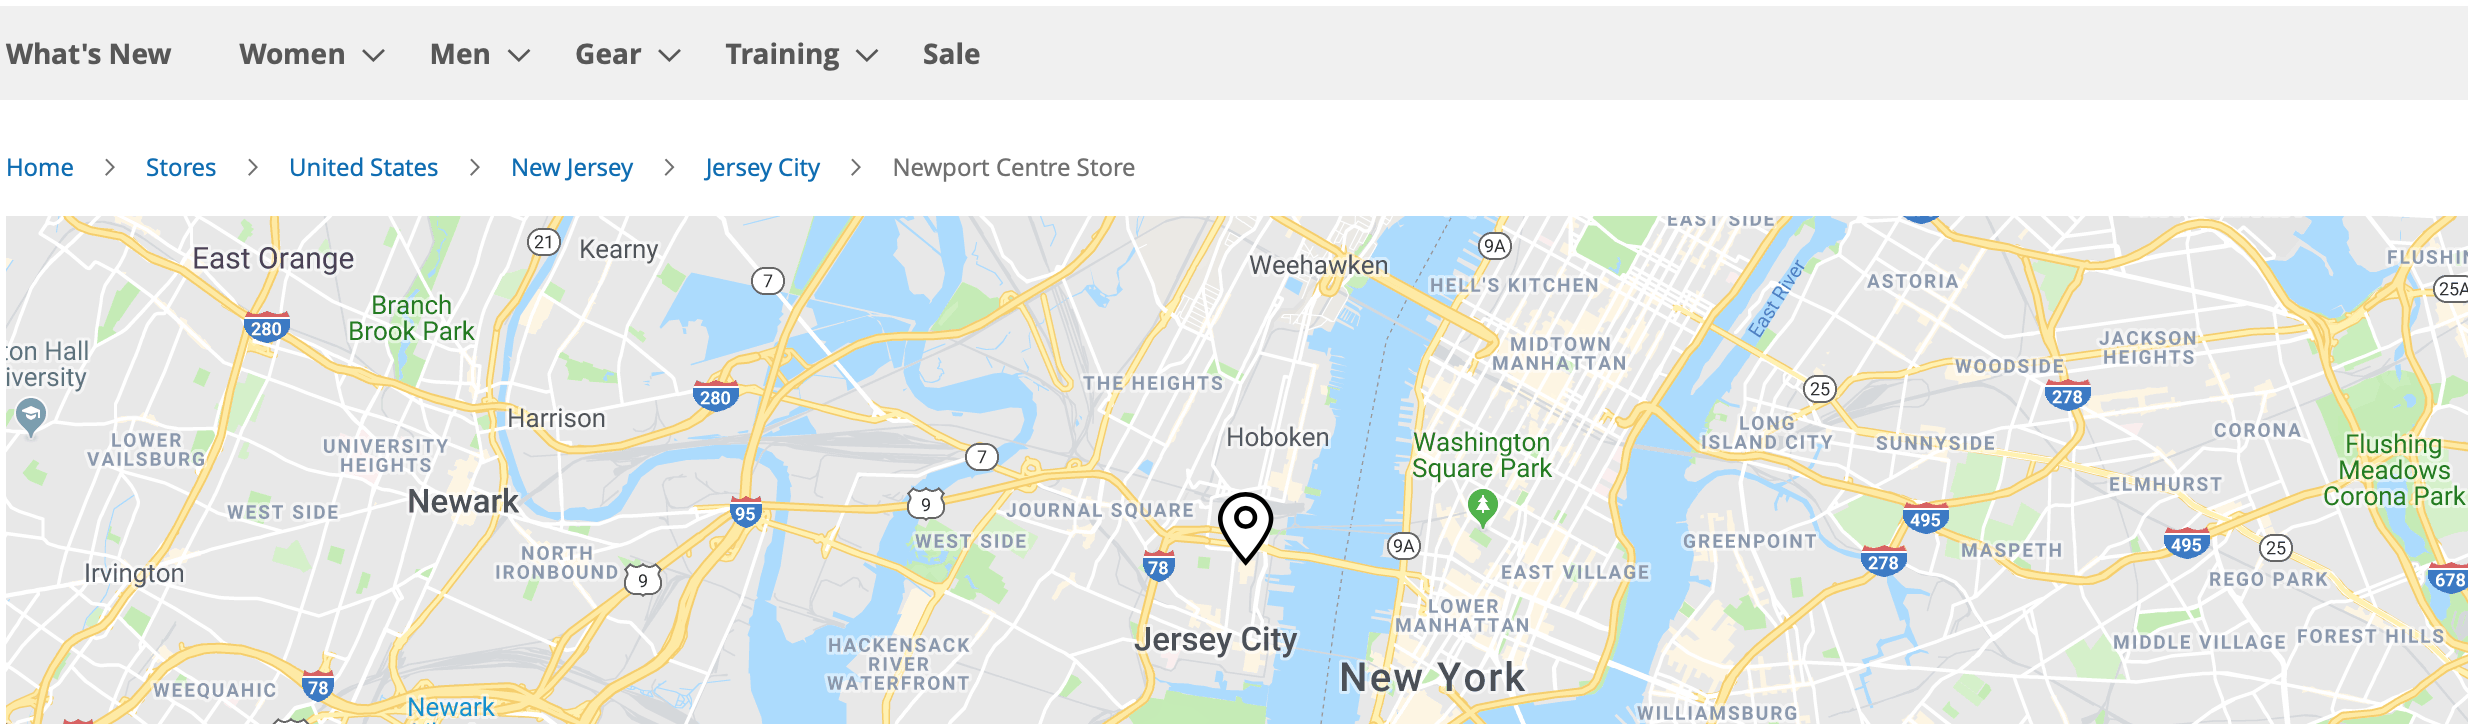
Base Path - this setting defines the the base path in the URL to the store page, which is added after your store domain: yourdomain/stores/, where the "stores" is the default value of the "Base Path". If empty, the default "stores" will be used.
-
Store URL Path - this multi-select setting allows you to include the GEO location of your store to the URL path. You can add a country, region/state and/or a city to the URL of your store pages.
-
Store URL Key - this multi-select setting allows you to add an address, a code and/or a name of a store to the URL key your store pages.
Example URL:
-
/stores/ - this part is controlled by the "Base Path" setting;
-
/united-states/new-jersey/jersey-city/ - this part is set in the the "Store URL Path" setting. Here the country, state and city are chosen;
-
/newport-centre-store/ - this part is configured in the the "Store URL Key" setting. In this example, the store name only is chosen.
-
Create Redirect From Old Urls - this setting automatically creates SEO-friendly (301) redirects from old store URLs to new ones if the URLs are changed. It is recommended to always keep this setting enabled on the live store.
-
Add Breadcrumbs - this setting enables/disbales the SEO-friendly brecdrumbs on the location pages.
-
Show Products On Store Page - this setting displays or hides the section with products available in the store. This block is the same as the block with products on the category page. The next 4 settings allows you to configure the products block view:
-
Default Meta Robots - this setting defines the default meta robots tag for the location pages. You can change this for each page separately.
-
Add to Sitemap - this setting allows you to add the location pages to MageWorx XML sitemap. If enabled, all active stores will be added to MageWorx XML sitemap automatically.
Checkout Page Settings
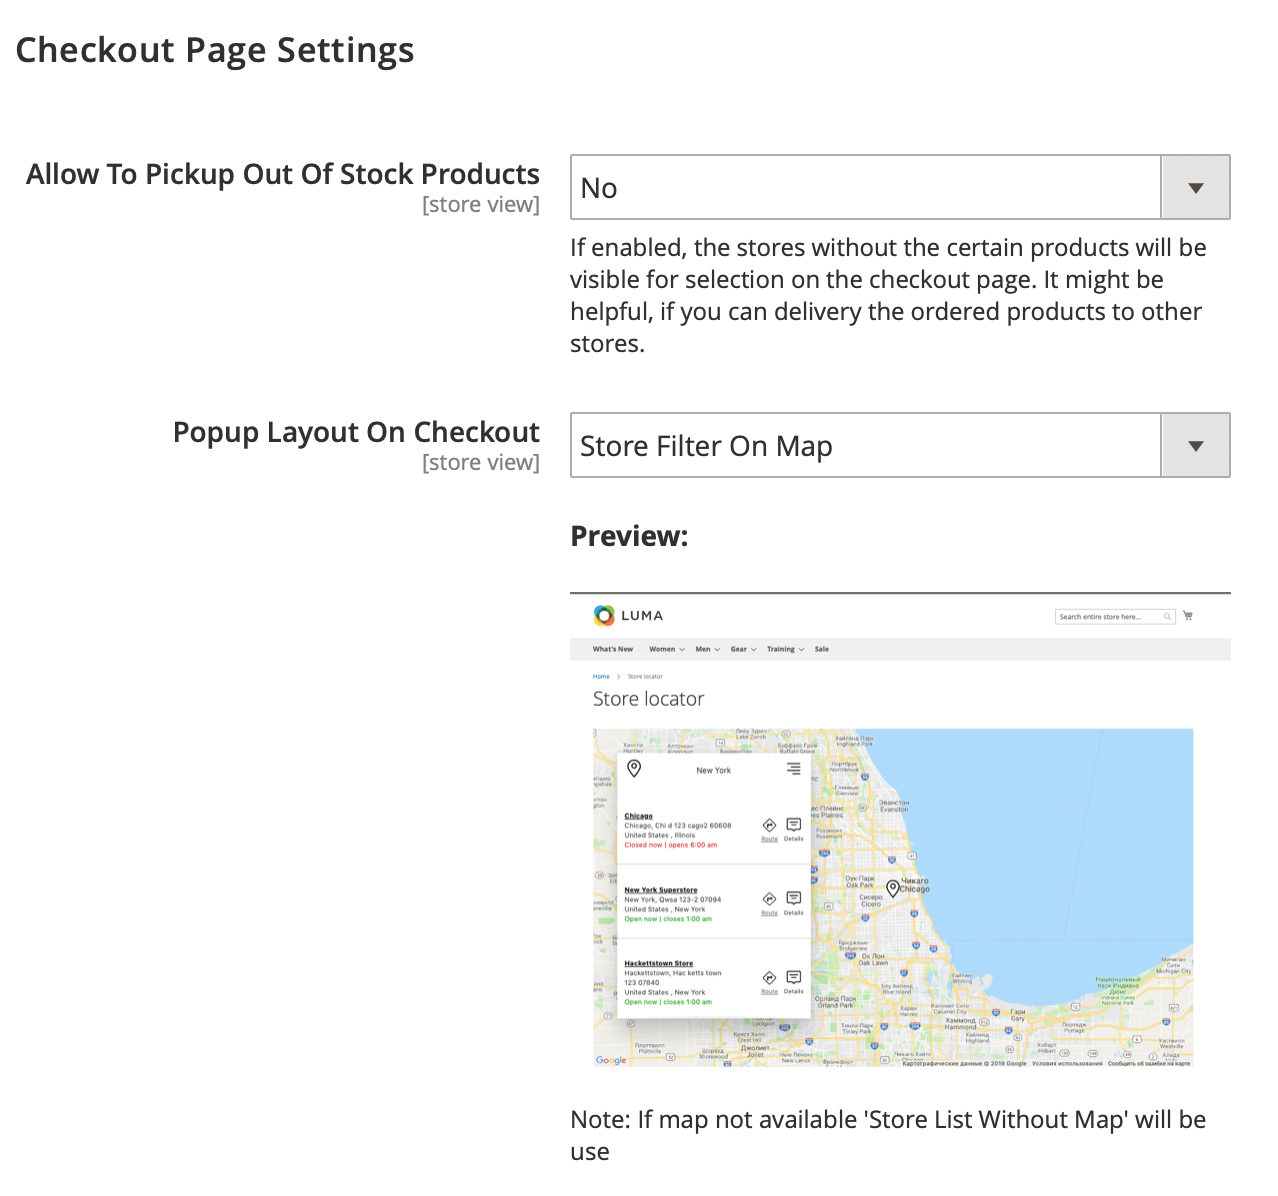
This configuration deals with the settings of the map that is shown on the checkout page if the customer selects the Pickup In Store as the Shipping Method:
- Popup Layout On Checkout - this setting manages the layout of the store locator popup, which appears when the customers clicks on the 'Select store' button.
The description of the layout of the map and the store list can be found in the Product Page section - "Popup Layout" setting.
- Allow To Pickup Out Of Stock Products - if enabled, the stores without the certain products will be visible for selection on the checkout page. It might be helpful, if you can delivery the ordered products to other stores.
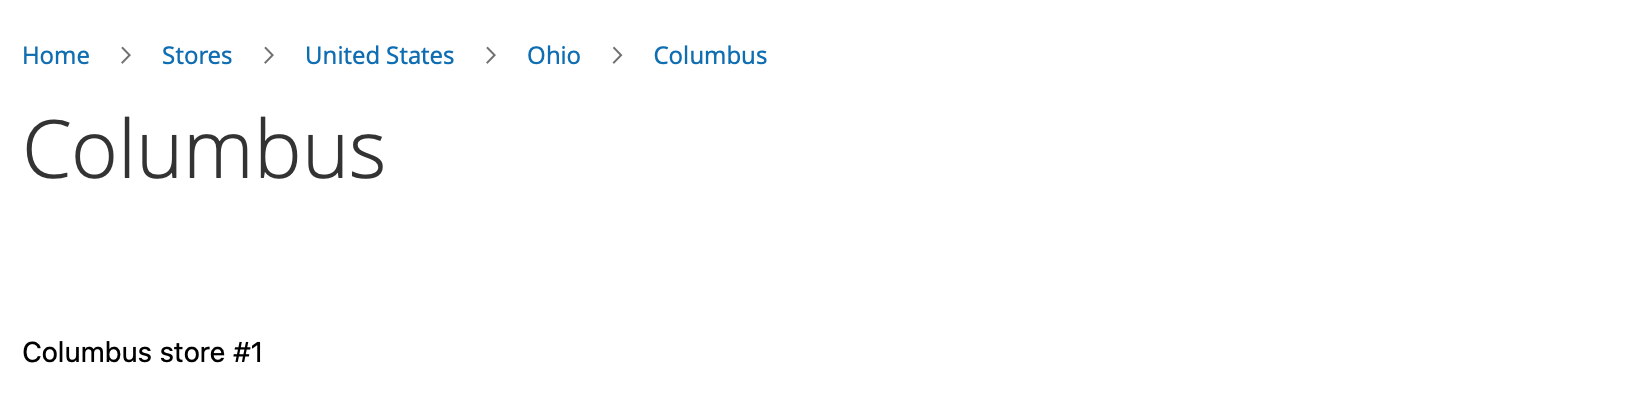
Country, Region, City Pages
These settings configures the SEO of the pages with the stores lists for the Country, Region/State and City levels. The availability of these pages depend on the 'Store URL Path' setting. These pages can be opened by clicking on the appropriate location links in the breadcrumbs.
Explanation
If you choose the country, region, city in this setting, the following pages will appear:
- City - this option creates the city page with the list of stores in the particular city;
- Region/State - this option creates the region/state page with the list of the cities, where there is at least one your store. If the "City" is not chosen in the "Store URL Path" setting, the list of all stores in the current region/state will be shown instead.
- Country - this option creates the country page with the list of the regions/states, where there is at least one store. If the "Region/State" is not chosen in the "Store URL Path" setting, the list of all cities with at least one store will be shown. If the "City" is not chosen in the "Store URL Path" setting either, the list of all stores in the current country will be shown instead.
- All stores - the page with worldwide stores is always available. This page can display either the list of countries, regions/states, cities or the stores, depending on the "Store URL Path" setting.
-
Meta Robots - the meta robots tag of the pages with the lists of stores.
-
Meta Title - the meta title of the pages with the stores lists. You can use the [name] variable to dynamically replace it with the location name on the front-end.
-
Meta Description - the meta description of the pages with the stores lists. You can use the [name] variable to dynamically replace it with the location name on the front-end.
-
Meta Keywords - - the meta keywords of the pages with the stores lists. You can use the [name] variable to dynamically replace it with the location name on the front-end.
Manage Stores
To observe, add, edit or delete the stores, log into the Magento Admin panel and go to STORES ⟶ MageWorx Stores ⟶ Stores.
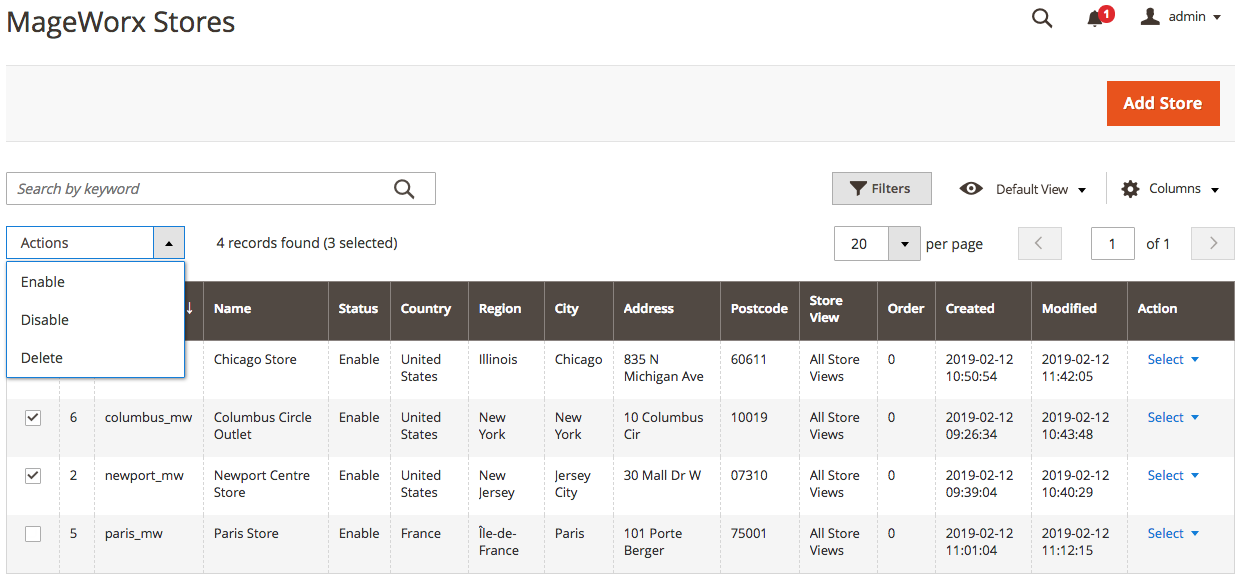
Please note that during the initial setup this grid will be empty.
The columns can be sorted alphabetically by clicking the column title. The grid supports actions for multiple selected stores. To create the new store, click the Add Store button. The store configuration consists of three tabs.
General Information
This tab provides the basic information that should be populated for the store to be shown.
-
Store Name - the name of the store that will be shown on the frontend.
-
Store Code - the technical name of the store. This name works as the store ID and won't be visible to the customers.
-
Store View - the store views the certain store is assigned to.
-
Active - it enables / disables the store on the front-end.
-
Available for pickup - this setting disables the store for pickup during the checkout.
-
Sort Order - it set the sort order of the store on the store list block.
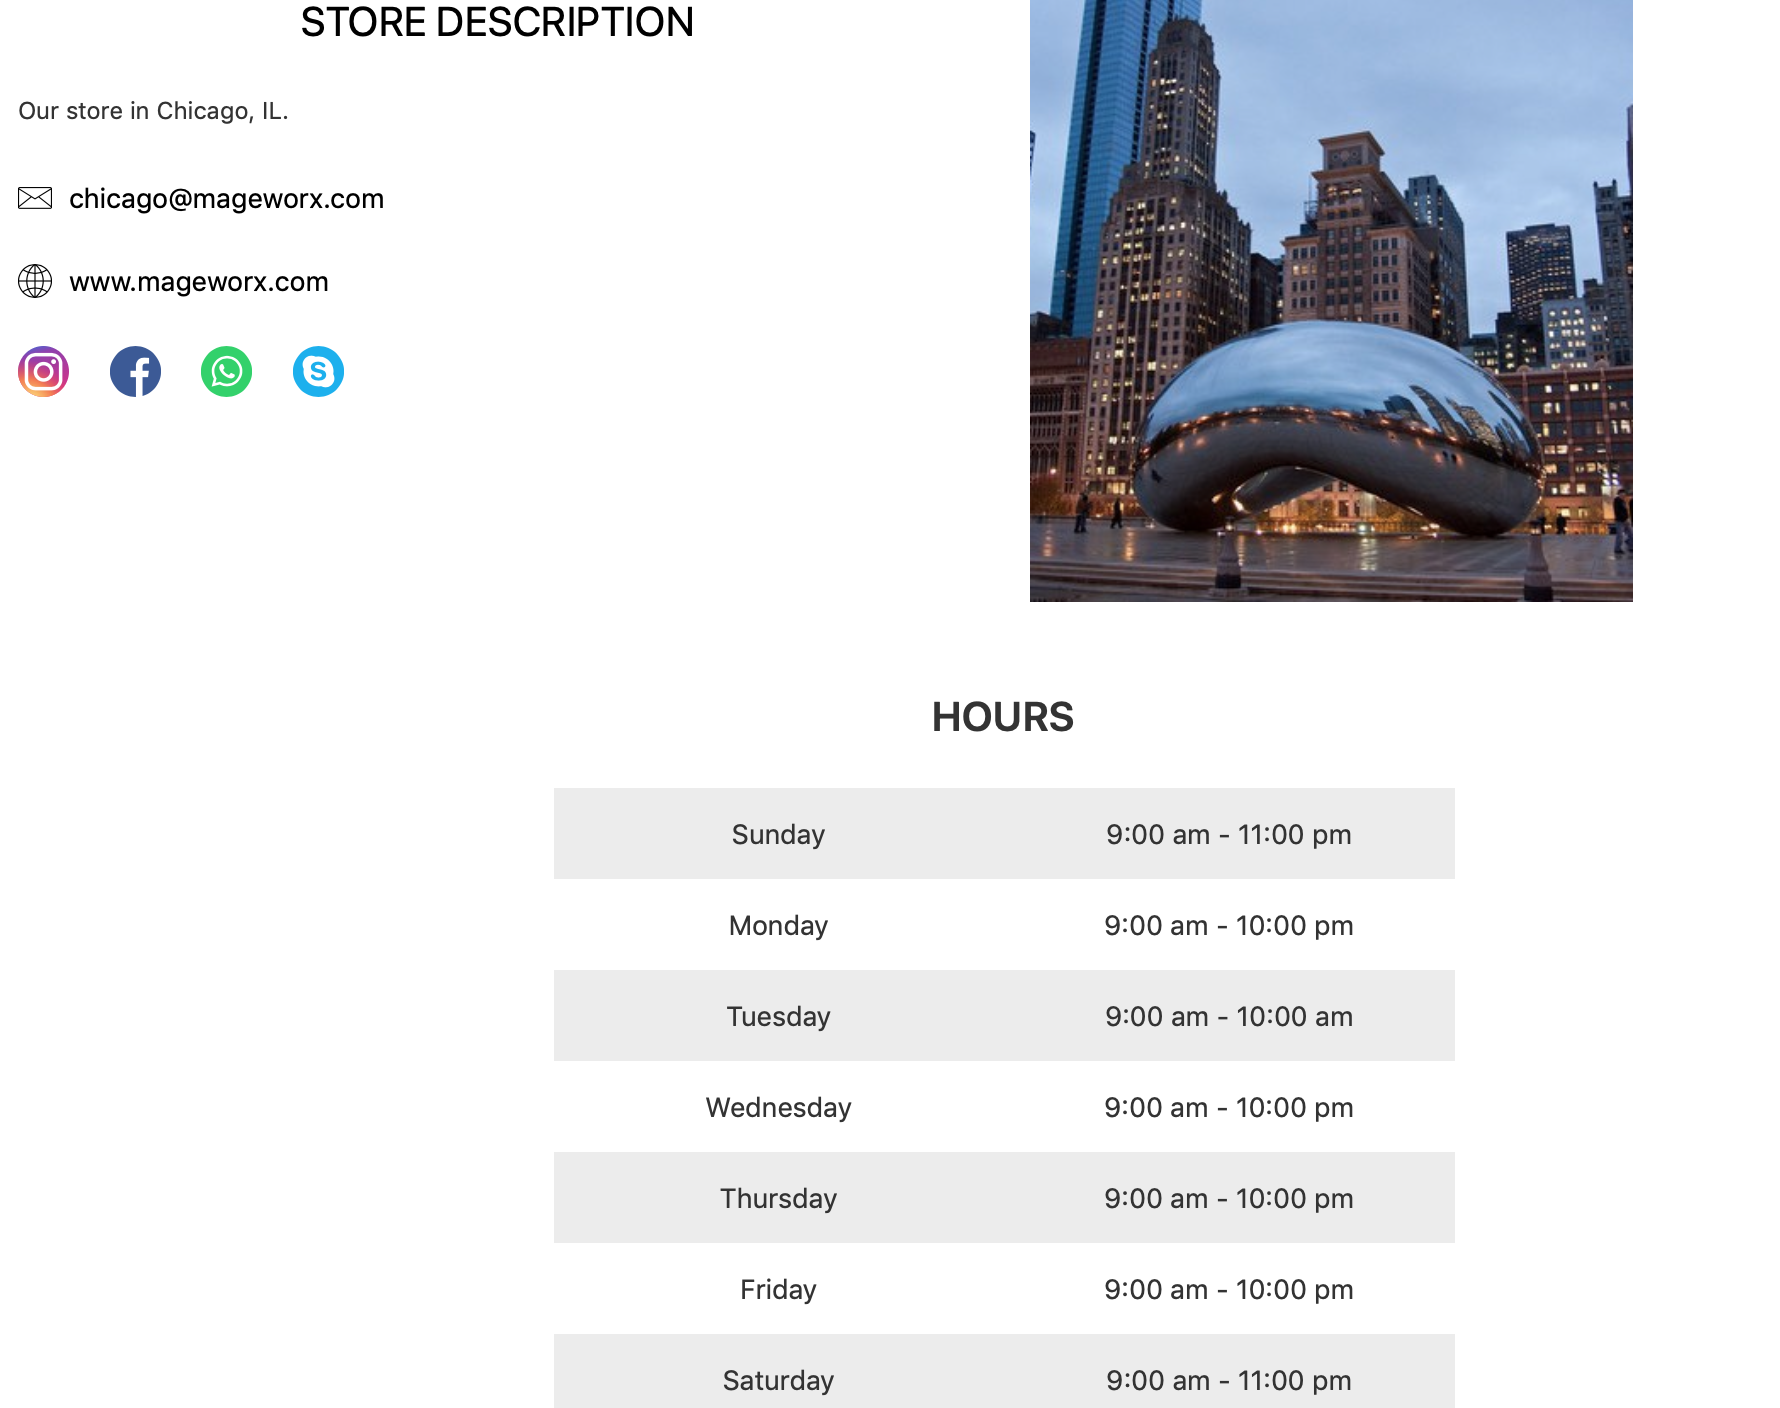
The store can have the Image and the Description (that supports HTML tags):
Address
This section consists of several groups: the store address, the store contacts, the working hours and the map location.
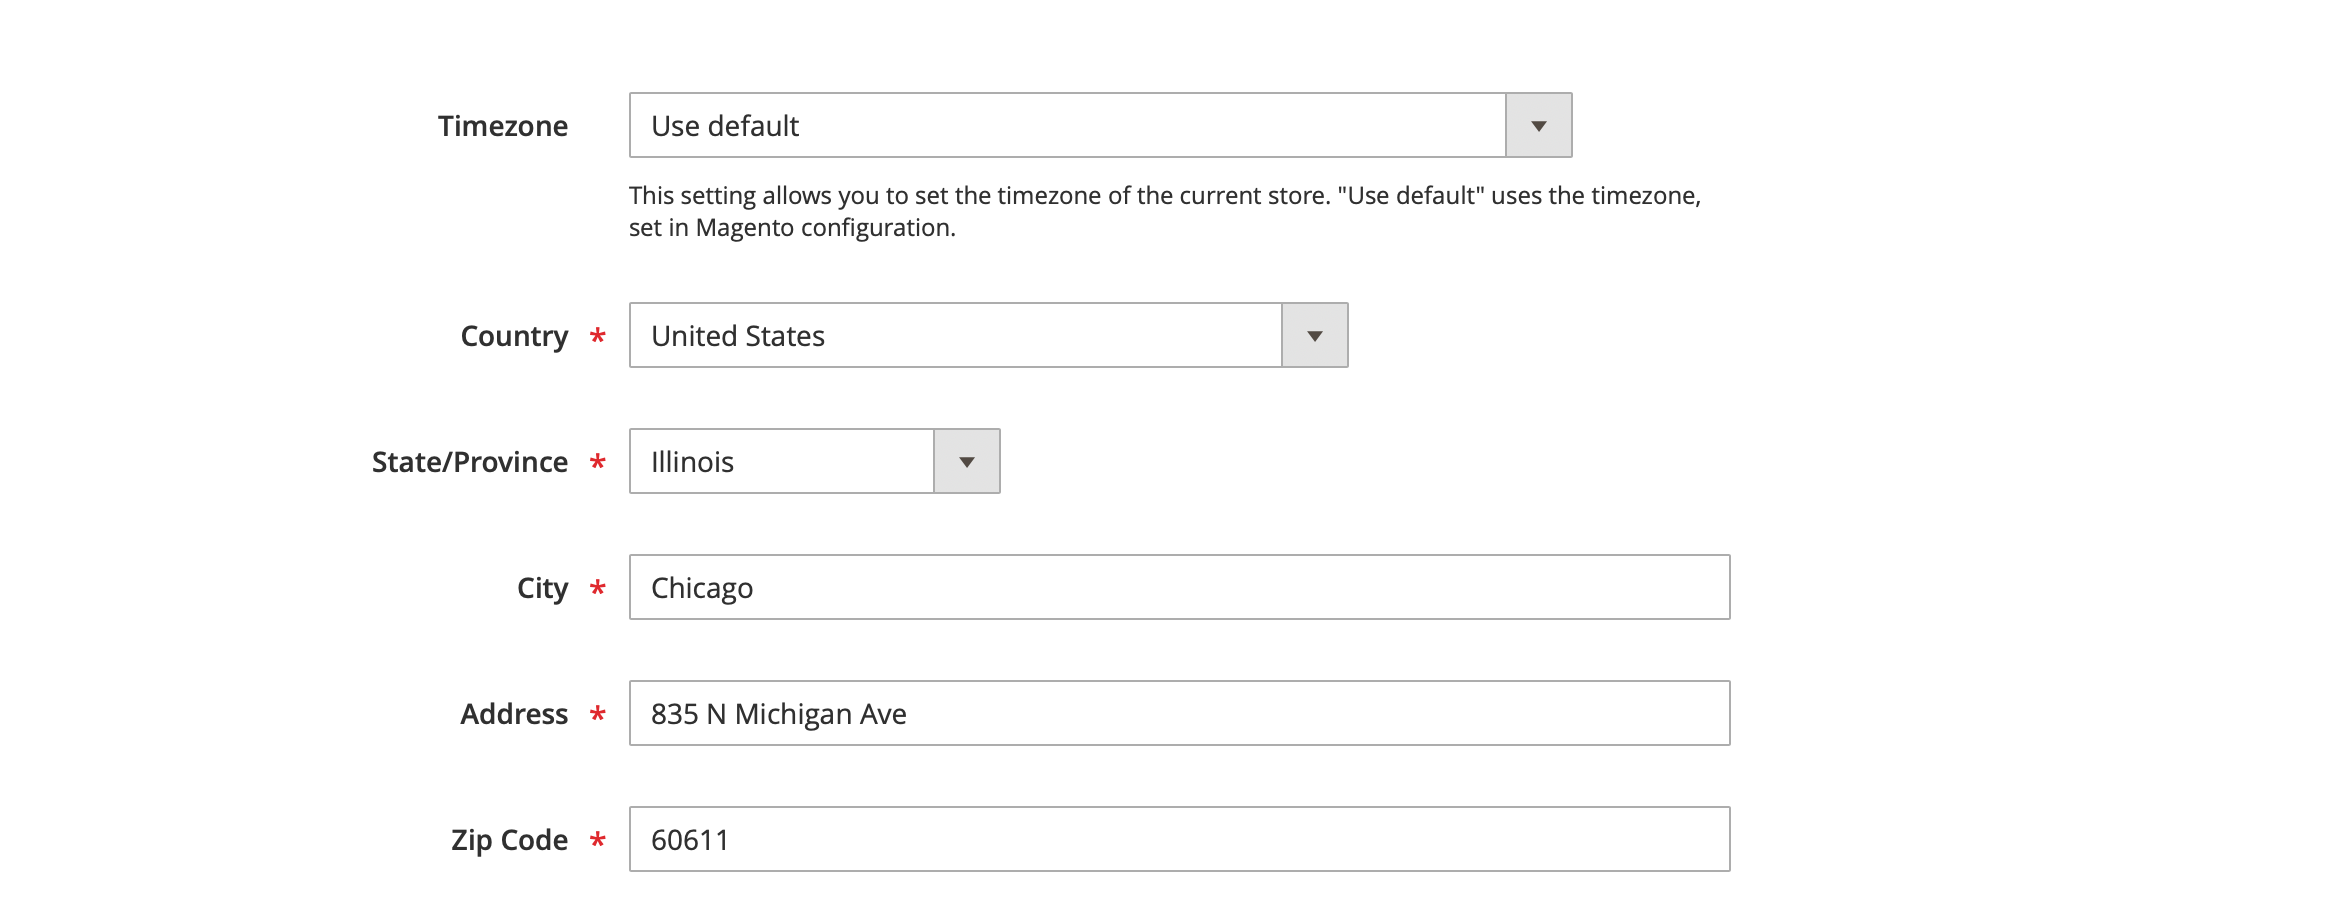
The Timezone setting allows you to specify the time zone of the store if it differs from the time zone of your Magento 2 setup.
This group consists of the exact address of the store that will be visible on the frontend.
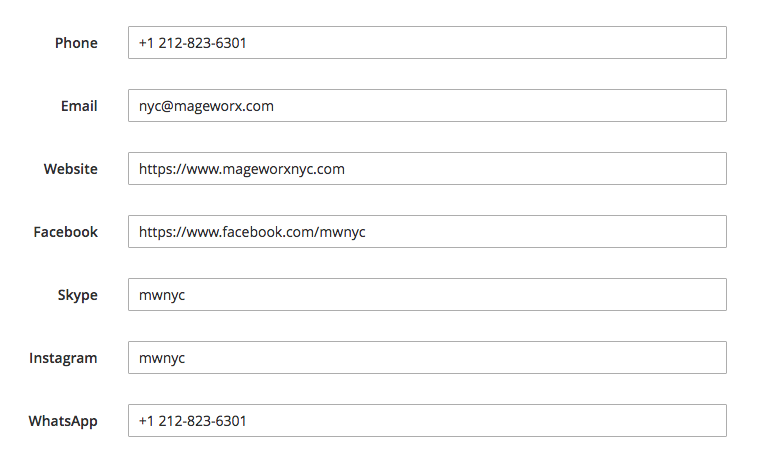
From here, the store owner can add any contact information (including the social networks and/or messengers) visible on the frontend:
The next section describes the Working hours of the store. You can enable/disable the working hours feature for each store if necessary. There are 3 available modes to set the working hours:
-
Everyday - it allows you to configure the same working hours for all working days at once.

-
Per day of week - it allows you to configure different working hours for every working day separately.
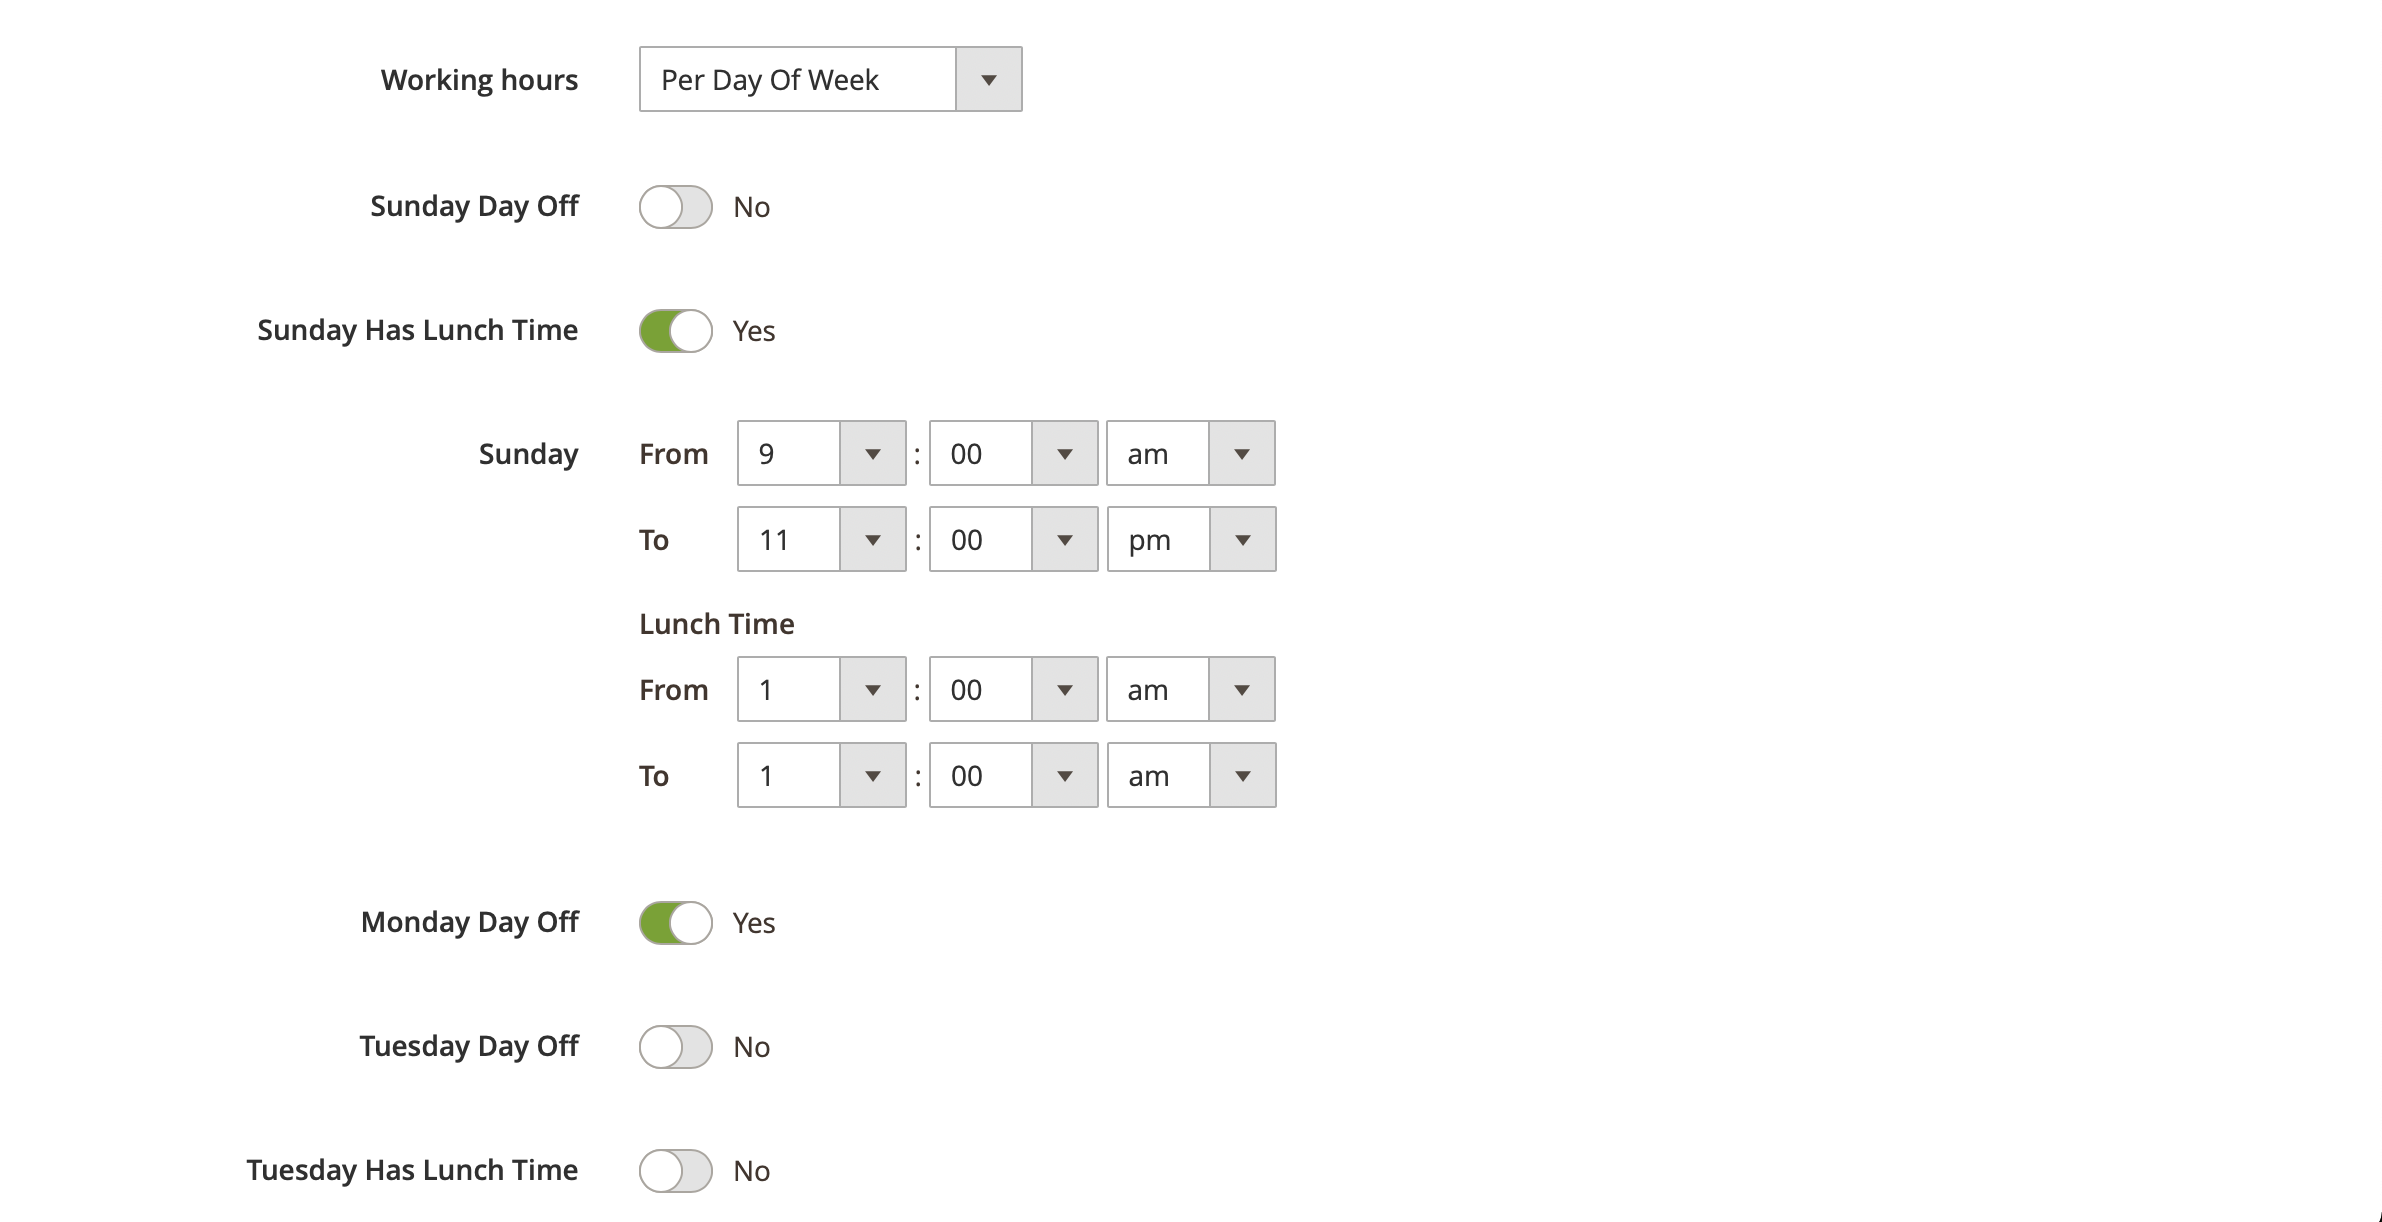
-
Open 24 hours a day - it allows you to mark the store as open 24 hours a day.
For "Everyday" and "Per day of week" you can also specify the lunch time if applicable.
For "Per day of week" you can disable any day manually and set it as non-working day.
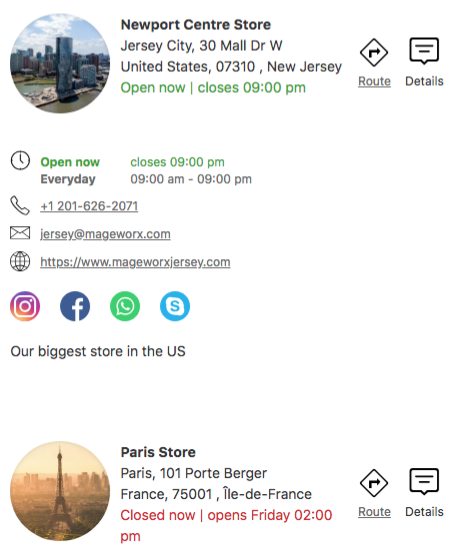
The extension also shows whether the store is opened or closed on the page load. If the store is opened, the text color is green, if closed, the color is red, and the customer can see the soonest opening time:
The last section of the Address tab is Store Coordinates.
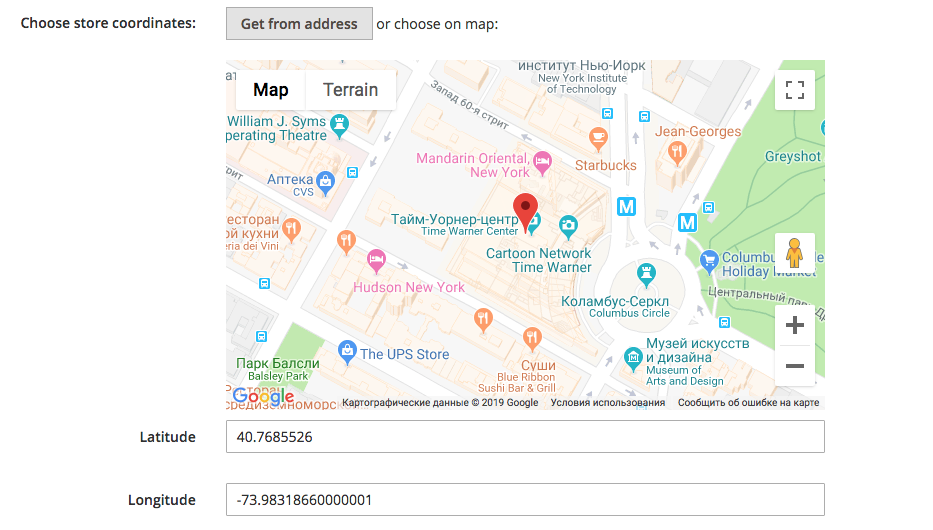
By default, it takes the coordinates from the address specified above in this section, but you may change the location to any other by clicking it on the map. Note that this will change the values in the Latitude and Longitude automatically.
Products In Store
This section allows you to assign the products to a particular store.
Note
Our extension stores the products assignement in a separate table in the database (as opposed to the majority of other Magento 2 solutions that checks it dynamically on the page load). This improves the loading speed and implements the more precise mechanism for the website operation via API.
The Assign Type configuration has 4 options:
- All products
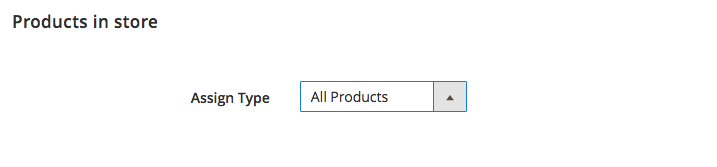
If the All Products value is selected, the extension adds all the products to the store. If a store owner adds more products to Magento 2 store, they will be added to our store automatically.
- By Condition
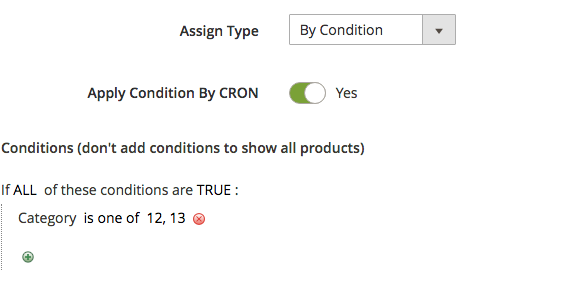
If the By Condition value is selected, the store owner can specify the conditions that the product should meet to be included in this store. If a store owner adds some products after the initial setup of the extension and wishes them to be added to the store, the Apply condition By CRON should be enabled.
- Specific Products
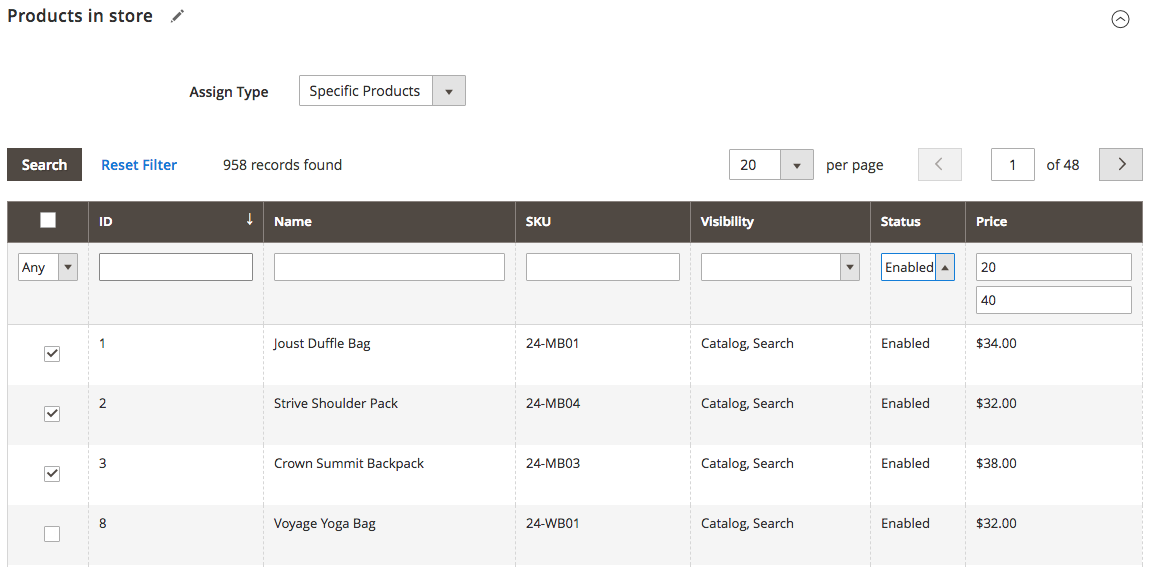
The store owner can select the Specific Products option. In this case, the table will be rendered with the possibility to select the specific products to be added to the store.
- Products from source
Note
This option is available if Magento 2 MSI is enabled.
This option allows you to connect your physical store to one of inventory sources, created in Magento 2 MSI or to create a new inventory source for the store.

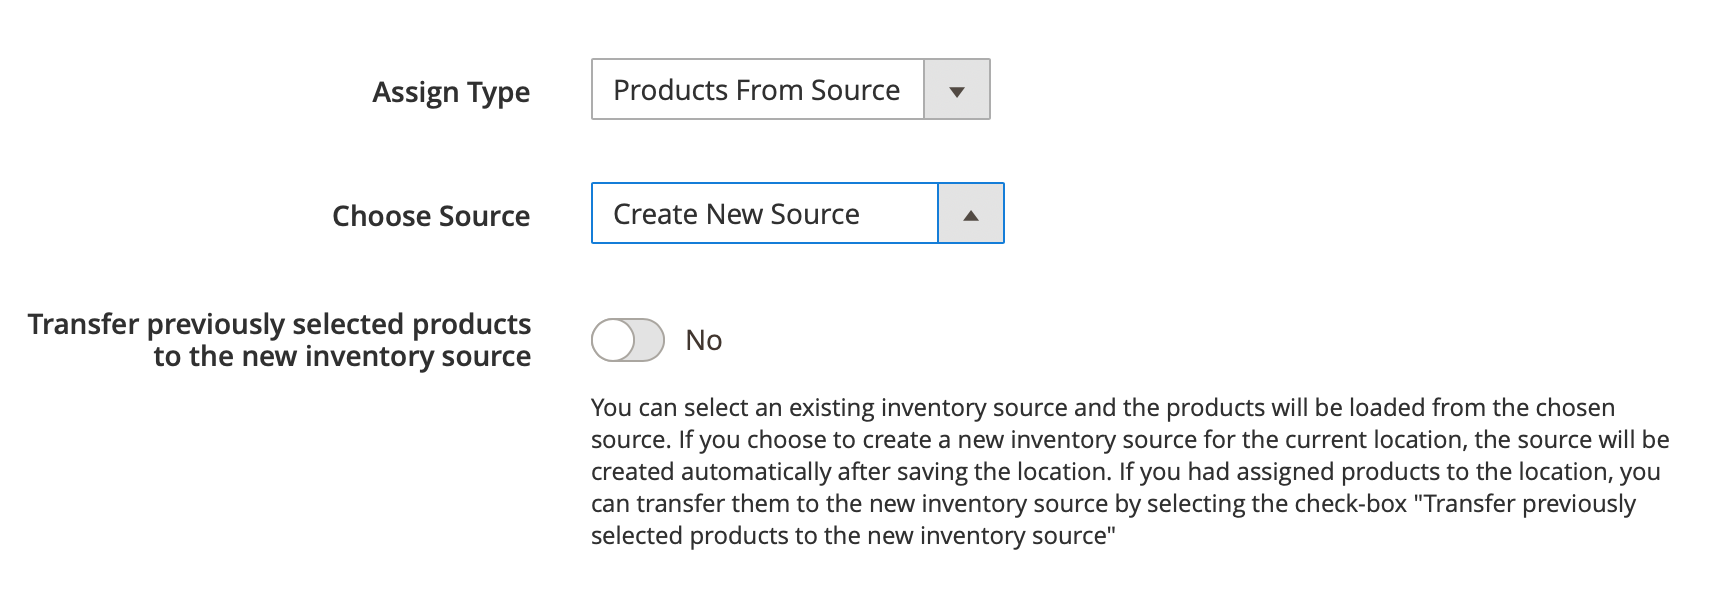
If you connect a store to one of the inventory sources, all products from this source will be automatically assigned to the store. The extension will track the stock of each product in the connected inventory source to display a correct stock status of the products for each store on the front-end.
If you create a new source for your store, the extension will automatically create a new inventory source in MSI using the store's details from our extension. Once it is done, you will be able to assign the products to this new source and specify the quantity using Magento 2 native MSI functionality.
If you previously assigned specific products to a store and then decide to create a new inventory source for this location, you can easily transfer all previously selected products to this new souce by enabling the toggle "Transfer previously selected products to the new inventory source".
Note
Our extension does not modify or change how Magento 2 MSI algorithms work. Our solution just allows you to create new inventory sources for the stores or connect them to existing sources. This approach keeps all MSI principles and doesn't break the MSI functionality so you will have a solution, perfectly integrated with MSI functionality. When your customers place the order and choose to pick up the order in one of your stores, created in our extension, Magento 2 will update the correct inventory source.
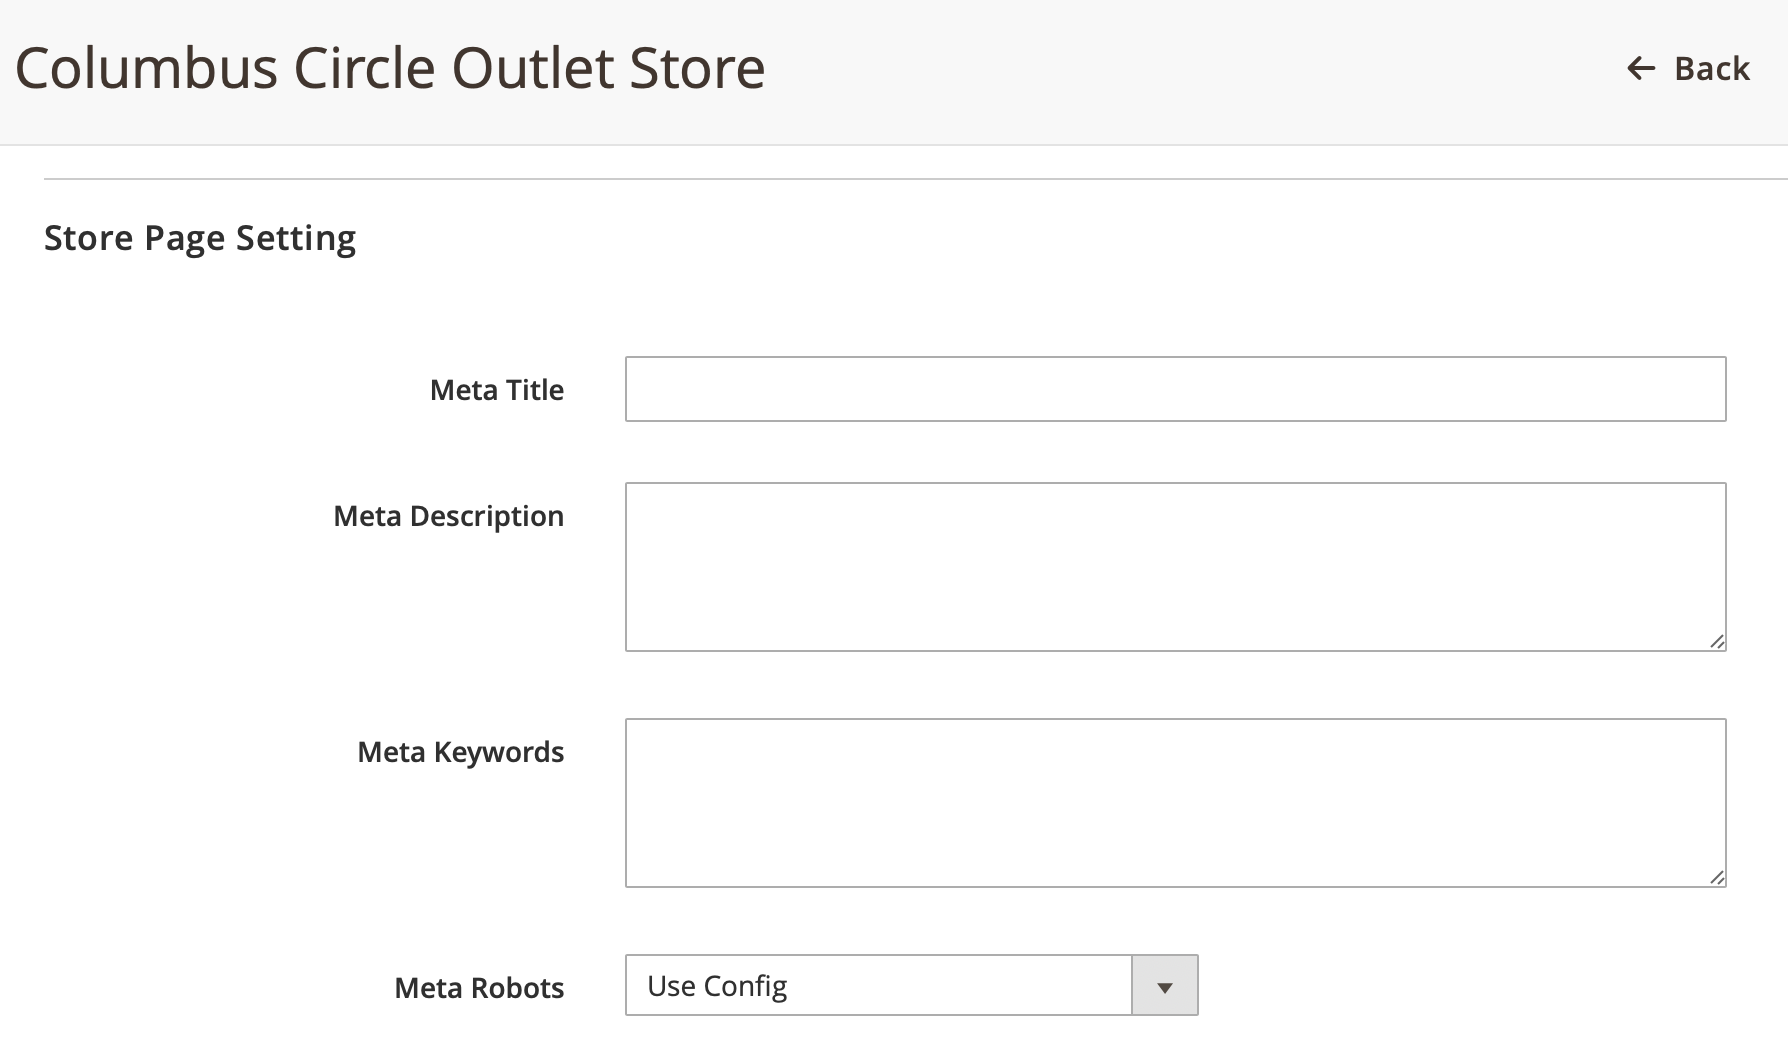
Store Page Settings
This section allows you to configure the SEO fields for your store pages.
Store Attributes
This section allows you to select the additional options, which are available in your stores. These attributes will be shown as the filters on the front-end if at least one of your store has them selected.
If you need to add new attributes you easily do this following this guide:
- 1 Duplicate the file MageWorx/Locations/Setup/Patch/Data/AddAtmAttribute.php
- 2 Replace the "Atm" in the file name to a code of new attribute. Replace the "Atm" code in the content of the file to the code of new attribute.
- 3 Upload an icon for new attribute to the folder app/code/MageWorx/Locations/view/frontend/web/images/icons or vendor/mageworx/Locations/view/frontend/web/images/icons. The name of the icon should be the same as the attribute's code.
- 4 Add the display of new attribute in the back-end in the file MageWorx/Locations/view/adminhtml/ui_component/mageworx_locations_location_form.xml. For this you can copy the code for the ATM attribute and replace its code to the code of new attribute:
<field name="atm" formElement="checkbox">
        <argument name="data" xsi:type="array">
            <item name="config" xsi:type="array">
                <item name="source" xsi:type="string">location</item>
                <item name="default" xsi:type="number">0</item>
            </item>
        </argument>
        <settings>
            <dataType>boolean</dataType>
            <label translate="true">ATM</label>
        </settings>
        <formElements>
            <checkbox>
                <settings>
                    <valueMap>
                        <map name="false" xsi:type="number">0</map>
                        <map name="true" xsi:type="number">1</map>
                    </valueMap>
                    <prefer>toggle</prefer>
                </settings>
            </checkbox>
        </formElements>
    </field>
Frontend Experience
'Find a store' menu
The customer can observe the Store locator page in the header section of the website:
The customers browsing the website from there smartphones will see the pin image instead:
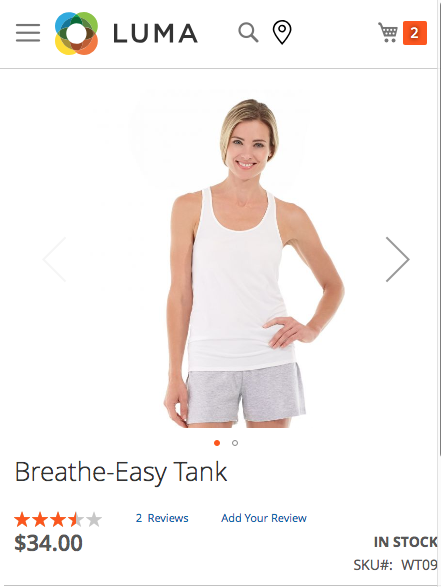
Product Page
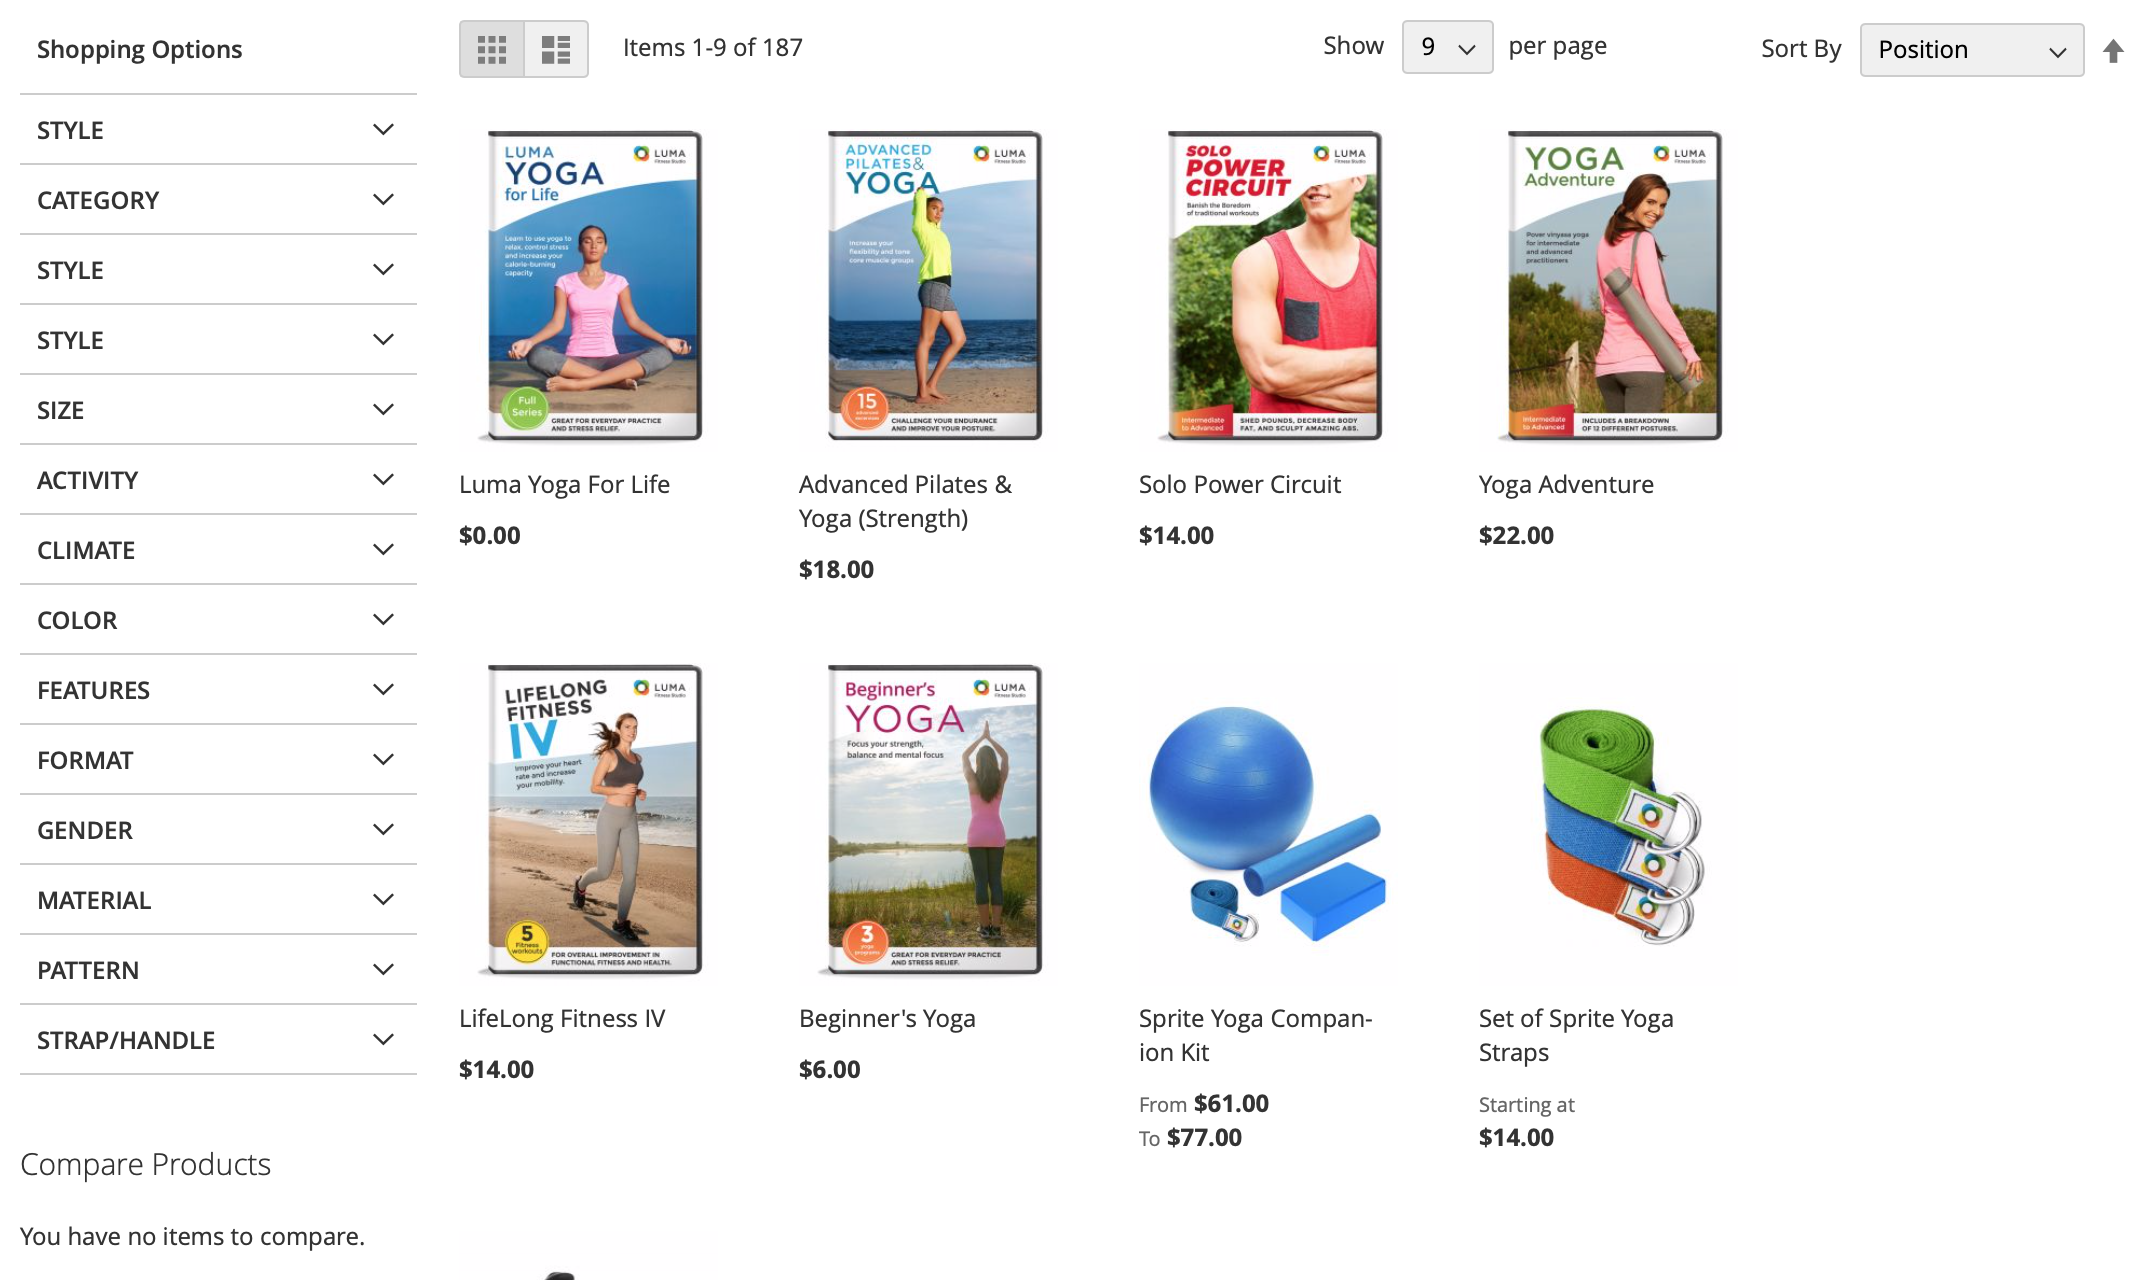
The layout of the available stores list on the product page depend on the settings in the "Product page" configuration section. There are two possible ways how the stores block can be shown:
-
Detailed
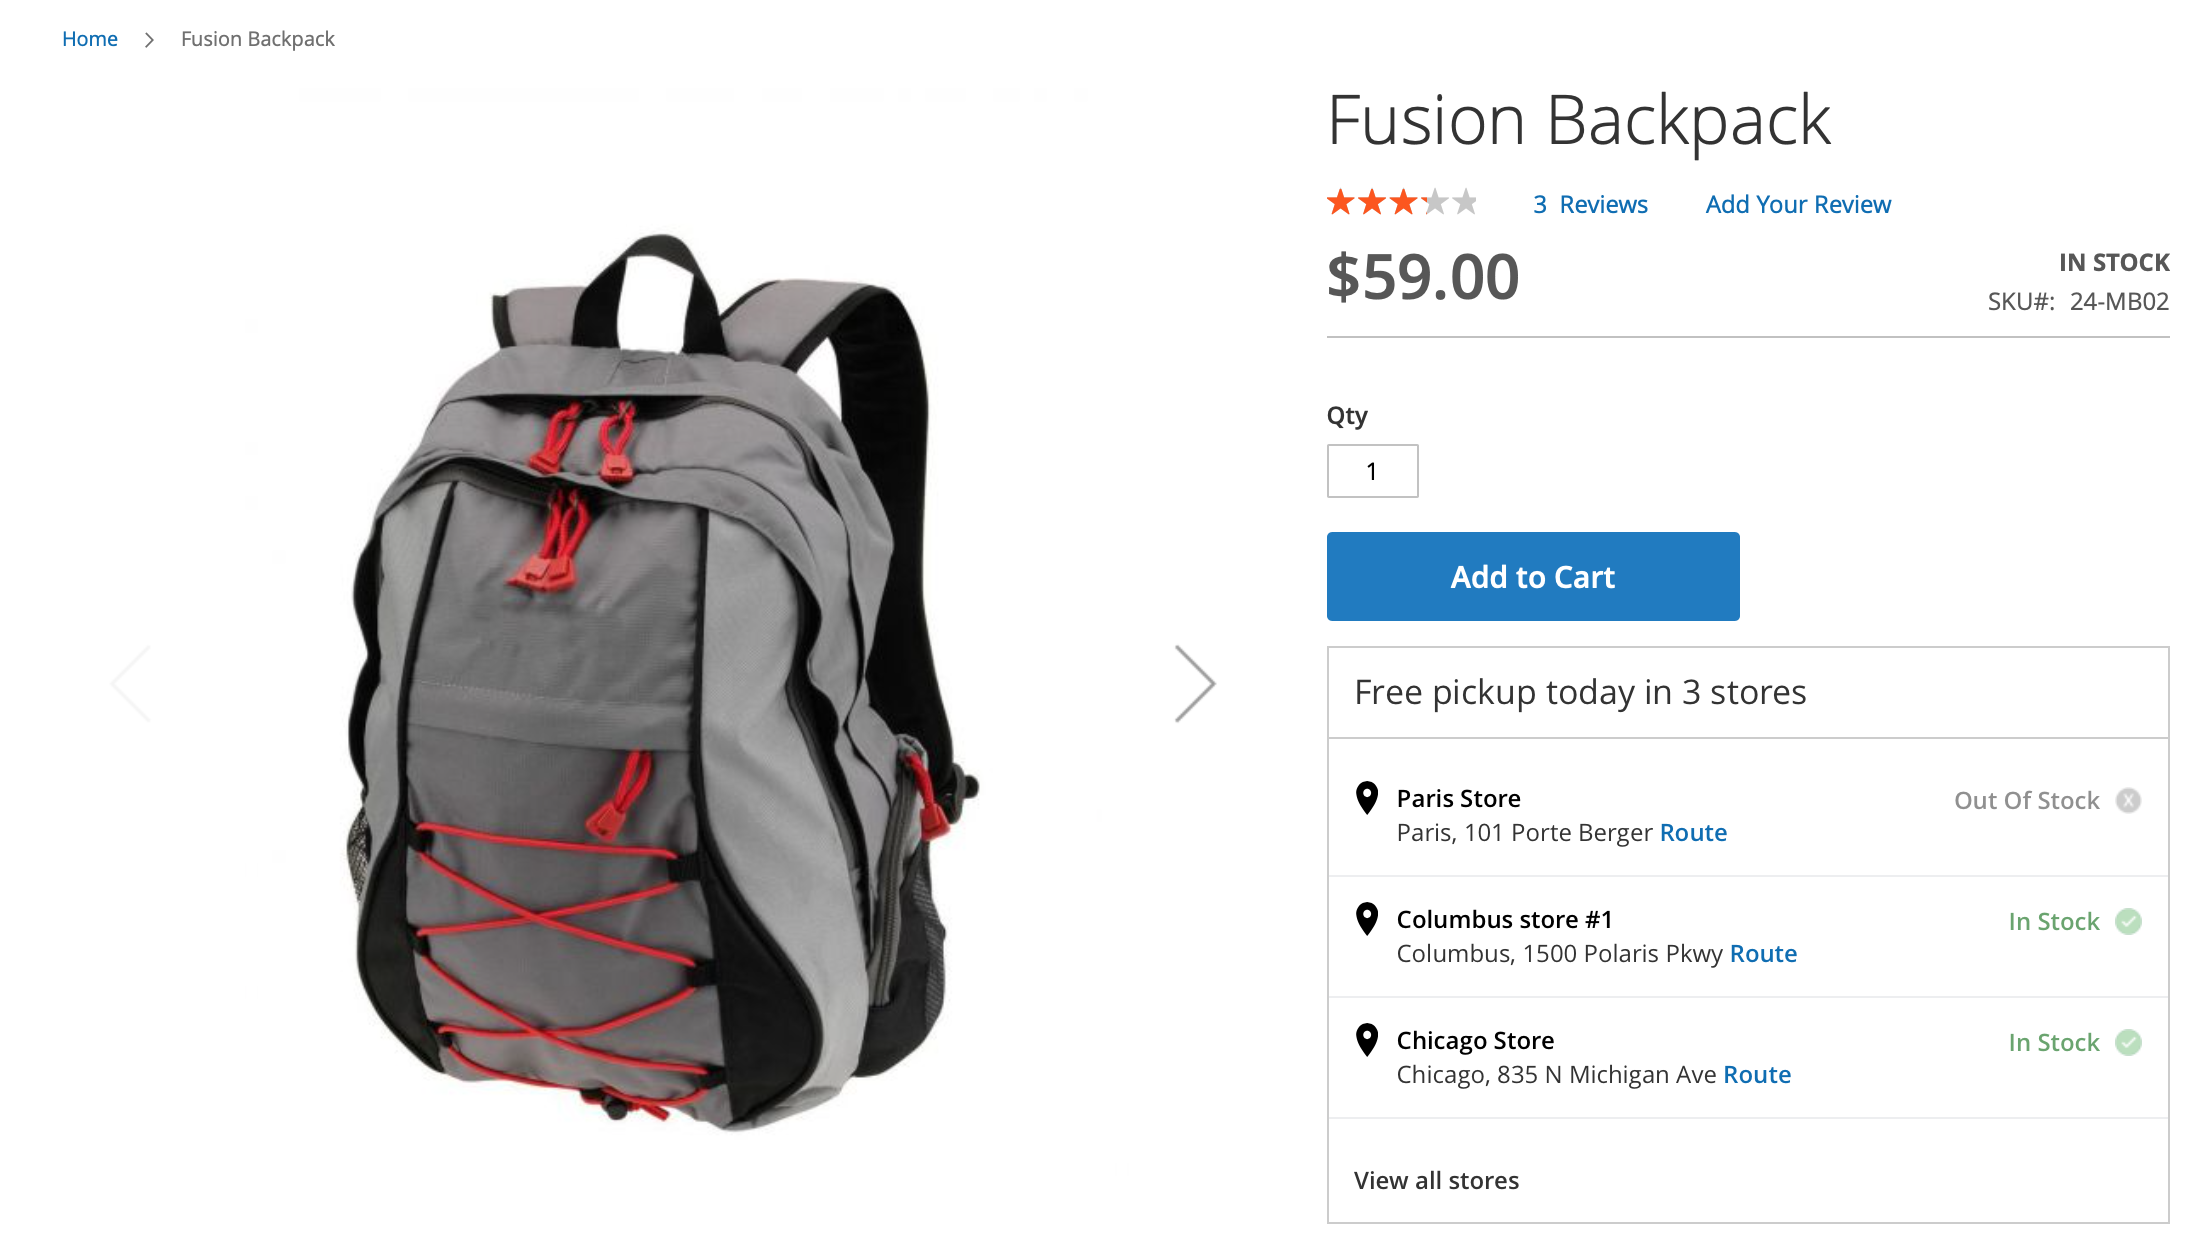
-
Simple
The deisng of pop-up with all stores depends on the 'Popup Layout' setting in the "Product page" configuration section.
The extension supports the configurable and grouped products and can update the available stores using AJAX, if the customers change the configurations. I.e. in most cases the parent configurable products are not assigned to the stores. Their associated products are assigned instead. The associated products are the final configurations selected by the customers. In order to see the stores, where the chosen configuration of the product is available, the customers should choose these options first. Untill then, the message specified in this setting will be shown, notifying your customers that they should configure the product to see its avaialbility for pickup.
How the stores are sorted on the product page
The extension sorts the stores using the following logic:
- if a customer enters a location in any our search boxes, then the extension will use this location and display the stores list on the PDP from the nearest store.
- if a customer doesn't enter any locations, then the extension will detect the location by IP and do the same as described in the previous point.
- if the location cannot be determined by the IP, then we will use the default store's location set in the configuration.
Store Page
The page of a store is beautifully designed and mobile-friendly.
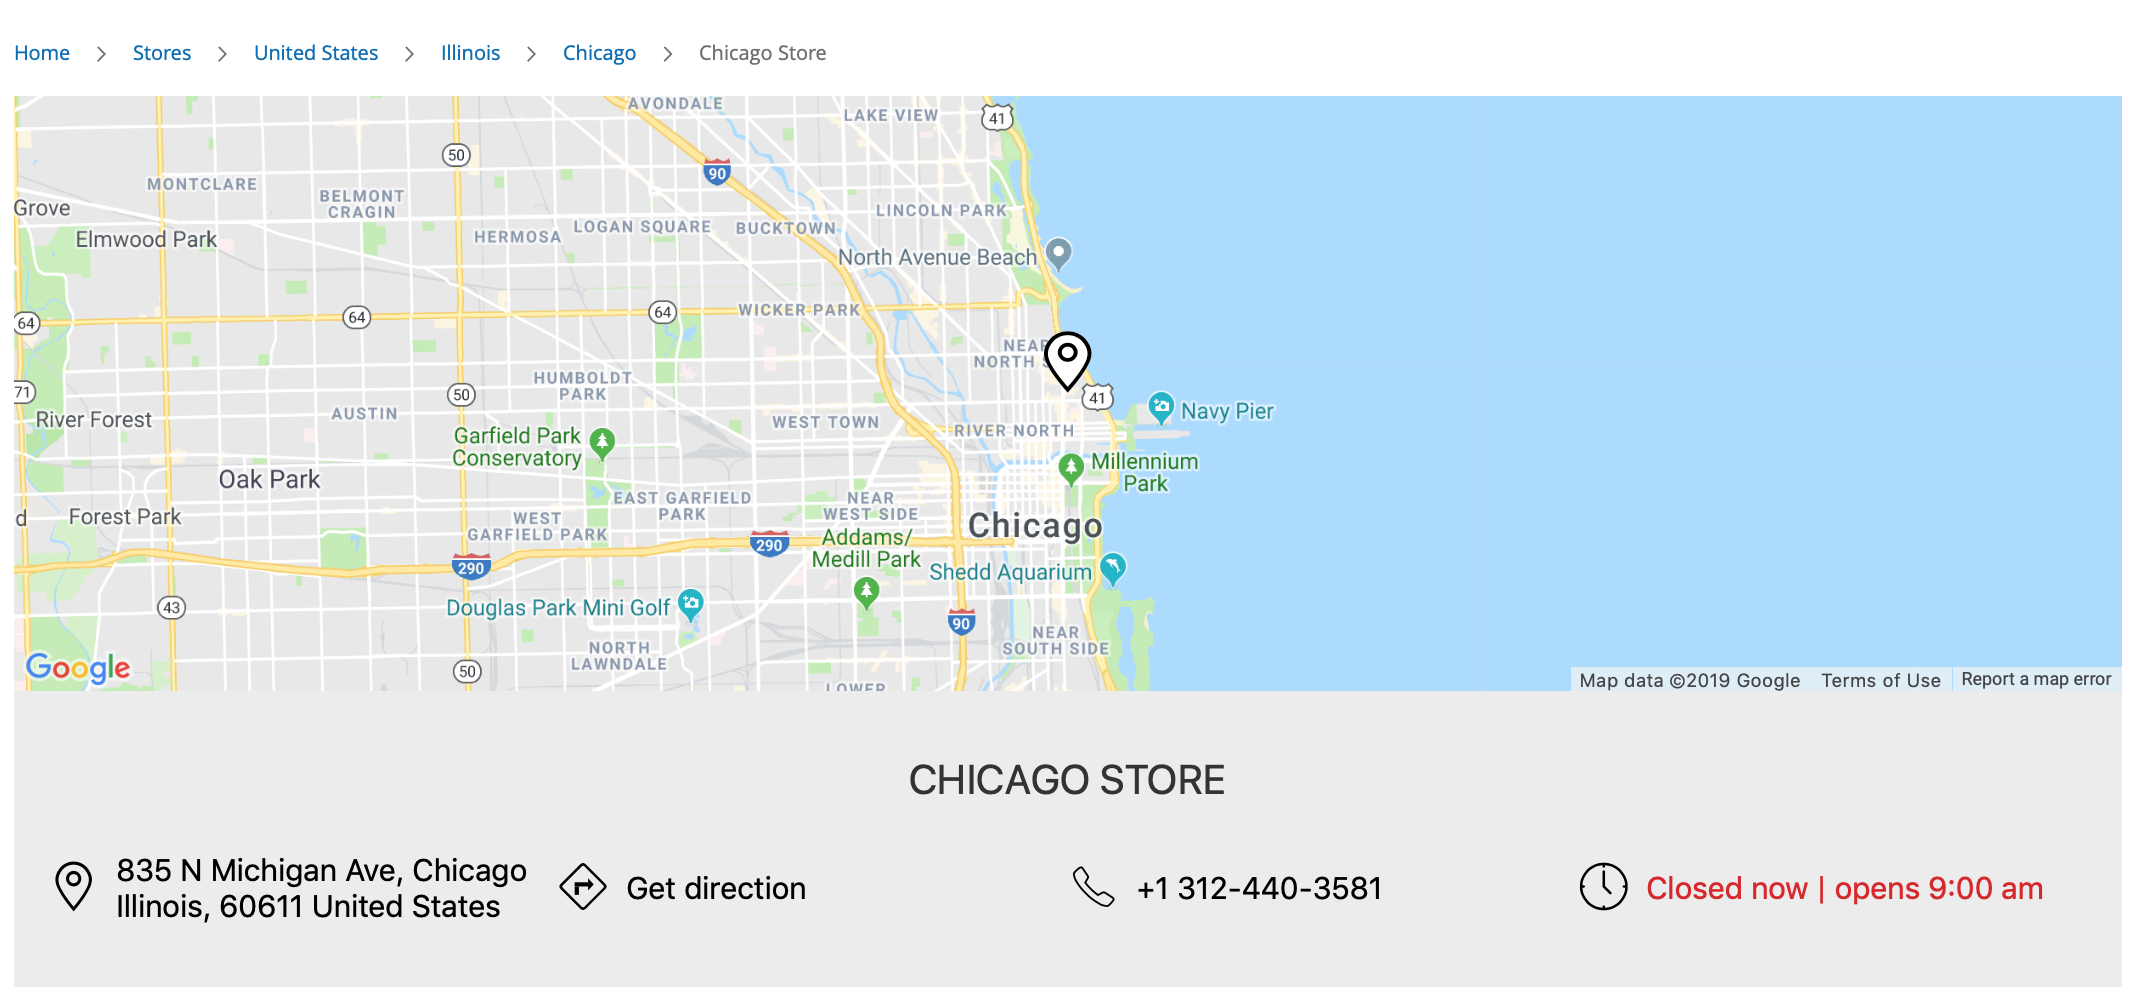
Check these two videos to see how the location pages are shown on the desktop and on the mobile.
Stores List
The pages with the stores lists for certain country, region/state and city can be generated based on the settings in the 'Country, Region, City Pages' configuration section.
-
Country - this page includes all regions/states with at least one store.

-
Region/State - this page includes all cities with at least one store.

-
City - this page includes the list of all available stores in the city.
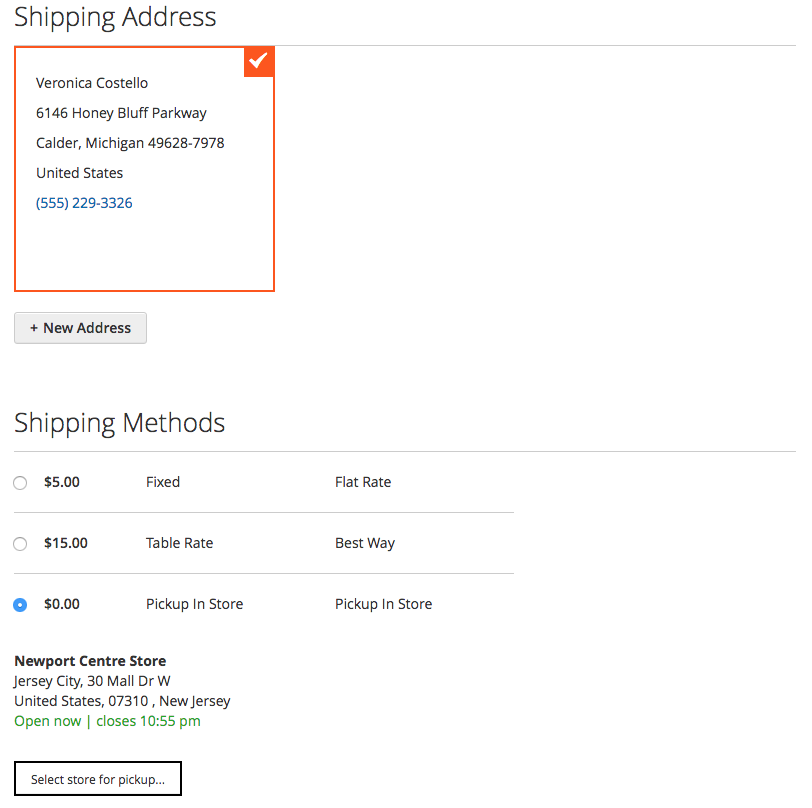
Checkout
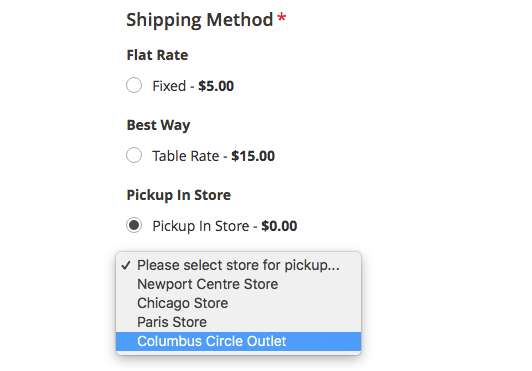
During the checkout, the customer can select the Pickup In Store as the Shipping Method:
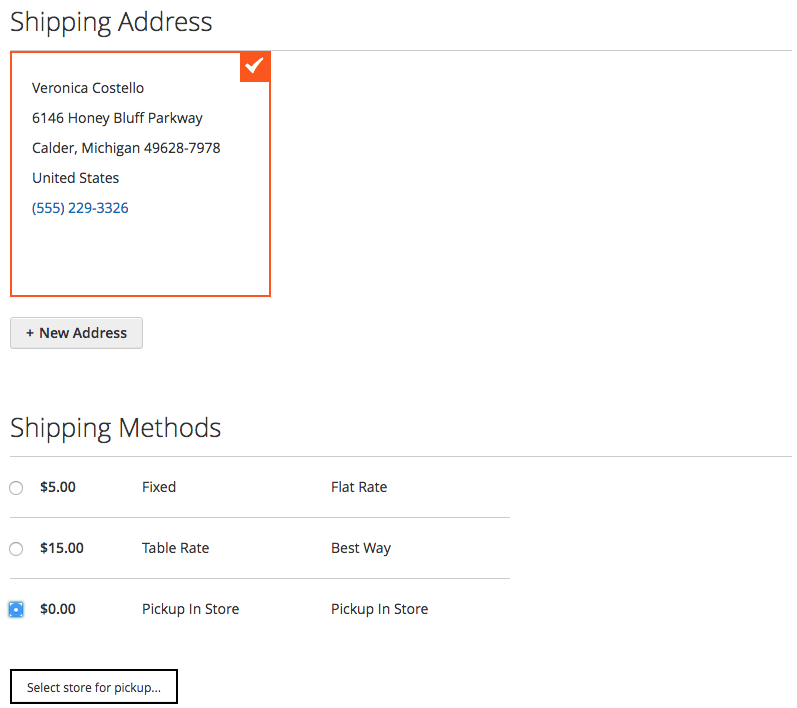
This method is shown to the customers only if all the products added to cart are available at least in one store.
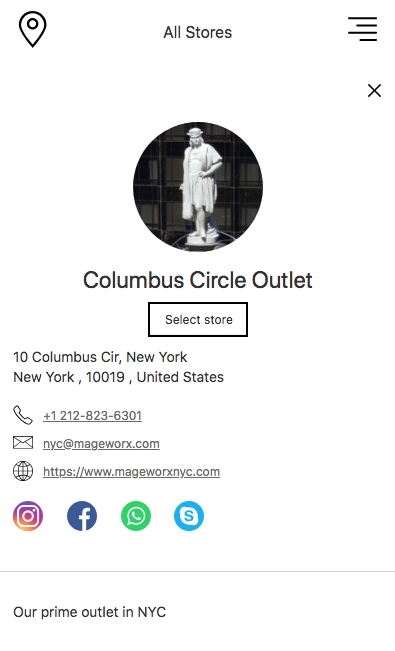
The customer can select the most suitable store in the popup by clicking the select store button:
When selected, the store will be shown below the chosen shipping method:
If the customers change their mind, they can click the Select Store for Pickup once again to select another store.
Success page
The extension allows you to add the details of the store, which was selected for the pickup, directly at the 'Thank you' page. You can display a custom static block with all necessary details. See more details in the General section of the configuration. This static block will be shown if the orders are placed with the Pickup method only.
Order confirmation email
The extension allows you to send a separate order confirmation email template, if the order was placed with the Pickup method. This email will be sent instead of the standard email. See more details in the General section of the configuration.
Sort by distance
Out of the box, the extension sorts the stores based on the distance from the current customer's location.
Note
The customer's current location can be determined bu the customer's IP address using the GeoIP functionality or from the customer's browser (if this feature is allowed in the browser).
Backend Experience
Shipping Method
The extension has its own shipping method for the In Store Pickup. This method is shown to the customers only if all the products added to cart are available in some store(-s). You can modify it in STORES ⟶ Configuration ⟶ SALES ⟶ Shipping Methods.
Our method's name is MageWorx Pickup In Store Shipping Method.
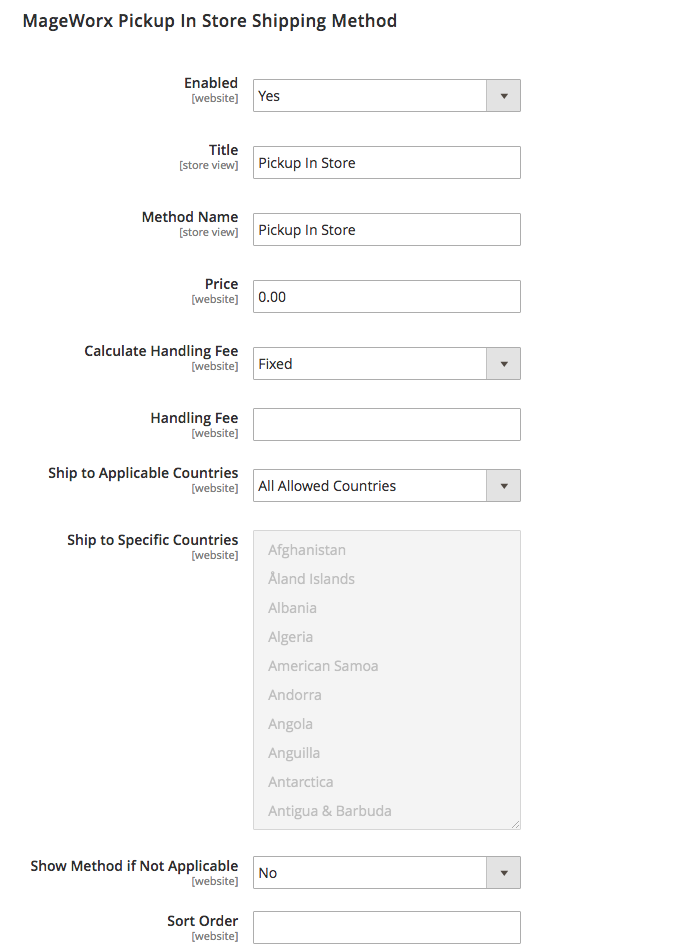
The methods settings are the standard ones for Magento 2 allowing you to change the name, price or limit the countries where the method can be displayed.
Order View
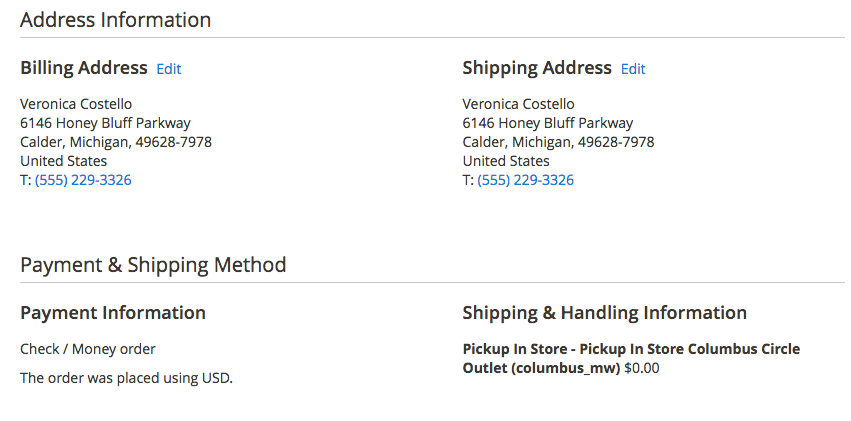
When the customer makes an order with the selected store for the pickup, it is shown in the Shipping & Handling Information section of the order:
The store owner can add the store for the pickup if the order is created from the backend:
Ready for pickup
The extension allows you to send the email notification to your customers, whey their orders are ready for pickup. To enable this feature, you should set the setting "Enable 'Ready For Pickup'" to Yes in the general configuration of the extension. Once it's done, you will see the "Ready for pickup" link in the orders, which were placed using the in-store pickup method:

This link will send the email to the customer, notifying that the order is ready for the pickup. The template for this email can be selected in the General section of the configuration of the extension.
Send email to store
The extension enables the functionality to notify the stores, when new orders with the in-store pickup method are placed for their stores. To activate this feature, you should enable the setting "Send Email to Store" in the General section of the configuration. The setting "Store Email Notification" allows you to select the email template, which should be sent. By default, the 'new order' email will be sent.
This functionality automatically sends the email to the store's email address, which is specified in the store's Address section, when new order with the pickup in the certain store is placed.
MSI Support
Our extension supports Magento 2 MSI functionality and allows you to connect the physical stores (created in our extension) to inventory sources from MSI. I.e. our extension will use the quantities and stock statuses of the products in specific inventory sources to track the availability of the products in each store and to display the actual stock status of the products for each store on the front-end. Thus, your customers will be able to see the availability of all your products in your stores. To find more details about MSI support check these sections:
- Products from source
- API support (check the sections starting from [MSI])
Import/Export
The extension allows you to import/export the stores. It allows you to add new stores and update the existing stores in bulk. You can also copy the data between different Magento 2 stores.
In order to import or export the MageWorx stores you should navigate to SYSTEM ⟶ Data Transfer ⟶ Import/Export MageWorx Stores.
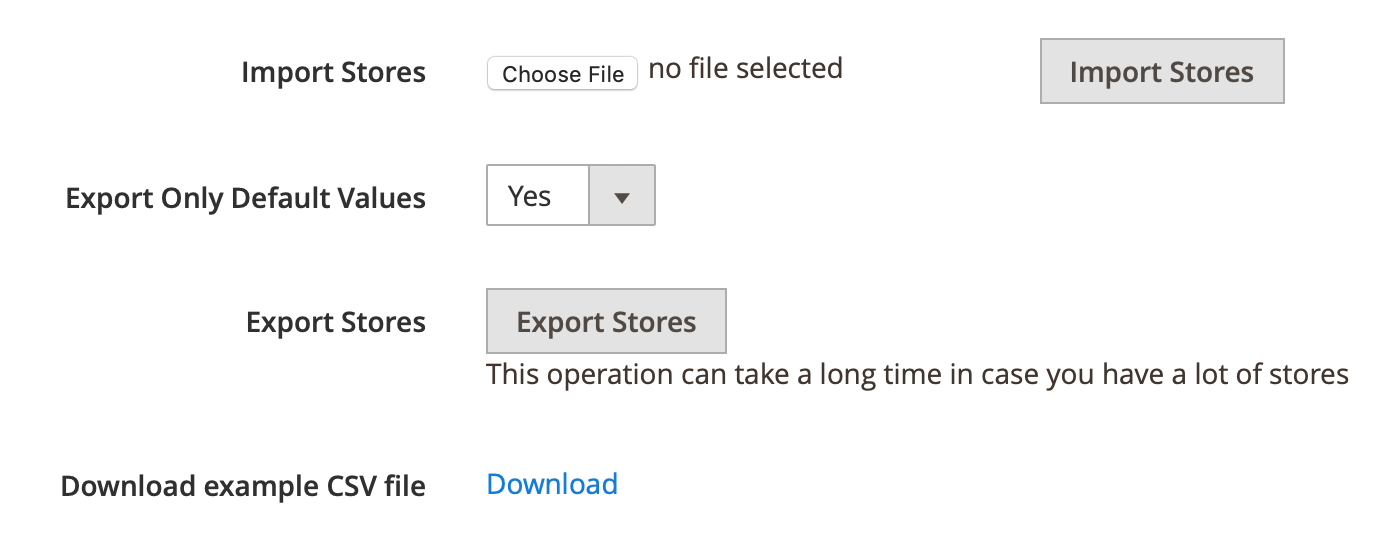
The extension gives you the ability to download the example CSV file in order to get to know the structure of the CSV file that should be used to import the stores.
If there are any errors during the import process, they will be logged in the system.log file.
Curbside pickup
The curbside pickup option is a new way to pick up the orders from a store. See more details about the curbside pickup option here.
The curbside pickup is added by the combination of 3 extensions:
- Store Locatore& In-store Pickup
- Delivery Date (Free with Store Locator extension)
- Curbside Pickup add-on (Free)
We also prepared the free sample data to create the new delivery option, rename the necessary settings, remove unnecessary titles and move the curbside pickup toggle on the checkout. Hopefully it will help you to configure everything easier.
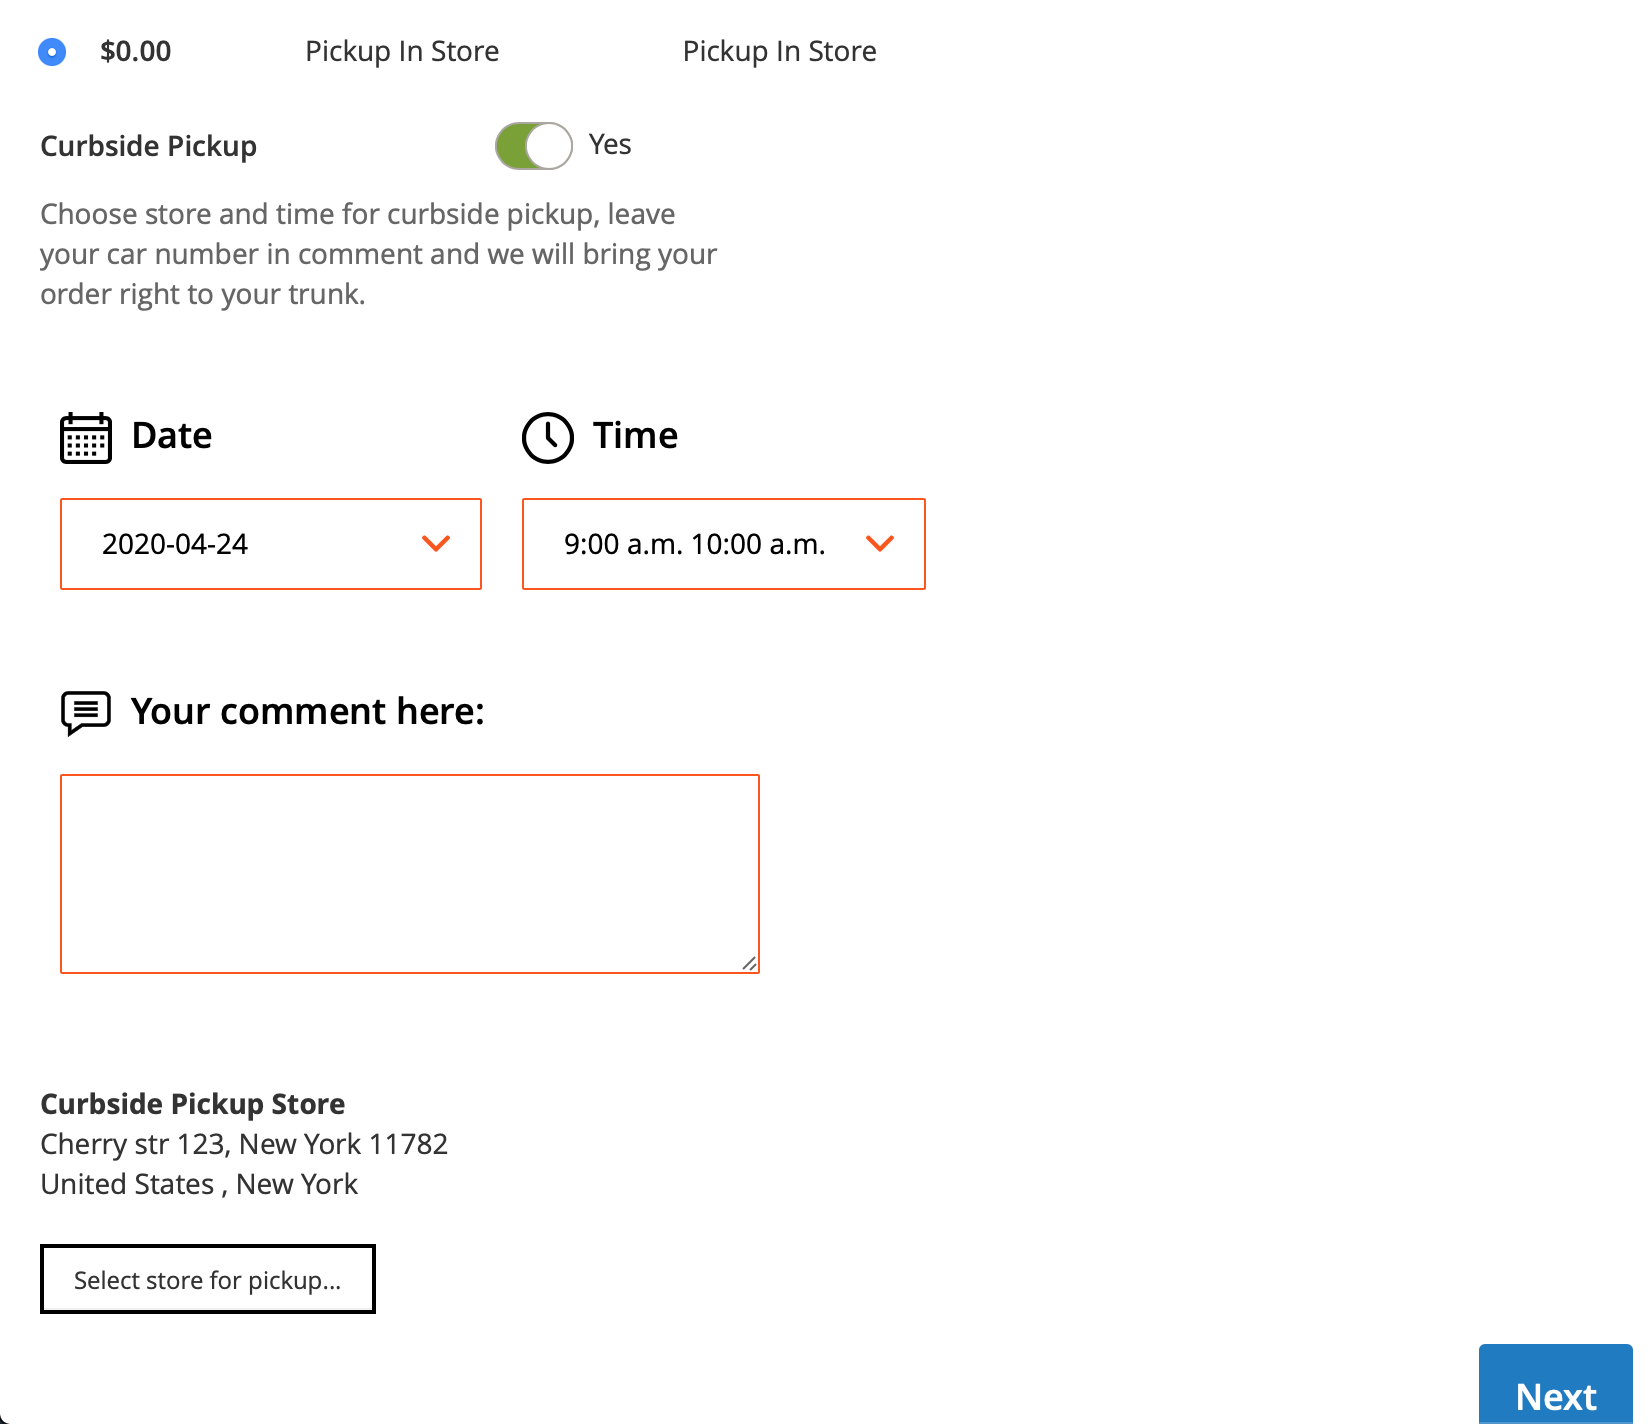
The selected Curbside pickup option will be added to the order, so you will be able to track such orders easily. It is also added to the order confirmation emails sent to your customers.
The Curbside pickup toggle can be assigned to the Pickup method only.
See the Delivery Date guide here.
See the Curbside pickup add-on guide here.
Hyvä themes
The extension out of the box has the integrations with Hyvä themes.
Note
The free compatibility addon must be installed. See this link for more details.
To install the Hyva compatibility module:
Installation via packagist.com
- Install via composer
composer require hyva-themes/magento2-mageworx-storelocator
- Enable module
bin/magento setup:upgrade
Hyva checkout
The extension out of the box has the integrations with Hyvä checkout:
Note
The free compatibility addons must be installed. See this link for more details.
To install the Hyva compatibility module:
Installation via packagist.com
- Install via composer
composer require hyva-themes/magento2-hyva-checkout-mageworx-storelocator
- Enable module
bin/magento setup:upgrade
Store Locator API
The Store Locator & In-store Pickup web API provides the developers with the means to use the web services that communicate with the Magento system. The list of the Store Locator API commands can be observed in the webapi.xml file located in app/code/MageWorx/Locations/etc/. Note that some API requests may need authorization. Please check this article for more information.
The API supports all the HTTP verbs such as GET (retrieving the information), POST (adding new resource) or DELETE.
The endpoint for these API requests is http://site.com/rest/V1/mwlocations/.
According to the desired business needs, the developer can create, update or delete the particular store, get the information about the store, add, edit or remove products.
Get All Existing Locations Codes
The method needs the admin authorization token. It helps with the identification of the store codes. The further API requests require this code. You can check it in the backend as well.
Request Format
api
GET /V1/mwlocations/
Response JSON example
json
[
    {
        "code": "chicago_mw"
    },
    {
        "code": "columbus_mw"
    },
    {
        "code": "newport_mw"
    },
    {
        "code": "paris_mw"
    }
]
The response includes the location codes list of all the stores that you have on your website.
Delete Location by Code
The method needs the admin authorization token. It simply deletes the store by the store code.
Request Format
api
DELETE /V1/mwlocations/{store_code}
Example:
api
DELETE /V1/mwlocations/paris_mw
Response JSON example
If the store is found in the database by its name, the response will be true. Otherwise, if the store has already been deleted or you have made the typo in the request, the response is:
json
{
   "message": "Requested Location doesn’t exist"
}
Get the Location Information by Code
The method needs the admin authorization token. It outputs the information about the location from the store code.
Request Format
api
GET /V1/mwlocations/{store_code}
Example:
api
GET /V1/mwlocations/paris_mw
Response JSON example
json
{
    "code": "paris_mw",
    "assign_type": "all_products",
    "apply_by_cron": false,
    "name": "Paris Store",
    "description": "<p>Our first store in EU directly in the belly of Paris</p>",
    "is_active": true,
    "order": 0,
    "image_path": "/c/o/columbus_4.png",
    "country": "France",
    "country_id": "FR",
    "region": "Île-de-France",
    "city": "Paris",
    "address": "101 Porte Berger",
    "postcode": "75001",
    "email": "[email protected]",
    "phone_number": "+33 1 44 76 87 08",
    "website_url": null,
    "skype": null,
    "whatsapp": null,
    "instagram": "mwparis",
    "facebook": "https://www.facebook.com/mwparis",
    "latitude": "48.8619911",
    "longitude": "2.346416299999987",
    "store_ids": [
        0
    ],
    "product_skus": [],
    "working_hours_type": "per_day_of_week",
    "working_hours": [
        "{\"from\":\"02:00 pm\",\"to\":\"11:30 pm\",\"off\":\"0\"}",
        "{\"from\":\"\",\"to\":\"\",\"off\":\"1\"}",
        "{\"from\":\"\",\"to\":\"\",\"off\":\"1\"}",
        "{\"from\":\"\",\"to\":\"\",\"off\":\"1\"}",
        "{\"from\":\"\",\"to\":\"\",\"off\":\"1\"}",
        "{\"from\":\"02:00 pm\",\"to\":\"11:30 pm\",\"off\":\"0\"}",
        "{\"from\":\"02:00 pm\",\"to\":\"11:30 pm\",\"off\":\"0\"}"
    ],
    "open_now": false,
    "working_hours_info": "opens  Friday 02:00 pm"
}
Response Parameters
| Name | Description |
|---|---|
| code | The store code. |
| assign_type | Can be either "all_products", “condition” or "specific_products". |
| apply_by_cron | Can be true only for the "condition" assign_type. |
| name | The name of the store visible on the frontend. |
| description | Supports HTML tags. |
| is_active | true for the enabled stores, false for the disabled ones. |
| order | The sort order of the store. The smaller the number value here, the higher the store will be shown in the list. |
| image_path | The relative file path from the base location of the uploaded store images which is /pub/media/mageworx/locations. Note that the images are stocked into 2 subsequent folders created by the first two letters of the image. Example: image01.png should be uploaded to the /pub/media/mageworx/locations/i/m/image01.png. |
| country | The name of the country, check this document for the correct country name. |
| country_id | The ID of the country, check this document for the correct country ID. |
| region | The name of the region that can be found in this document. |
| city | The city name where the store is located. |
| address | The real address of the store. Check the name on the Google Maps to avoid any ambiguity. |
The instagram account of the store. You can use @ before the instagram account name. |
|
The facebook account of the store, use "https://www.facebook.com/store_name". |
|
| latitude | The exact latitude. Check the Google Maps for this information. |
| longitude | The exact longitude. Check the Google Maps for this information |
| store_ids | The default value is [0] for all store views; comma-separated IDs for multiple values: [2,5]. |
| product_skus | Is populated only for the "specific_products" assign_type. Comma-separated SKUs for multiple values: [24-MB01,24-MB02]. |
| working_hours_type | Can be either "everyday" or "per_day_of_week". |
| working_hours | This block starts from Sunday til Saturday. \"off\":\"0\" used for the working day, \"off\":\"1\" for the day-off. |
| open_now | Checks whether the store is opened (true) or closed (closed). |
| working_hours_info | Shows the next time (day of the week and time of the day) the store will be opened. |
In this chart, we haven't mentioned some parameters with the apparent values: postcode, email, phone_number, website_url, skype and whatsapp. The required fields are bold. If some non-required parameter of the store is not populated (in this sample response such as skype, whatsapp, etc.), their value is null.
Create Location By Code
The method needs the admin authorization token. It creates a new store.
Request Format
api
POST /V1/mwlocations/create
Request JSON Example
The store creation requires some parameters to be populated. The description of these parameters can be shown above. The minimum data for the store creation is:
json
{
   "location": {
        "code": "newstorecode",
        "name": "Store Imported Via API",
        "store_ids": "0",
        "country_id": "US",
        "region": "Illinois",
        "city": "Chicago",
        "address": "1410 S Museum Campus Drive",
        "postcode": "12345"
   }
}
You can add any other non-required parameter from the grid provided above.
Response JSON example
json hl_lines="2 5 11 12 13 14 15 25 26 27"
{
    "code": "newstorecode",
    "assign_type": "all_products",
    "apply_by_cron": null,
    "name": "Store Imported Via API",
    "description": null,
    "is_active": true,
    "order": null,
    "image_path": "",
    "country": "United States",
    "country_id": "US",
    "region": "Illinois",
    "city": "Chicago",
    "address": "1410 S Museum Campus Drive",
    "postcode": "12345",
    "email": null,
    "phone_number": null,
    "website_url": null,
    "skype": null,
    "whatsapp": null,
    "instagram": null,
    "facebook": null,
    "latitude": null,
    "longitude": null,
    "store_ids": [
        "0"
    ],
    "product_skus": [],
    "working_hours_type": null,
    "working_hours": [],
    "open_now": false,
    "working_hours_info": ""
}
Any non-required parameter of the store that wasn't mentioned in the request has the null value.
The default value of the assign_type parameter is all_products.
The current version of the API doesn't allow editing the working_hours parameter.
The open_now and working_hours_info are used for the information only and cannot be populated as well.
Update Location By Code
The method needs the admin authorization token. It allows changing the store parameters from the store code.
Request Format
api
POST /V1/mwlocations/update/{store_code}
Example:
api
GET /V1/mwlocations/update/paris_mw
Request JSON Example
You can change any parameter value from the grid provided above except the code, working_hours, open_now and working_hours_info. The structure of the JSON request is:
```json { "data": {
"is_active": false
}
} ```
In the response, you will observe that the value has been changed:
json hl_lines="7"
{
    "code": "paris_mw",
    "assign_type": "all_products",
    "apply_by_cron": false,
    "name": "Paris Store",
    "description": "<p>Our first store in EU directly in the belly of Paris</p>",
    "is_active": false,
...
...
}
Update Working Hours By Location Code
The method needs the admin authorization token. It allows updating the working hours of the locations.
Request Format
api
POST /V1/mwlocations/updateWorkingHours/{store_code}.
Request JSON Example 1
This example will show you how to specify the working hours by the days of the week. The structure of the JSON request is:
json
{
   "monday": {
          "from": "1:00 am",
          "to": "10:00 pm",
          "off": 0
        },"tuesday": {
          "from": "2:00 am",
          "to": "10:00 pm",
           "off": 0
        },"wednesday": {
          "from":"3:00 am",
          "to": "10:00 pm",
           "off": 0
        },"thursday": {
          "from": "4:00 am",
          "to": "10:00 pm",
           "off": 0
        },"friday": {
          "from": "5:00 am",
          "to": "10:00 pm",
           "off": 0
        },"saturday": {
          "off": 1
        },"sunday": {
          "off": 1
        }
}
Request JSON Example 2
This example will show you how to specify the working hours for everyday. The structure of the JSON request is:
json
{
  "everyday": {
          "from": "10:00 am",
          "to": "10:00 pm",
          "off": 0
        }
}
If you specify the parameters 'everyday' and by the days of the week, the working hours for 'everyday' will be set. If any of the parameters ('from', 'to', 'off') is not set, the default values will be used:
json
"from": "1:00 am",
"to": "1:00 am",
"off": 0
Add Products To Location
The method needs the admin authorization token. It allows adding any product by SKU to the store.
Request Format
api
POST /V1/mwlocations/addProducts/{store_code}
Example:
api
GET /V1/mwlocations/addProducts/newstorecode
Request JSON Example
You can add the products to the stores with the "assign_type": "specific_products" only.
The structure of the JSON request is:
json
{
    "product_skus": "24-MB02,24-MB03"
}
In the response, you will observe that these SKUs will be added:
json hl_lines="9 10"
{
    "code": "newstorecode",
    "assign_type": "specific_products",
    "apply_by_cron": false,
    "name": "Store Imported Via API",
...
...
    "product_skus": [
        "24-MB02",
        "24-MB03",
        "24-MB01",
        "24-MB04"
    ],
...
...
}
Delete Products From Location
The method needs the admin authorization token.
Request Format
api
POST /V1/mwlocations/deleteProducts/{store_code}
Example:
api
GET /V1/mwlocations/deleteProducts/newstorecode
Request JSON Example
You can delete the products to the stores with the "assign_type": "specific_products" only.
The structure of the JSON request is:
json
{
    "product_skus": "24-MB02,24-MB03"
}
In the response, you will observe that these SKUs will be deleted.
Delete All Old Products And Add New Ones To Location
The method needs the admin authorization token. After performing this command, all old products that were assigned to this store will be deleted, and the new ones will be added (the old products will be replaced with the new ones).
Request Format
api
POST /V1/mwlocations/updateProducts/{store_code}
Example:
api
GET /V1/mwlocations/updateProducts/newstorecode
Request JSON Example
You can replace the products to the stores with the "assign_type": "specific_products" only.
The structure of the JSON request is:
json
{
    "product_skus": "24-MB02,24-MB03"
}
In the response, you will observe that all the old SKUs have been deleted and only those added in the request have been added:
json hl_lines="9 10"
{
    "code": "newstorecode",
    "assign_type": "specific_products",
    "apply_by_cron": false,
    "name": "Store Imported Via API",
...
...
    "product_skus": [
        "24-MB02",
        "24-MB03"
    ],
...
...
}
[MSI] Create Source For Location By Location Code
Request Format
api
POST /V1/mwlocations/createSource/{store_code}
Request JSON Example
It can be empty if you do not need to transfer the products, previously added to a store, to a new inventory source. Possible parameter: "is_transfer_products" - 1 / 0
json
{
    "is_transfer_products": 1
}
Response JSON Example
The response will contain a code of created inventory source:
json
"paris_store"
Note
If you previously assigned specific products to a store and then decide to create a new inventory source for this store, you can easily transfer all previously selected products to this new souce by adding "is_transfer_products": 1 parameter.
[MSI] Assign Source to Location (store)
This API request allows you to assign a location to one of existing inventory sources or to create a new source as well.
Request Format
api
POST /V1/mwlocations/assignSource/{store_code}
Request JSON Example
Expected parameter: 'source_code' (string)
json
{
    "sourceCode" : "paris_store"
}
Response JSON Example
The response will contain a code of assigned inventory source. If something goes wrong, the response will be empty or contain a different source code:
json
"paris_store"
Note
Use 'create_new_source' as 'source_code' to create a new source for a location and "is_transfer_products": 1 parameter to transfer products previously selected products to this new source.
Themes compatibility
The extension is compatible with Magento 2 Luma, Porto and Ultimo themes by default. If you have any issues with compatibility with any other 3rd party themes, please drop us a line and we will be happy to assist.
Got Questions?
MageWorx offers FREE lifetime support and updates for any extension developed for Magento. Need help with the extensions? Feel free submit a ticket from our Support page.
MageWorx offers outstanding services developing custom-tailored solutions for Magento platform to attain your eCommerce objectives. Our professional impassioned team provides profound and custom oriented development of your project in a short timeframe.