Magento 2 Popup Widget Manual
The extension is developed by a MageWorx partner.
Introduction
Magento Popup Widget extension allows the store owner to create any type, shape, size of pop-ups in the right place at the right time. It allows to gather visitors’ email addresses, inform customers about special deals, attract web traffic, i.e. use popups as an effective conversion channel.
Such widgets can be used for coupon and email subscriptions, product lists, popular offerings, and other types of dynamic content.
The popups can have their own design that fully correspond the store owner website’s look, feel and business requirements.
Requirements and Installation
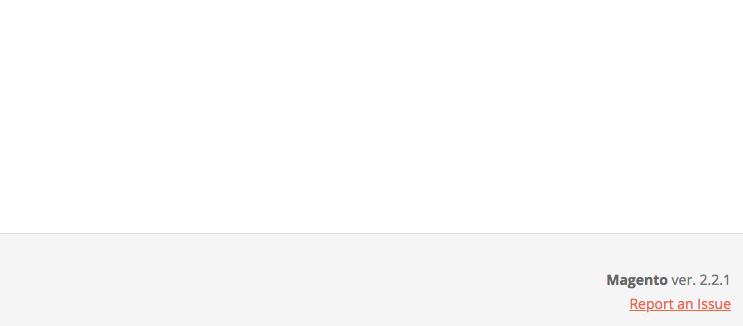
Popup Widget supports both Community and Enterprise edition of Magento starting from version 2.1. The current version of the Magento installed on your website can be found in the lower right corner of any backend page.
To install the extension, follow these steps:
-
Download the extension's package from your customer account, unzip it.
-
Use any SSH client to connect to your server. Bear in mind that the user should write permissions to this folder and its subfolders.
-
Upload all the files and folders from the extension's package to the root Magento folder.
-
Via SSH, navigate to the root Magento folder and perform the command:
php bin/magento module:enable Magebird_Popup -
Clear the compiled code and cache:
php bin/magento setup:upgrade
php bin/magento cache:flush
php bin/magento setup:static-content:deploy
Popup Management
To view, edit and add the popups, go to Conent ⟶ Magebird Popup
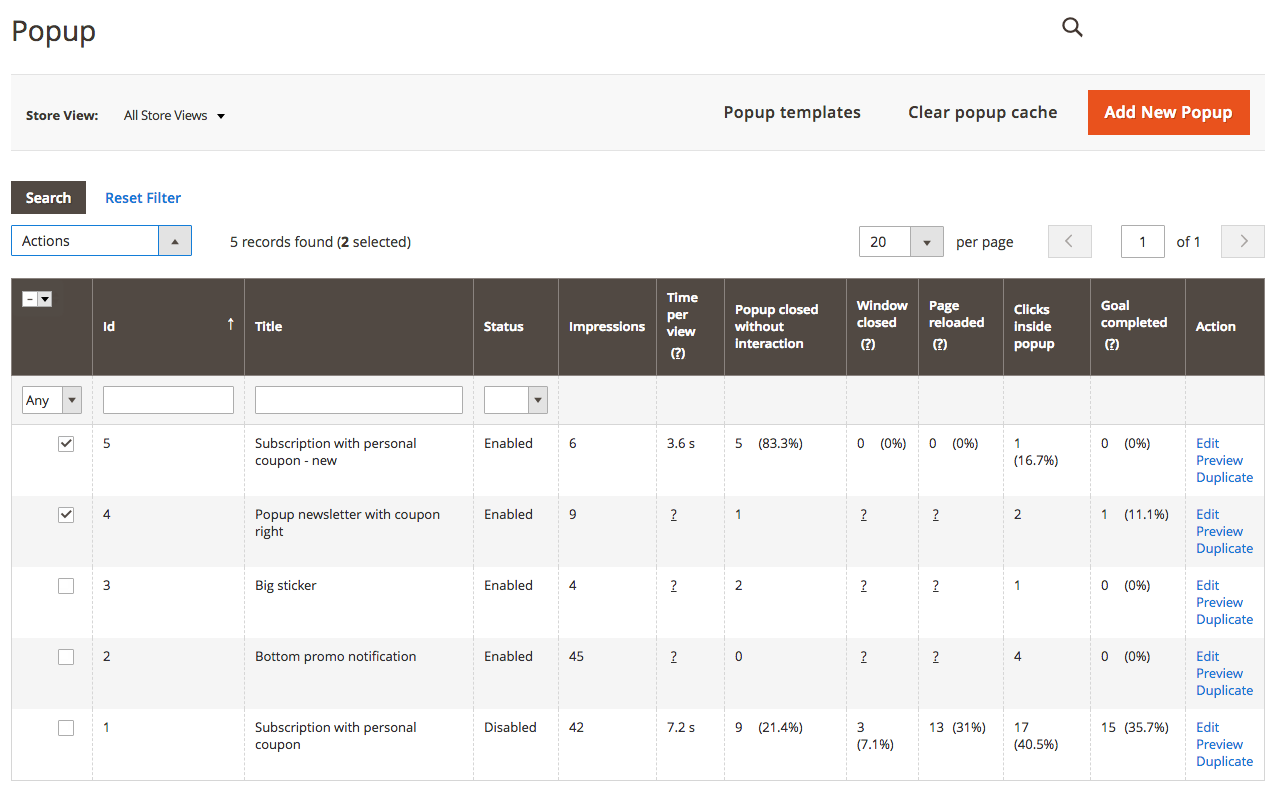
Please note that during the initial setup this grid will be empty.
The columns can be sorted alphabetically by clicking the column title.
The grid supports mass actions. For this, click the checkboxes near the pop ups that you wish to modify and click the Edit link on the Actions dropdown. When done, click the Save Edits button to proceed.
The grid displays various kinds of popup statistics that can be used for analyzing the effectiveness of your marketing campaigns.
To create a new popup, the user can either create it from scratch or to use one of the 69 pre-defined templates. The difference is that if the store owner decides to use some template, the configuration of the popup will be already populated, while creating the new one means that all the configuration should be done manually.
• To create the new popup from scratch, click the Add New Popup button. This leads to the Popup Configuration workspace
• To use the templates, click the Popup templates to choose the appropriate one from the list of 69 templates.
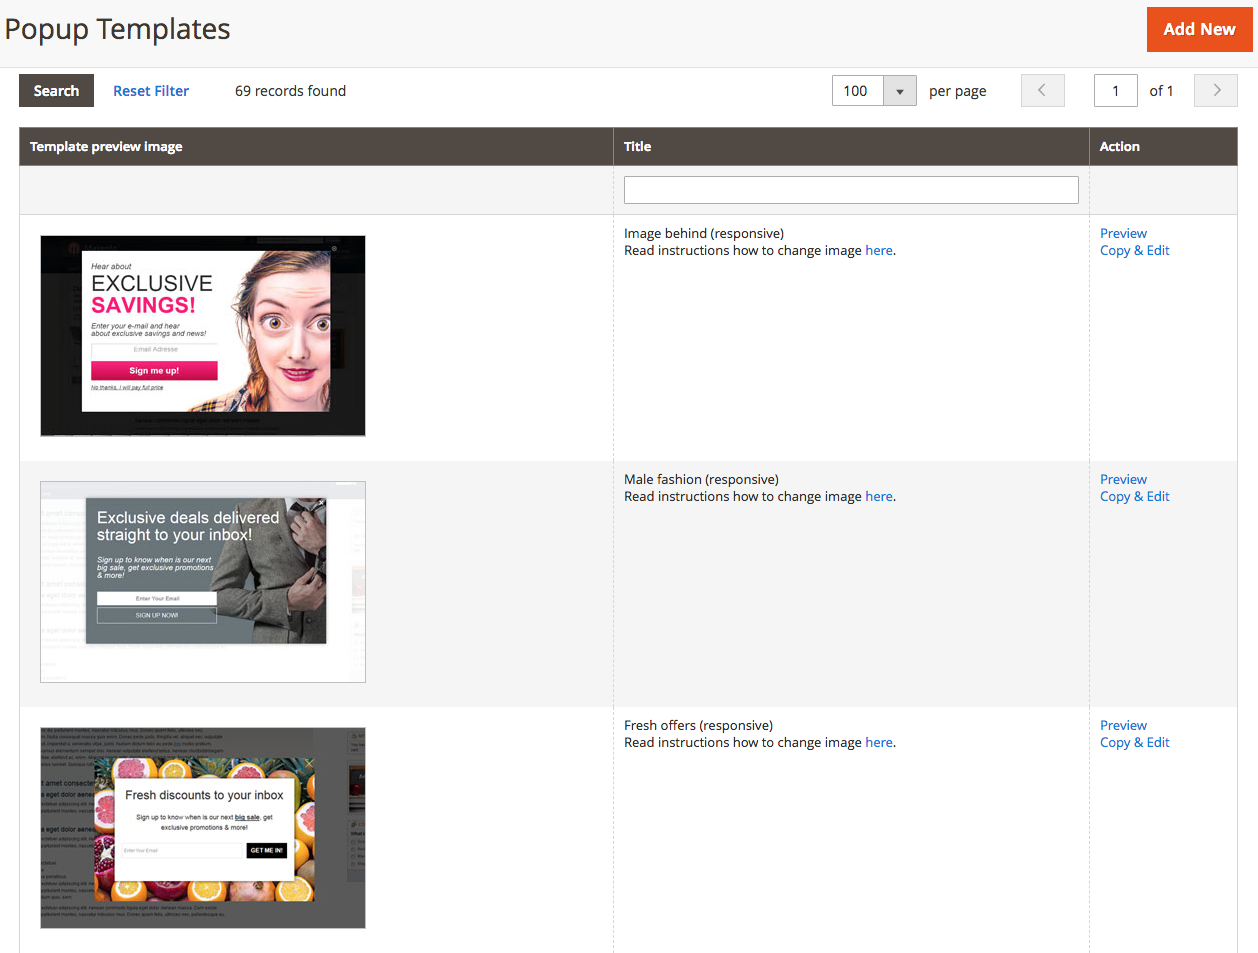
The Preview button shows the sample of the image on the frontend.
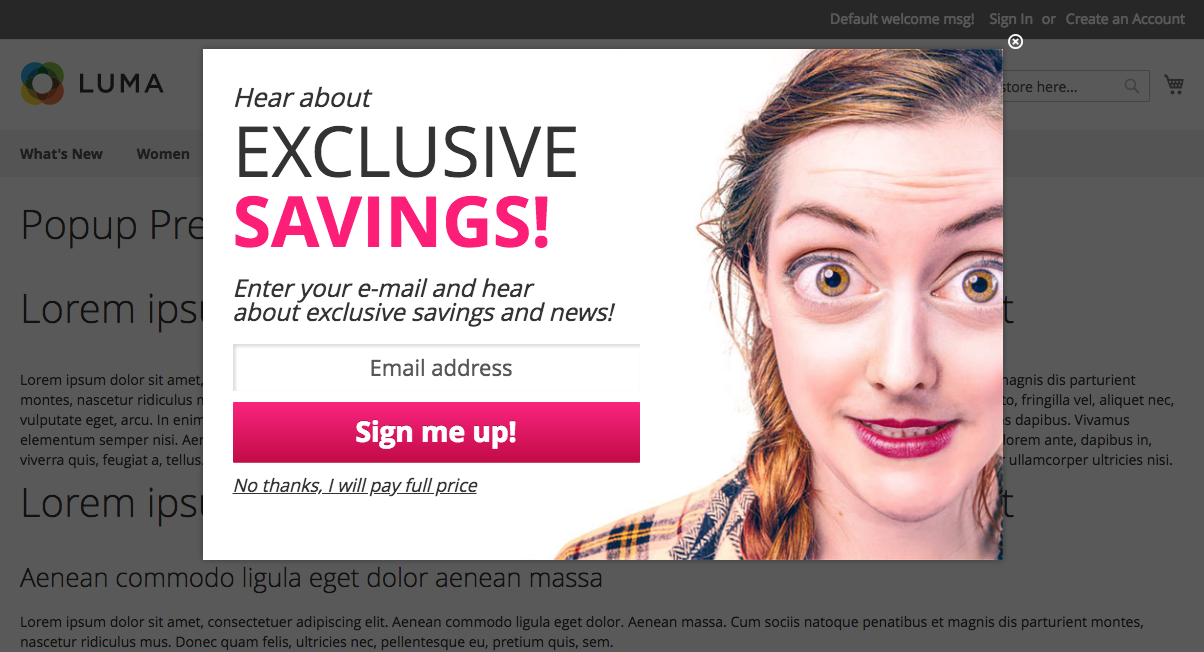
The sample of the popup.
The Copy & Edit link on the popup templates grid sends the store owner to Popup Configuration workspace.
Popup Configuration
The configuration workspace of the popup consists of 6 tabs: Popup Information, Settings, Position, Appearance, Conditions and Cart Conditions.
Popup Information
Under these settings, it’s possible to to set up the following.
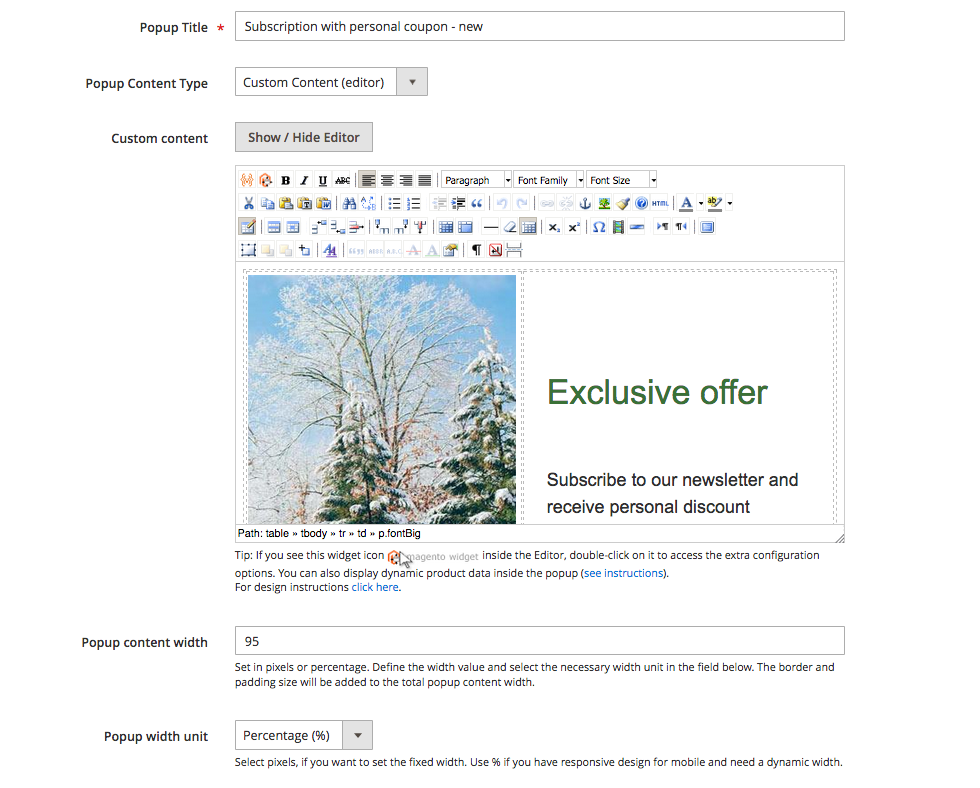
The Popup Title is the technical name for this popup that will be shown only in the backend.
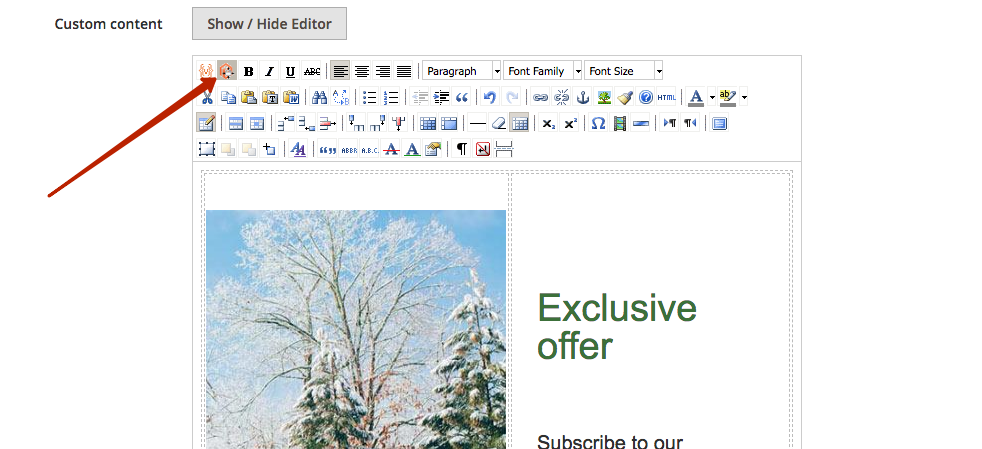
The Popup Content Type can be either Custom Content for the WYSIWYG-editor or Image for the simple file upload.
The Popup content width provides the ability to select the width of the popup. If the Popup width unit is set to Percentage, then it is regarded as amount in percents of the screen, otherwise it is regarded as the number of pixels.
The store owner can set the Popup content max width (in px) so that the popup won't get too big.
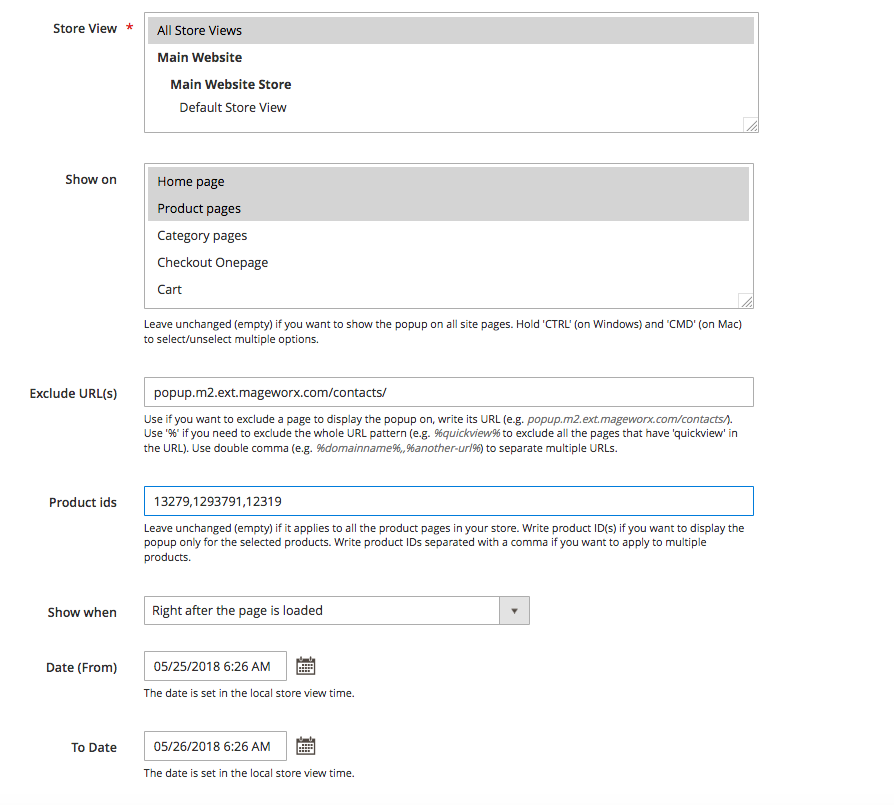
The store owner can select the desired Store View, the Pages where the popup will be shown and Exclude URLs according to their marketing goals.
The Show When feature provides a bunch of possible options to set up popup display. Your message can be shown:
-
After page is loaded;
-
Some seconds after page is loaded;
-
Some seconds spent on the entire site;
-
Some seconds after the 1st item added to cart;
-
After a set number of scrolls;
-
Upon the click;
-
Upon the hover;
-
When the user intends to exit a website (the mouse leaves browser window).
The From Date and To Date provides the ability to demonstrate the popup during the set time intervals.
Settings
The Settings section stores the configuration popup setup.
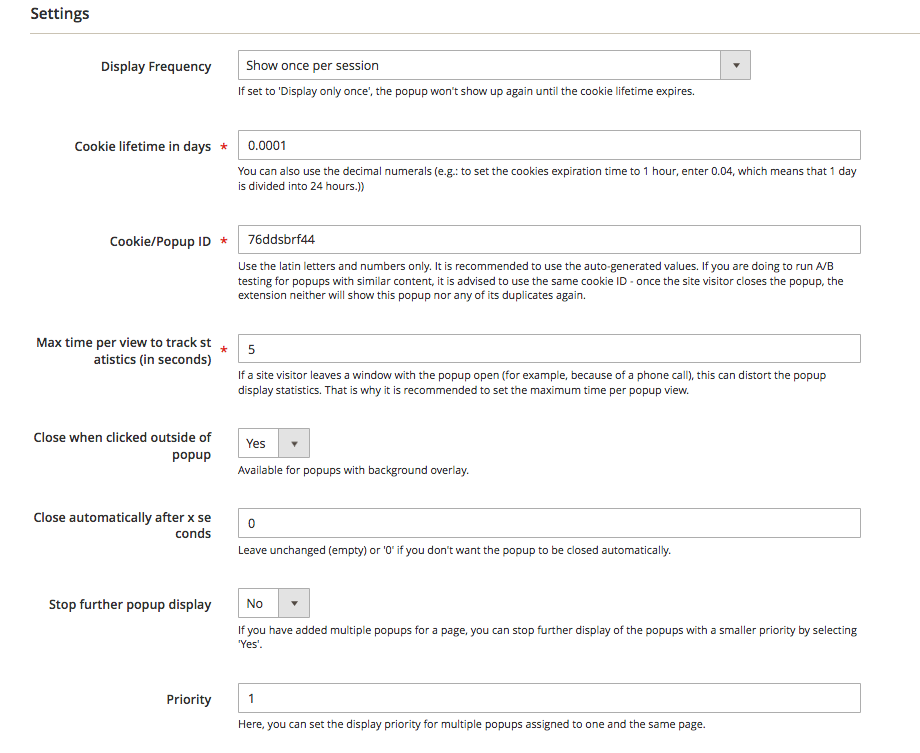
The Display Frequency lets you set the number of times the popup is shown to the customer.
The Cookie lifetime in days specifies the cookie expiration time. First of all, it displays the period when the cookie can be stored in the browser if "Display Frequency" was set to any periodicity that is other than Show every time. Be aware that changing cookie/popup id will force to show popup once again to the visitors who already closed it.
The Cookie/Popup ID can be used for the A/B testing. To perform such testing, the store owner may create 2 or more popups. All these popups should have the same Cookie/Popup ID value. When 2 or more popups share the same cookie ID, the extension will show just one of them randomly. The store owner can create as many popups with the same cookie ID as needed.
The Max Time per view to track stats limits and excludes the cases when the page is opened in an inactive tab, leading to the unrepresentative values.
Other settings include the possibility to Close popup when clicked outside the popup zone, Stop Futher popups display, the store owner can specify the time whrn the popup should be Automatically Close and manage the popup Priority.
Position
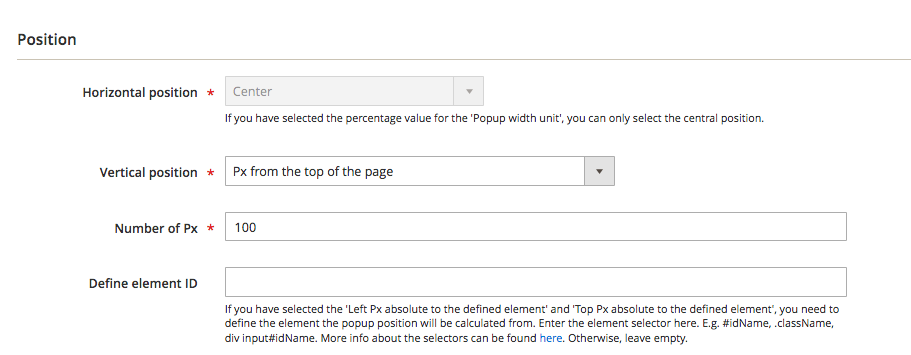
The appearance of the Horizotal Position setting depends on the Popup width unit. In case the Px setting is selected, the store owner can modify this configuration including the possibility to edit the position from the right, left side or from the center of the page. From here, it is possible to select some special element as the starting point (not the edge of the page), and later to Define element ID putting the element selector name.
Then, the store owner can specify the amount of the pixels to be taken into account.
Same settings can be applied for the Vertical Position. This configuration also provides the possibility to add the popup as the element that shows on the top of the page and pushes its content down.
Appearance
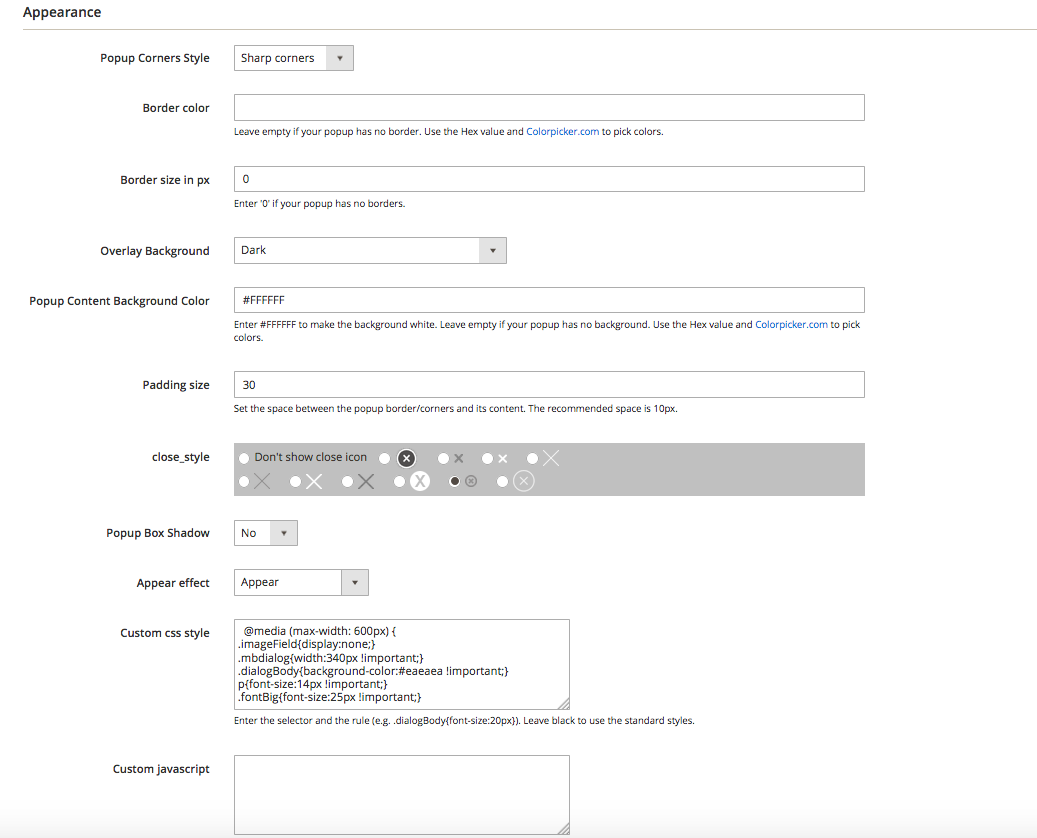
The Popup Corners Style provides the possibility to select the desired design for the corners of the popup.
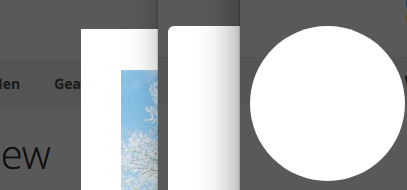
Sharp Corners, Rounded (with the default 6px radius) and Circle Popup
The store owner can select the desired Border color (in hex format) and Border size in px, Popup Background Color (in hex format as well) and Padding Size.
The close_style setting allows to select the ✕ - mark that closes the popup. Below, the store owner can decide, whether to show the shadows for the popup box or not and the animation for the Appear effect.
Conditions
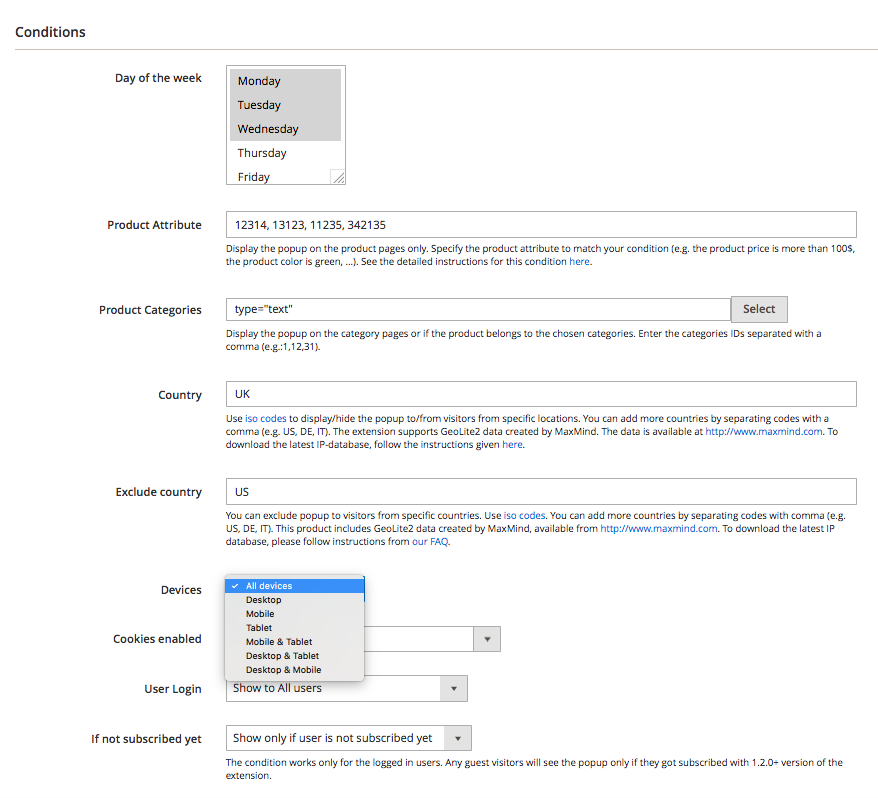
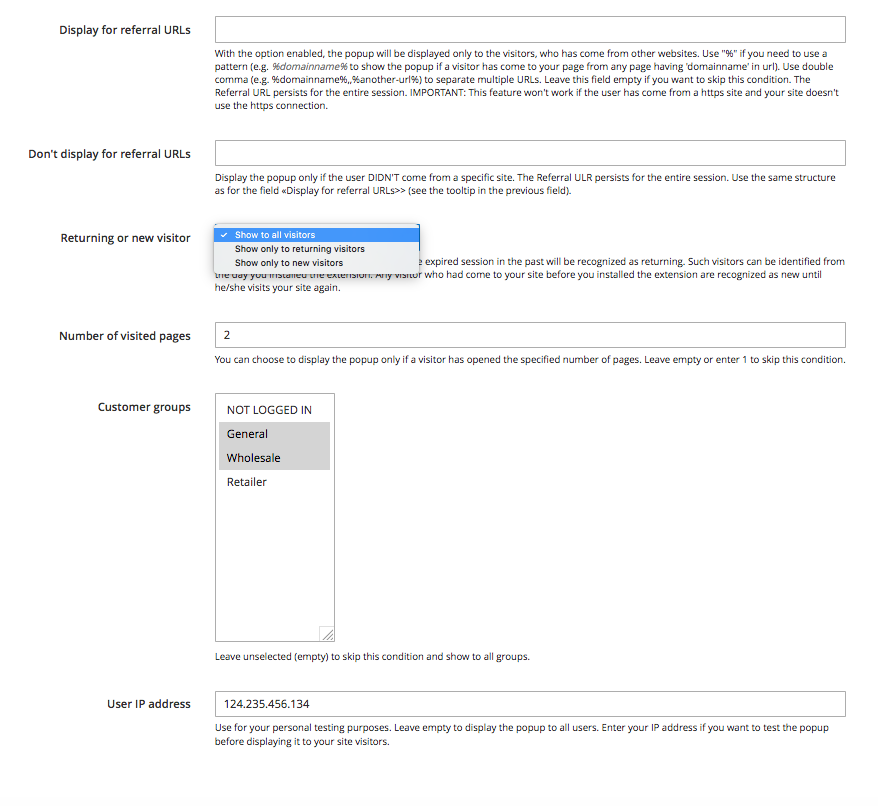
From here, the conditions can be set up to specify the popup display options. You can specify the Day of the week when the popup is shown, the product attribute configuration, the Product Categories where the popup should be shown, the possibility to show the popup only for the customers from some Country or not to show the popup for specific countries.
The Devices configuration provides the possibility to select whether to show the popup to the users who opened the website from Desktop Browser, via Mobile or Tablet.
The User Login may allow to skip the popup appearance for the unregistered users, this setting can be further limited in the setting that shows the popup only if the user is still not subscribed to the mailing lists.
The Customer Group setting provides the possibility to limit popup display to certain audiences (groups of customers).
The User IP address setting is designed for testing purposes. Leaving this field empty will show the popup to all users. If the store owner needs to test something, it is possible to input some particular IP where the popup will be shown.
Cart conditions
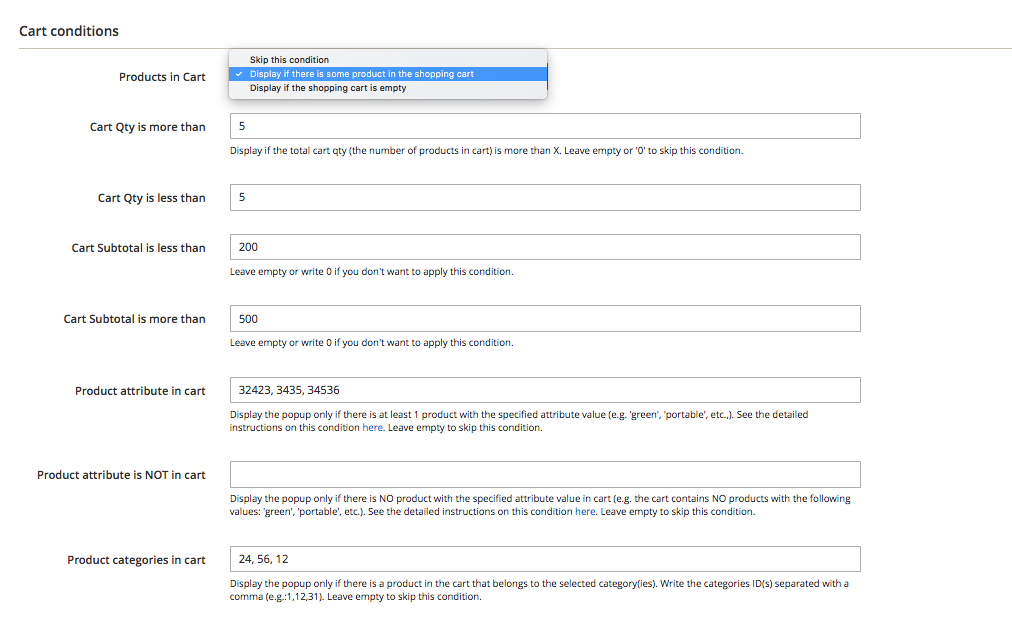
These conditions settings lets you define popup display if certain requirements are met in the cart (e.g the set Cart Qty, Cart Subtotal, selected Product Attributes and Product Categories).
Popup Widgets
The extension provides a number of widgets that are possible to be put inside the popup. The store owner can add the widget by clicking the Magento button on the Custom Content block of the Popup Configuration
Magebird Popup Button
When the user selects the Magebird Popup Button widget, the main extension’s settings appear.
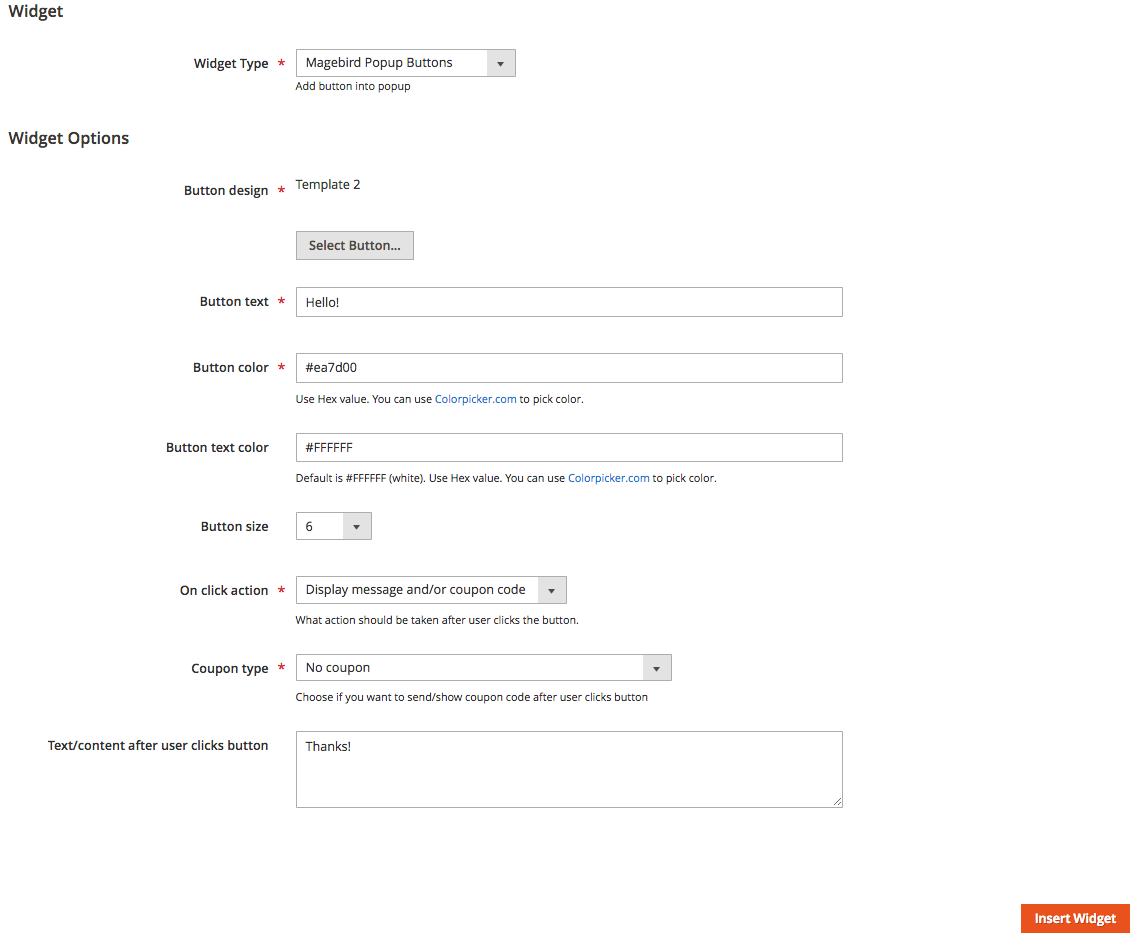
Button Design provides several templates of the button shape to choose from.
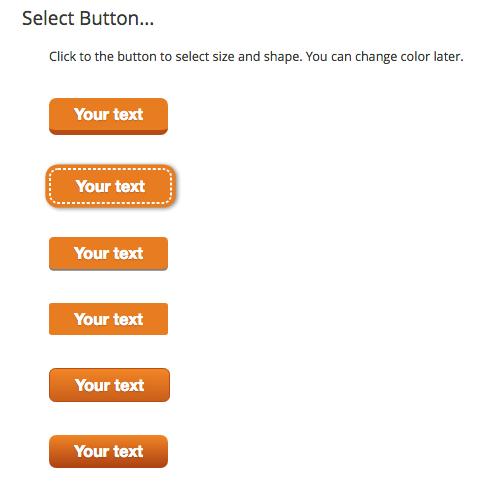
To apply the desired button shape, just select it from the list.
At the next step, the store owner can specify the Button text, colors for both the button and the text and the Button Size.
The On click action provides the possibility to display some coupon code, redirect the page to some URL, or simply close the popup. The coupons can be either autogenerated or static. To implement the coupons campaign via popups, the store owner needs to tie up the coupons generated in Magento with this extension. First of all, it’s necessary to generate a required amount of coupons. To do this, one can use Magento 2 Cart Price Rules. Second, the store owner should select the cart price rule with the popup. To do it, one needs to select the the rule ID in the Shopping Cart Price Rule ID dropdown.

From here, the store owner can edit the coupon configuration.
The setup of the Magebird Popup Button offers the possibility to edit the text that appears after the user clicks the button. To display a coupon code here, the {{var coupon_code}} variable can be used. The example is: Your coupon is: {{var coupon_code}}.
This field supports HTML code
Magebird Popup Newsletter
When the user selects the Magebird Popup Newsletter widget, the settings appear.
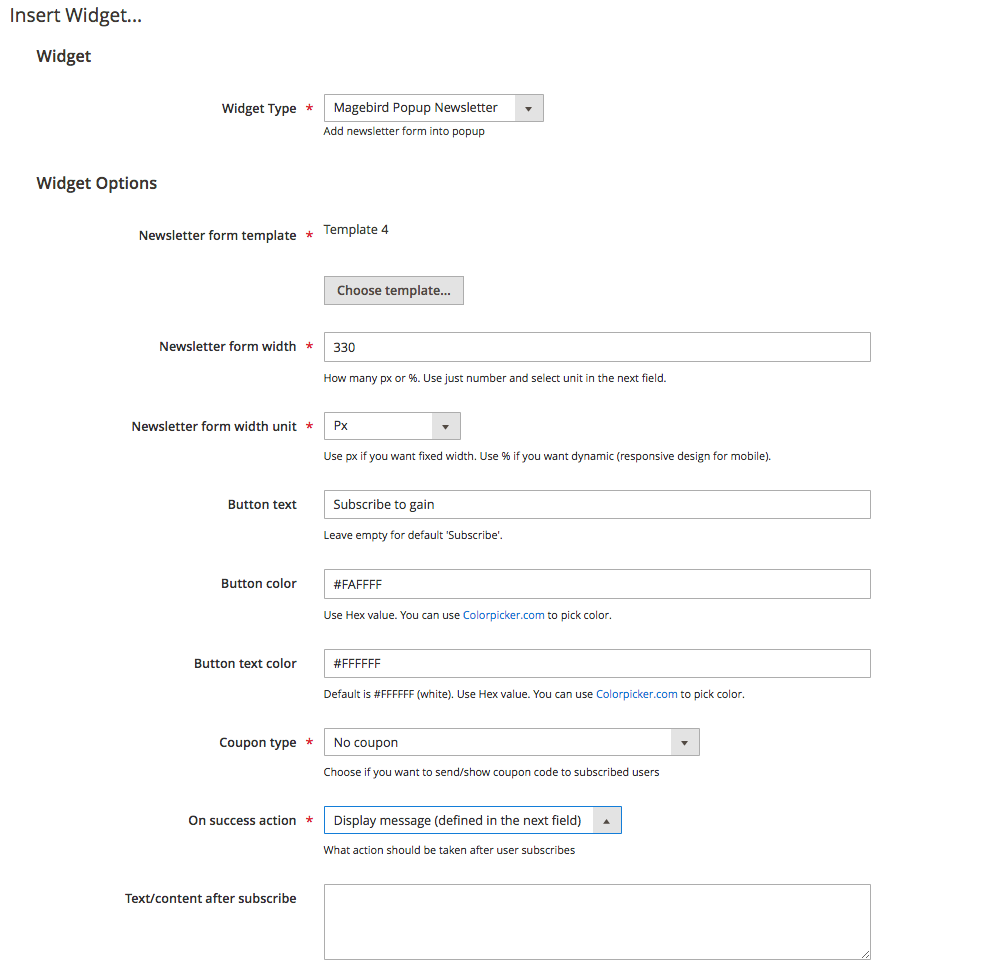
The Newsletter Form Template provides several templates of the widget to choose from.
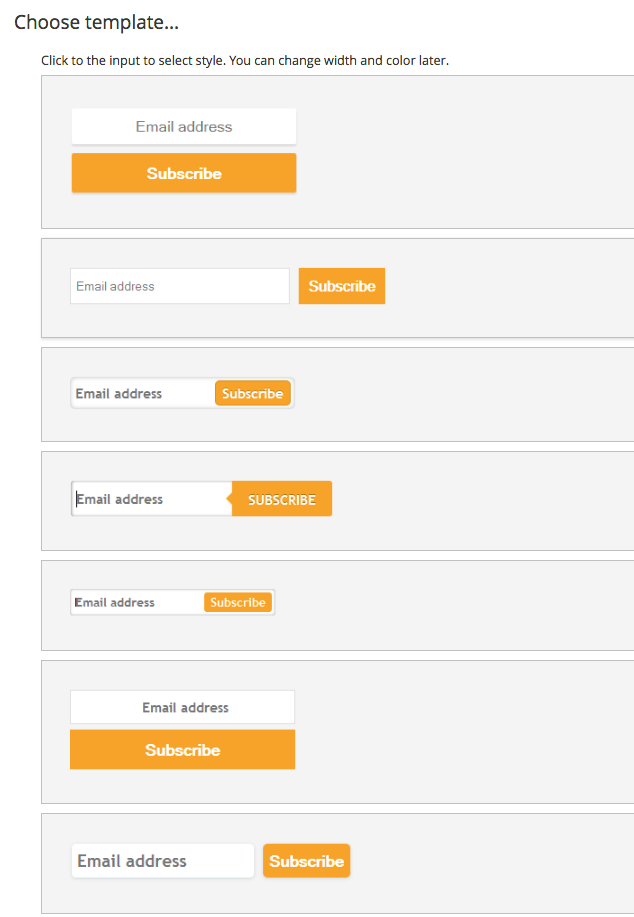
Click the desired template to select the subscription form look-and-feel.
After that the store owner can specify the Newsletter Form width, Button text, colors for both the button and the text.
The Coupon Type provides the possibility to display some coupon code. The coupons can be either dynamic (autogenerated) or static. To implement the coupons campaing via popups, the store owner needs to tie up the coupons generated in Magento with this extension. First of all, it’s necessary to generate a required amount of coupons. To do this, one can use Magento 2 Cart Price Rules. Second, the store owner should select the cart price rule with the popup. To do it, one needs to select the the rule ID in the Shopping Cart Price Rule ID dropdown.

From here, the store owner can also set up the coupon configuration.
The setup of the Magebird Popup Newsletter offers the possibility to edit the text that appears after the user subscribes. To display coupon code here, the {{var coupon_code}} variable can be used. The example is: Your coupon is: {{var coupon_code}}.
Popup Countdown Timer
When the user selects the Popup Countdown Timer widget, the settings appear.
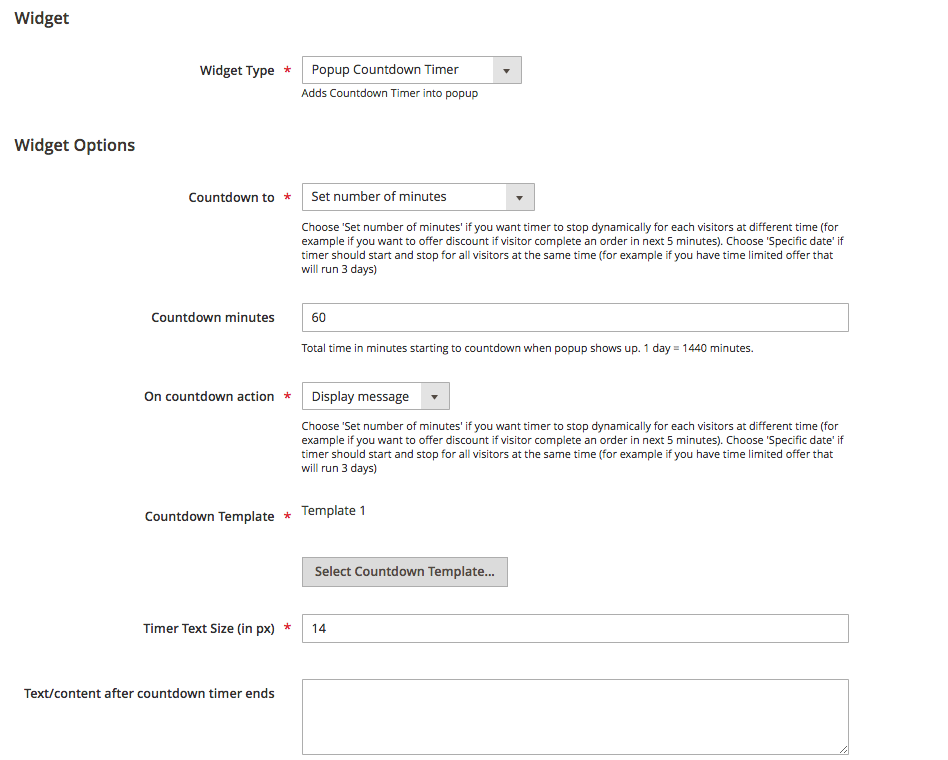
The Countdown to configuration provides the possibility to set the desired number of minutes, end date or take the same settings from another timer. The On countdown action configuration allows either to close the popup or to display some message. The Countdown Template provides several templates of the widget to choose from.
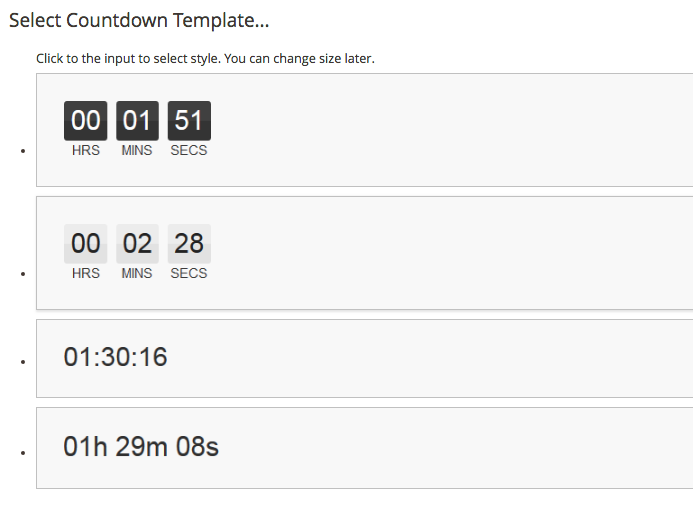
Click the desired countdown timer shape to select this template.
The setup of the Popup Countdown Timer has the possibility to edit the text that appears after the countdown timer ends. To display coupon code here, the {{var coupon_code}} variable can be used. The example is: Your coupon is: {{var coupon_code}}.
Extension Configuration
Extension's configuration can be found in STORES ⟶ Configuration ⟶ MAGEBIRD EXTENSIONS ⟶ Popup.
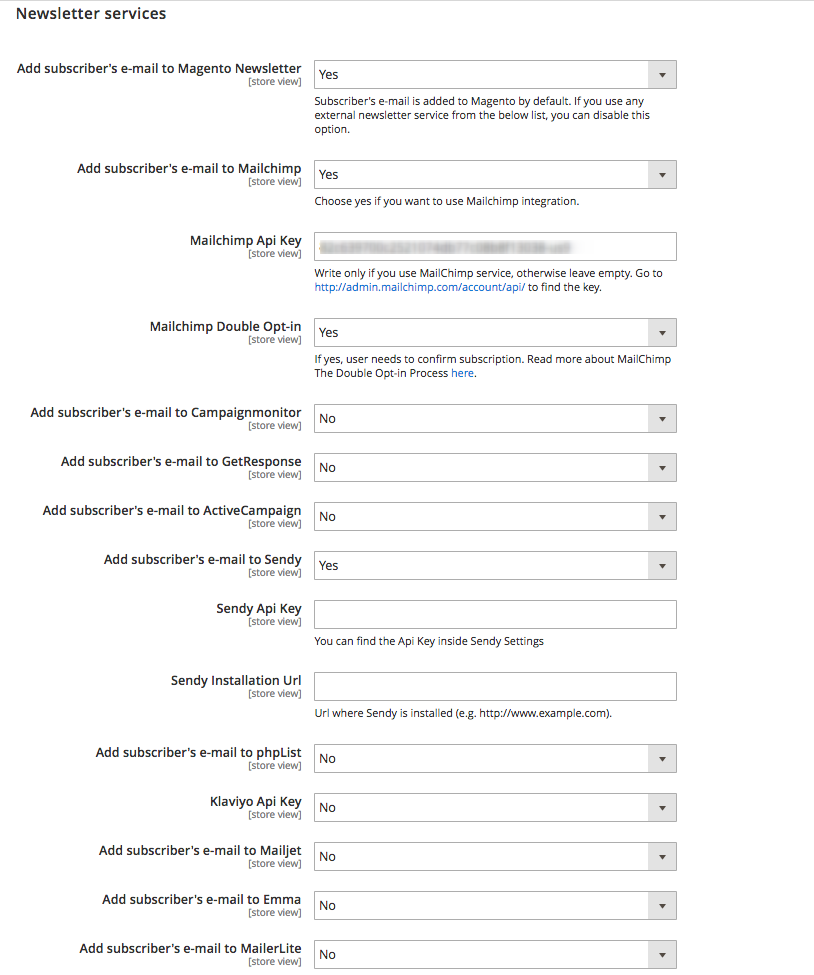
The configuration provides the possibility to add subscriber's e-mail to default Magento Newsletter or use a bunch of popular marketing platforms. To gain the compatibility with the third-party platforms the store owner should know the API key that can be found in the configuration sections of the corresponding software.
Got Questions?
MageWorx offers FREE lifetime support and updates for any extension developed for Magento. Need help with the extensions? Feel free submit a ticket from https://www.mageworx.com/support/
MageWorx offers outstanding services developing custom-tailored solutions for Magento platform to attain your eCommerce objectives. Our professional impassioned team provides profound and custom oriented development of your project in a short timeframe.