How to install Magento 2 extension
Installation via composer from Mageworx repository
Our Magento 2 extensions can be installed and updated from our repository using the access keys created in your account on our store. For more details, please check the guide How to use the MageWorx Repository
Installation via composer from local repository
-
Create a folder anywhere on your server (preferably not in the Magento installation directory). Put the zip archive into this folder.
-
Use any SSH client to connect to your server. Navigate to the root Magento folder. Bear in mind that the user should write permissions to this folder and its subfolders.
-
Add the folder with the extension's archive as a repository. For this, run the Composer command:
sh
composer config repositories.mageworx artifact {/ABSOLUTE/PATH/TO/FOLDER}
like:
sh
composer config repositories.mageworx artifact /mageworx/extensions/zip
This command will add these lines to your
composer.jsonfile:json "mageworx": { "type": "artifact", "url": "/mageworx/extensions/zip" } -
Perform the command:
composer require mageworx/module-modulenameHow to identify the name of the module?
You need to check the
composer.jsonfile. Its' structure can be shown as:
{
    “name”: “mageworx/module-advancedproductoptions”,
    “version”: “2.9.1",
    “type”: “metapackage”,
    “require”: {
        “mageworx/module-optionbase”: “2.4.13”,
        “mageworx/module-optioninventory”: “2.4.11”,
        “mageworx/module-optiontemplates”: “2.4.11”,
        “mageworx/module-optionfeatures”: “2.4.0”,
        “mageworx/module-optiondependency”: “2.0.14”,
        “mageworx/module-optionswatches”: “2.0.7”,
        “mageworx/module-optionlink”: “2.0.2”
        }
    }
The name of the extension can be seen on the “name” string, so, e.g., in this example the name is “mageworx/module-advancedproductoptions”.
Our extensions have the different structure. Some of them consist of several submodules. The main module is called the metapackage (as shown in this example). You need to put the name of the metapackage of the extension when performing thecomposercommand -
Clear the compiled code and the cache:
sh php bin/magento setup:upgrade -
To update the extension via composer perform the command:
composer update mageworx/module-modulenameDo not forget to change the modulename with the appropriate one as described above.
This chart has the composer names for all our extensions:
| The Extension's Name | Composer Name |
|---|---|
| Advanced Product Options | mageworx/module-advancedproductoptions |
| Cross Links | mageworx/module-seocrosslinksmeta |
| Currency Auto Switcher | mageworx/module-currencymeta |
| Customer Group Prices | mageworx/module-customergrouppricesmeta |
| Custom Order Number | mageworx/module-customordernumber |
| Delivery Date | mageworx/module-deliverydate |
| Donations Suite | mageworx/module-donationsmeta |
| Extended Rich Snippets | mageworx/module-seomarkupmeta |
| Extended Sales-Orders Grid | mageworx/module-ordersgridmeta |
| File Downloads & Product Attachments | mageworx/module-downloadsmeta |
| Geo Lock | mageworx/module-geolockmeta |
| Gift Cards | mageworx/module-giftcards |
| Landing Pages | mageworx/module-landingpagesprometa |
| Layered Navigation | mageworx/module-layered-navigation-meta |
| Multi Fees | mageworx/module-multifeesmeta |
| No-contact Delivery | mageworx/module-nocontactdeliverymeta |
| Order Editor | mageworx/module-ordereditormeta |
| Order Management | mageworx/module-ordereditor |
| Others Also Bought | mageworx/module-alsoboughtmeta |
| Personal Customer Discount | mageworx/module-personalpromotionmeta |
| Prices per Customer | mageworx/module-customerpricesmeta |
| Product Countdown Timers | mageworx/module-countdowntimers |
| Reward Points | mageworx/module-rewardpointsmeta |
| Search Suite | mageworx/module-searchsuitesphinxmeta |
| SEO Meta Templates | mageworx/module-seoxtemplatesmeta |
| SEO Suite Ultimate | mageworx/module-seosuiteultimate |
| Shipping Calculator | mageworx/module-shippingcalculator |
| Shipping Suite | mageworx/module-shippingrulesmeta |
| Shop by Brands | mageworx/module-brands |
| Sitemap Suite | mageworx/module-sitemapsuitemeta |
| Social Proof & FOMO | mageworx/module-socialproof |
| Store and Currency Auto Switcher | mageworx/module-storecurrencymeta |
| Store Locator & In-store Pickup | mageworx/module-storelocatormeta |
| WAVES Crypto Payments | mageworx/module-waves-payment |
Installation via Magento Marketplace
Magento 2 provides the possibility to install the extensions via Web Setup Wizard tool in the backend. This is the main method to install the extension purchased on Magento Marketplace website. First of all, please check this article to ensure that all the minimum requitrements are met. After that please follow this guide.
-
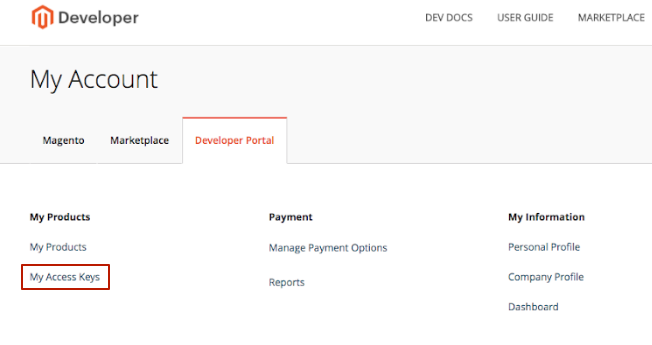
Log into your Magento Marketplace account. Click the My Access Keys link on the Developer Portal tab.
-
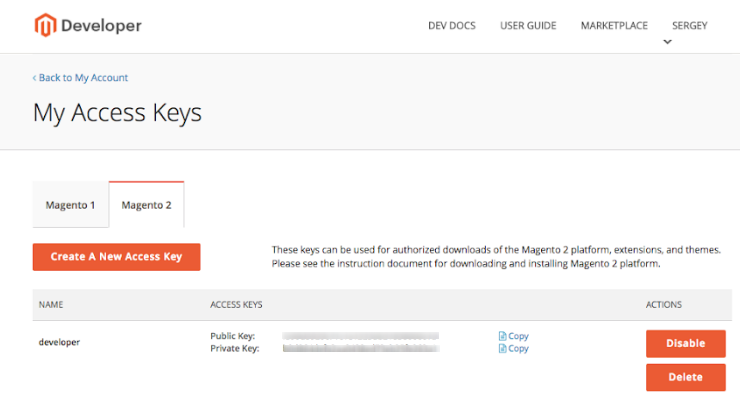
Copy both Public Key and Private Key. Note that thet are provided on the Magento 2 tab
-
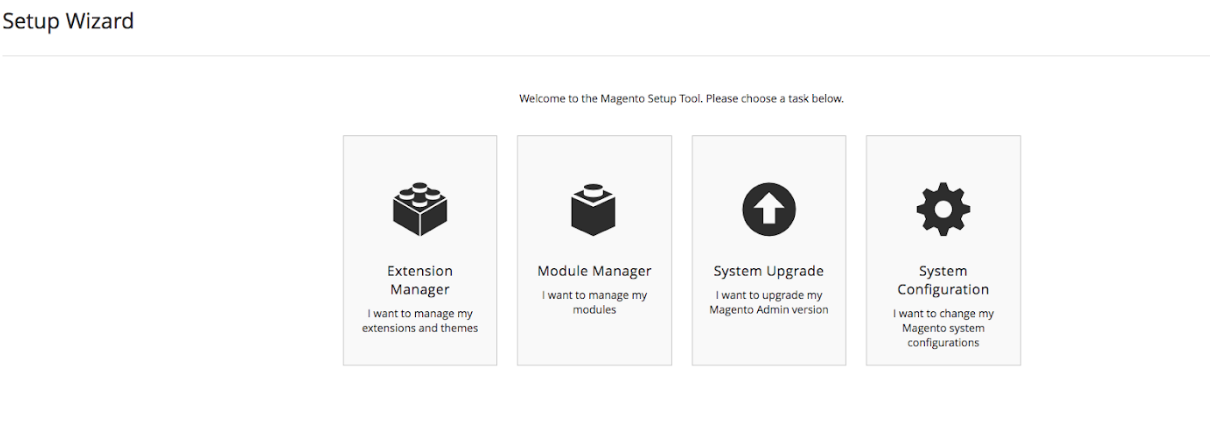
Log into the Magento backend panel and go to SYSTEM ⟶ Tools ⟶ Web Setup Wizard
-
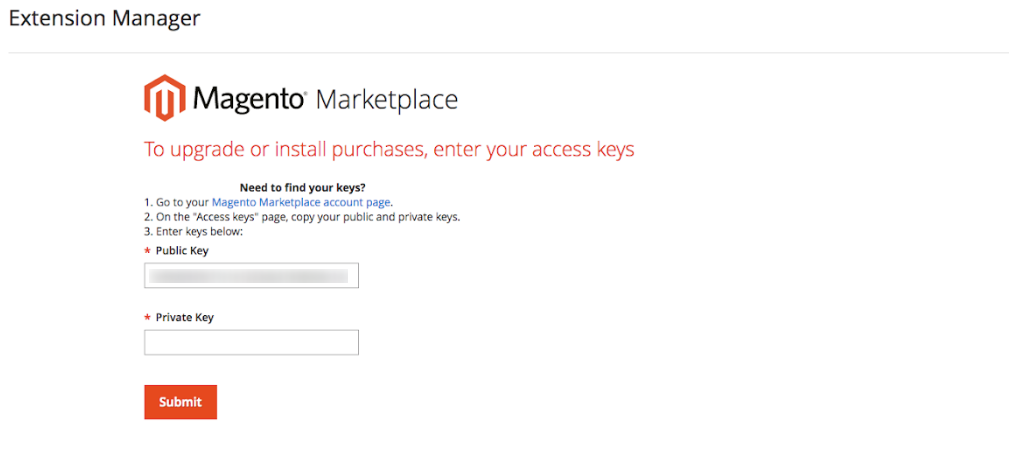
Click the Module Manager. Then, click the Sign In link in the upper-right corner. Put the Public Key and Private Key from your Marketplace account.
-
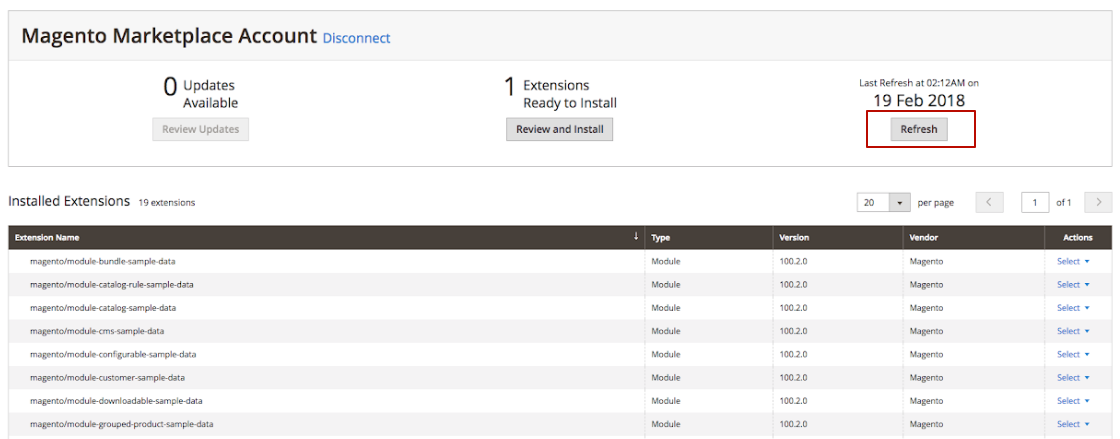
You need to synchronize your backend with the Marketplace website. For this click the Refresh button. Note that it might take a few minutes. After that you'll be able to observe the number of the purchased extensions close to the Extensions Ready to Install text.
-
Click the Review and Install button below the Extensions Ready to Install text. In the Extensions Grid, mark the checkbox of the extension you want to install. Please, always use the latest version of the extenxion (extensions). Click the Install button.
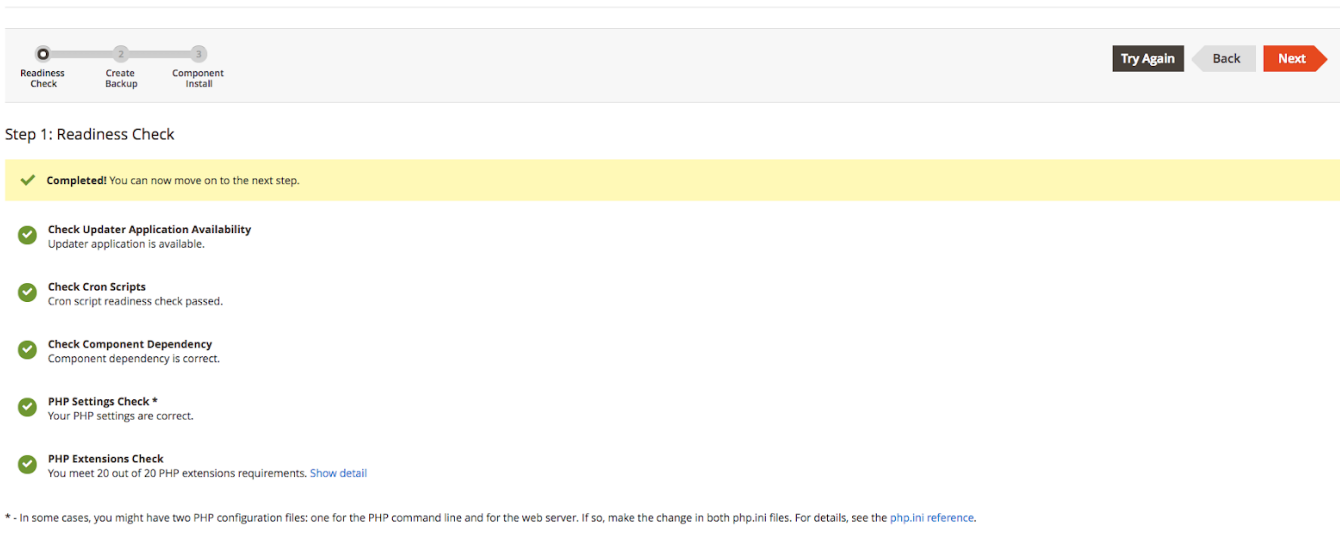
The installation process has started. - Rediness Check. The store environment is checked for compatibility. When the Readiness Check completes successfully, tap Next button. If you observe some problems here, fix them and click the Try Again button to recheck the compatibility of the Magento installation.
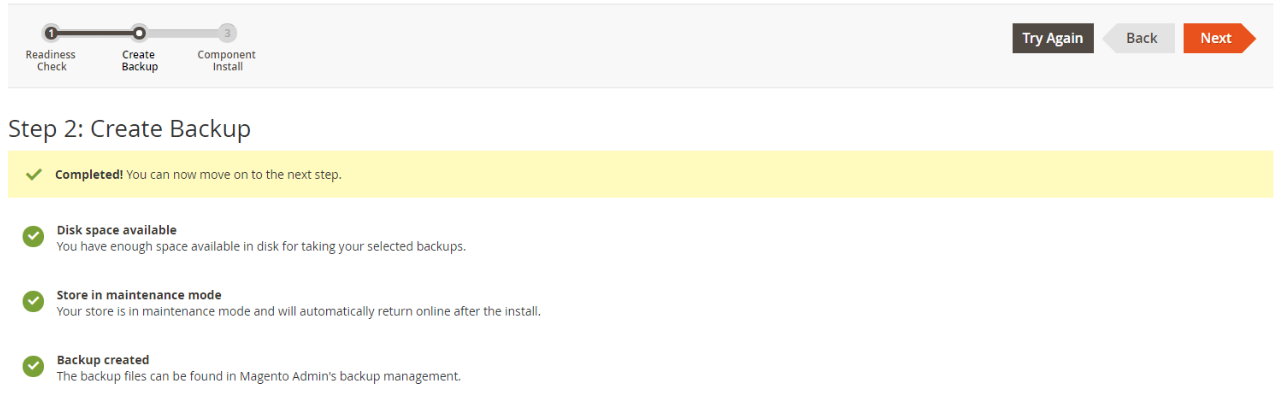
- Create Backup. By default, the backup includes the code, media, and database but you can deselect any checkbox of any item that you do not want to include in the backup. Click the Create Backup button.
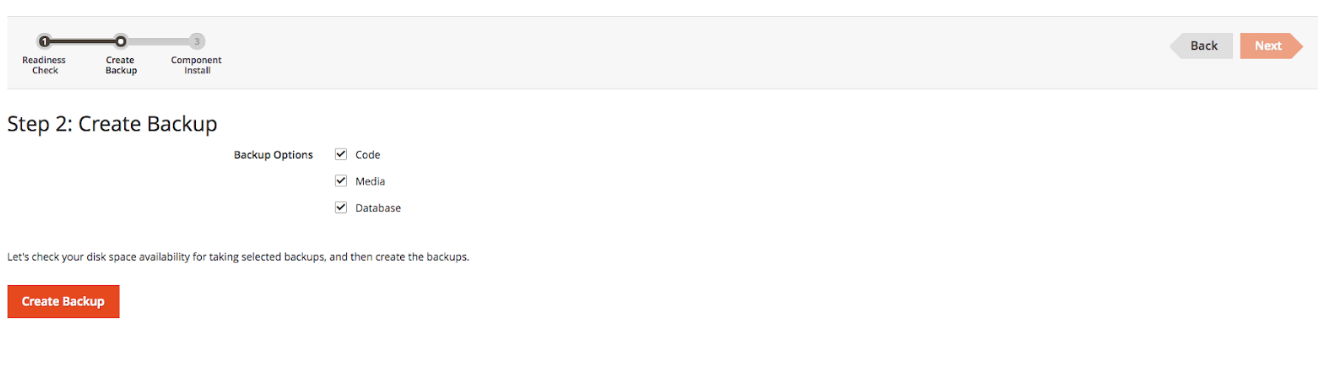 Once this operation has finished, click the Next button
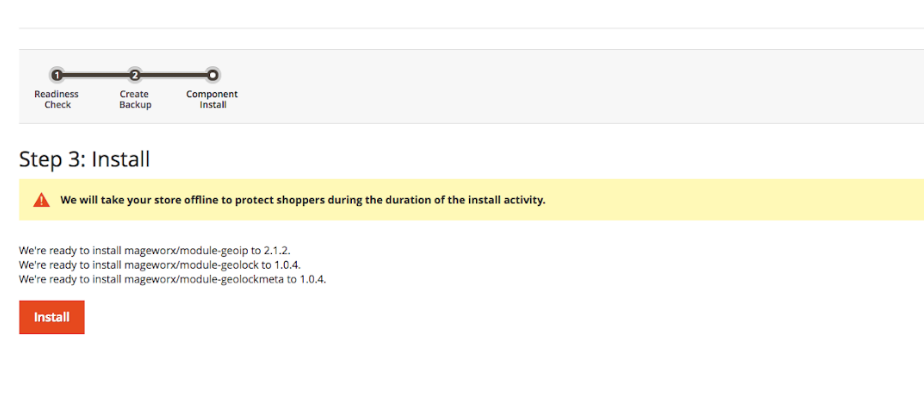
- This page shows the names and the versions of the extensions that are about to be installed. The website will be taken offline to protect your customers during the installations. Click the Install button.
- The page shows the current status, and you can track its progress in the Console Log
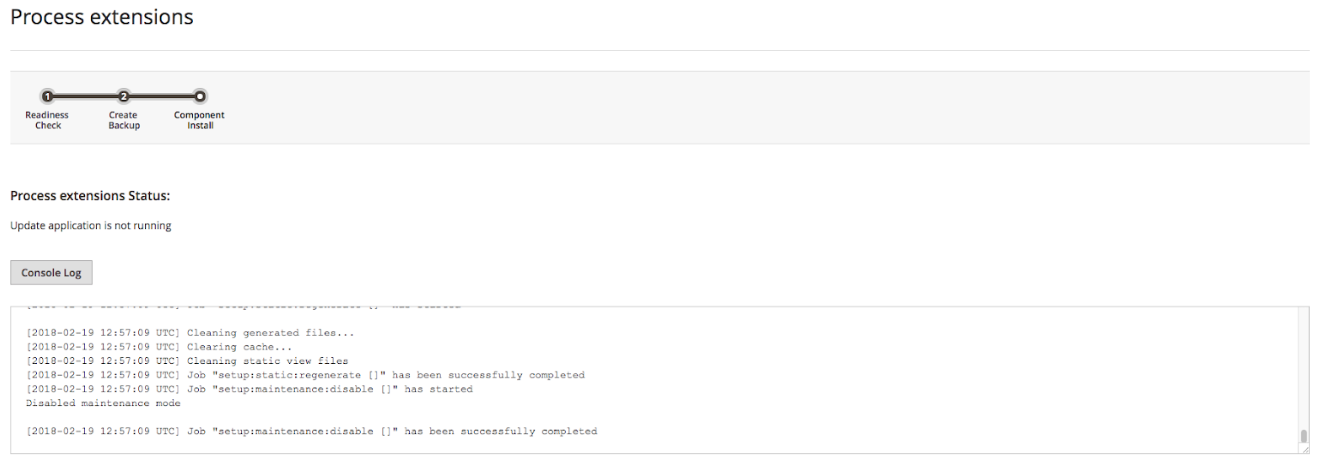 The Success page appears when the process is complete.
 - Log out and in for all the changes to take into effect. Your extension is now ready to use.
Installation by copying the code
Note
We do not recommend to use this method. Please use the installation via the composer instead.
-
Download the "Ready to Paste Package" package from your customer account, unzip it.
-
Use any SSH client to connect to your server. Bear in mind that the user should write permissions to this folder and its subfolders.
-
Upload all the files and folders from the "extension" directory to the root Magento folder (note: you should merge the uploaded folders with the existing ones).
-
Via SSH, navigate to the root Magento folder and perform the command:
php bin/magento module:enable MageWorx_ModuleNameHow to identify the name of the module?
The names of the extensions can taken from the names of the folders located in /app/code/Mageworx/ in the module's folder. Bear in mind that several folders can be seen there, in this case you need to list all of them without commas, like
php bin/magento module:enable MageWorx_SeoAll MageWorx_SeoBase MageWorx_SeoXTemplates...etc. You do not need to include the meta package in this link. The meta package has the ...Meta word in the name likeMageWorx_OrderManagementMeta. You do not need to add the extensions that were already installed. -
Clear the compiled code and cache:
php bin/magento setup:upgrade
php bin/magento cache:flush
php bin/magento setup:static-content:deploy