Magento 2 Landing Pages Manual
Introduction
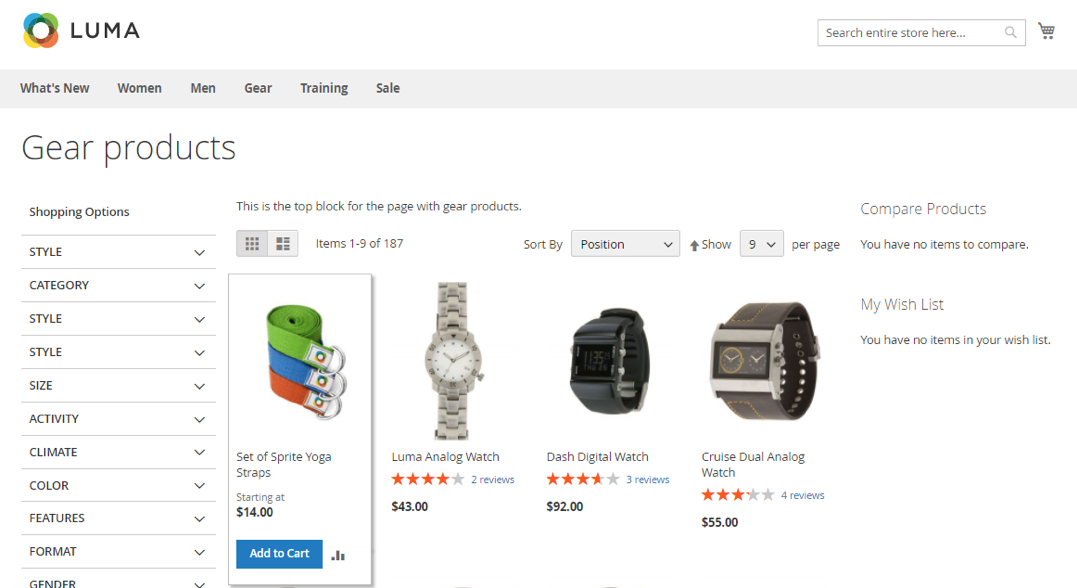
Landing Pages module allows you to design and create SEO-friendly pages for different marketing campaigns, such as AdWords, sales, seasonal promos, new products, etc.
The store owner can optimize such pages for various Store Views and define custom SEO values specifically for them.
The extension provides the possibility to customize the design of landing pages. This will include the addition of the HTML blocks, selection of the sorting order for products, and display mode.
The extension allows automating the process of the landing page creation by setting specific conditions based on SKUs, certain attributes or categories.
The module includes landing pages into the advanced MageWorx SEO Suite Ultimate extension that helps the search engines better crawl and index the newly created pages.
Requirements and Installation
Landing pages module supports Open source (Community), Commerce (Enterprise) editions and Commerce cloud. The current version of the Magento installed on your website can be found in the lower right corner of any backend page.
Landing pages extension has 3 separate ways of installation:
1) Copy the code (ready-to-paste package);
2) Use MageWorx Repository;
3) Use local Composer.
Extension Configuration
Backend Setup
The main extension’s settings can be found under STORES ⟶ Configuration ⟶ MAGEWORX ⟶ Landing Pages Pro.
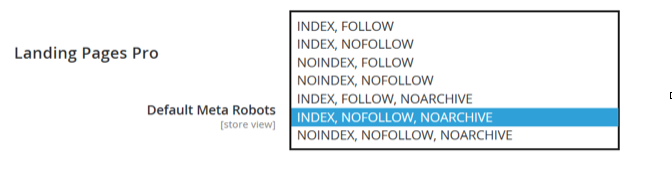
The Landing Pages extension helps you create SEO-friendly pages by placing the robots meta tag in the <head> section of a given page, which tells the search engines how this page should be treated. From here, you can set the Default Meta Robots which will be set on the new landing pages by default.
If the store owners don’t need some webpage to be cached by the web spider, they need to put the NOINDEX tag.
NOFOLLOW tag tells the Web crawler not to follow any links it finds on that page, thus hiding them from indexation. Note that if one of the mentioned pages is also linked from somewhere else (e.g., from another page), the crawler can still find and index it via that other link.
Thus, using NOFOLLOW is not the best practice to ensure that the content won’t get into the search results, NOINDEX is the best way to hide such pages. The eCommerce websites have some peculiarities over the ordinary website. The website caching may provide some irrelevant information over time.
To avoid displaying the cached version of the page, the store owners can use the NOARCHIVE tag. This tag only removes the Cached link for the page. Google will continue to index the page and display its snippet.
Manage Landing Pages
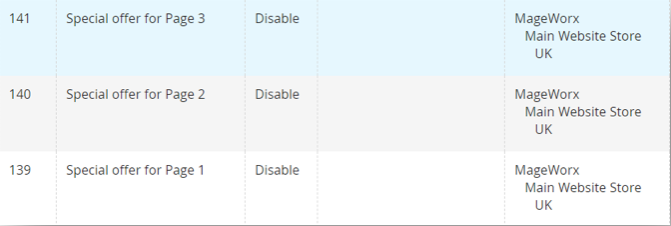
To tweak the general Landing Pages settings, log into the Magento Admin Panel and go to CONTENT ⟶ Landing Page by MageWorx ⟶ Pages.
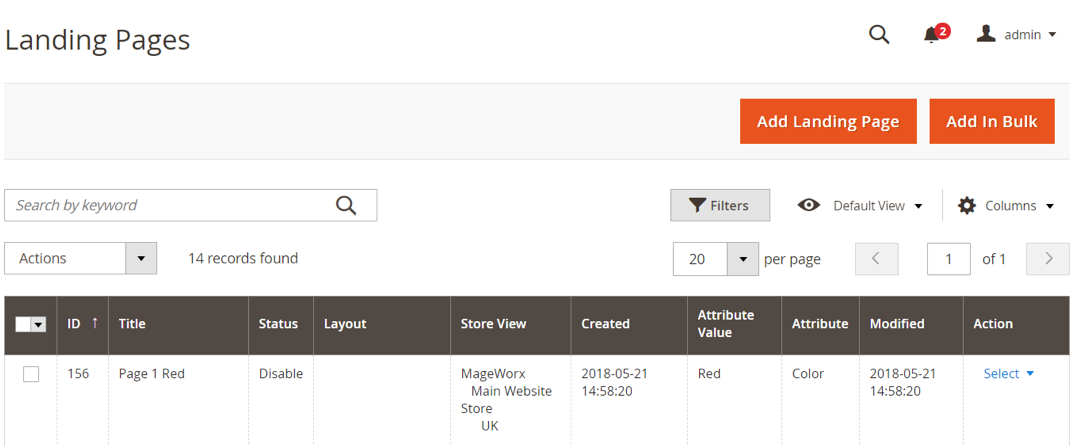
Please note that during the initial setup this grid will be empty.
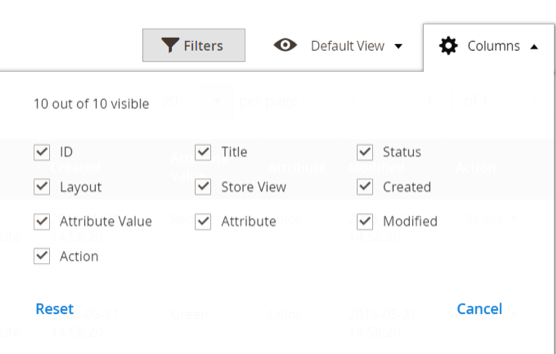
The Сolumns tab has 10 columns that can be conveniently moved in the grid. The columns include such critical values as ID, data on the status of a landing page, store view, title, layout, action, created, modified, attribute and attribute value. The columns can be sorted alphabetically by clicking the column title.
Under the grid settings, the store owner can manage all the landing pages:
-
add new ones;
-
edit the existing landing pages;
-
duplicate them;
-
select and delete the ones that are not required;
-
overview the created pages.
The Filters tab allows for using the standard Magento filters functionality to easily find the necessary landing pages.
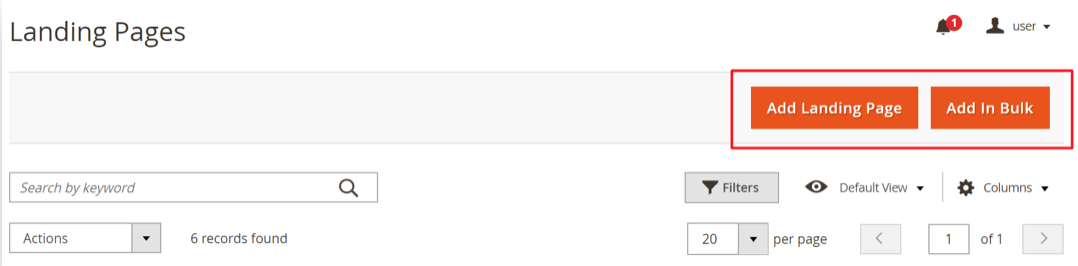
To create a new landing page, click the Add Landing Page button.
Landing Pages Configuration
With the extension, you can either add landing pages by one, or in bulk.
To create one landing page, click the Add Landing Page button. To create multiple landing pages at once, click the Add in Bulk button.
Adding One Landing Page
The configuration workspace of the Landing Pages consists of 12 tabs: General Information, URL Key Conditions, Header, Design, Texts For Top/Bottom Blocks, Top Block, Bottom Block, Meta Title, Meta Description, Meta Keywords, Meta Robots and SEO (optional).
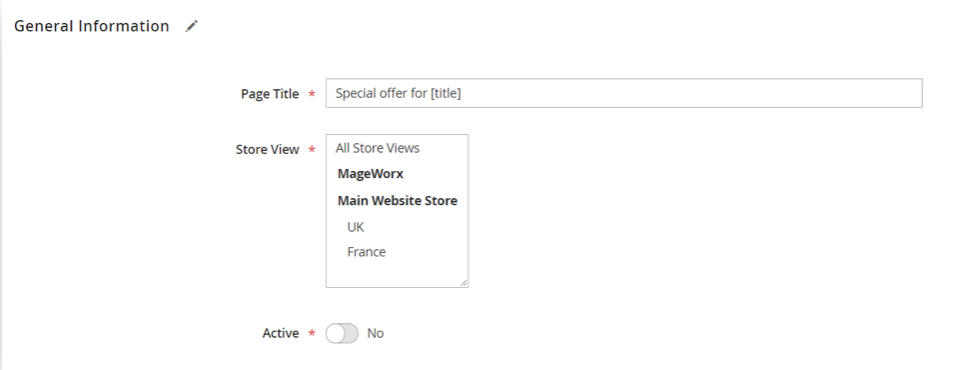
General Information
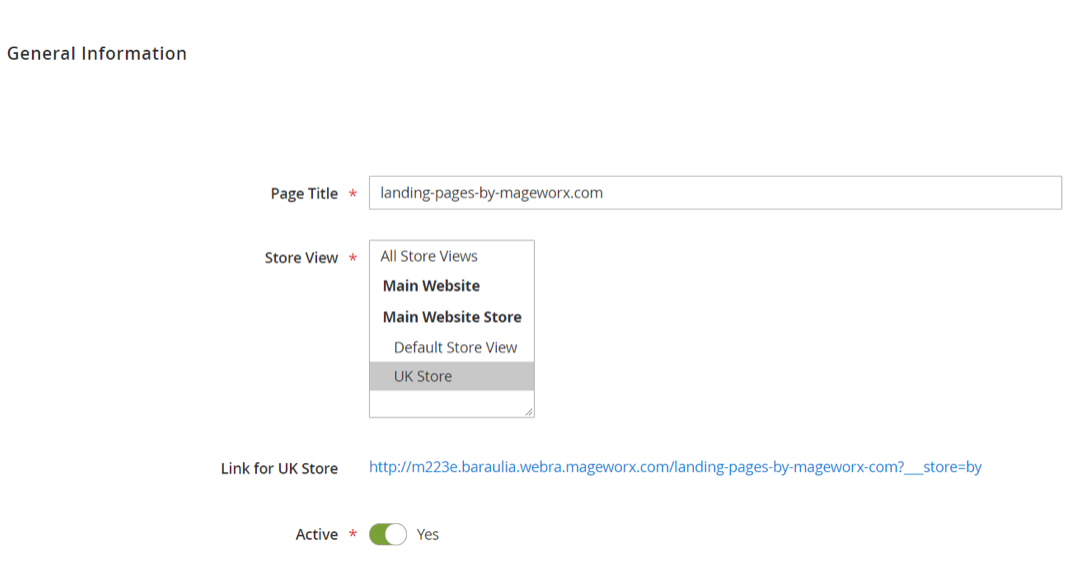
The Page Title is a technical name for the landing page that will be shown only on the backend.
The Store View manages the Store Views where the landing pages should be visible.
The Link for UK Store allows opening and previewing the newly created landing pages right from the backend. The link displayed shows how the link to the landing page will look like after the configuration is completed.
Note that the link can be changed for different Store Views in the URL Key section.
The switcher next to Active allows you to enable/disable the landing page.
URL Key
This section allows you to customize the URL of the landing page depending on the Store View. When left empty, the page’s URL will be created automatically based on the data that you entered in the Page Title section.
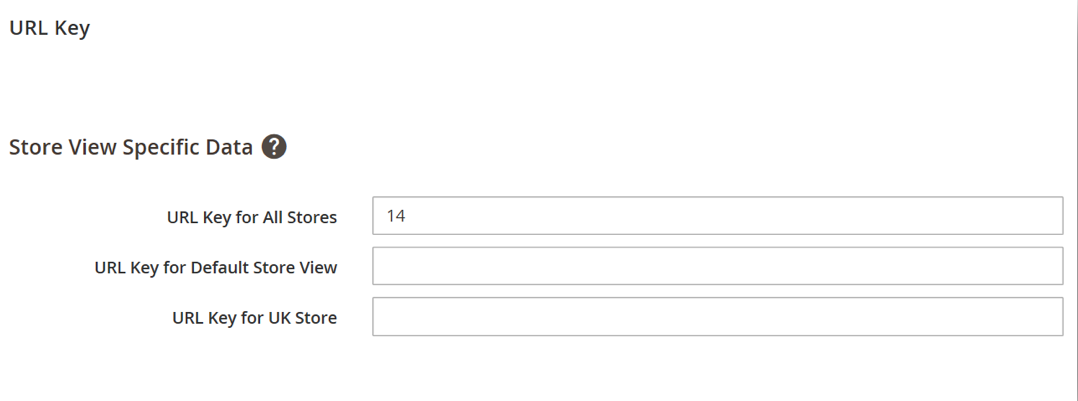
The URL Key for All Stores allows the store owner to specify the URL for all the Store Views if it should be different from the data entered in the Page Title section.
In the URL Key for Default Store View section, you enter the URL to be used for the Default Store View.
The URL Key for UK Store allows you to create a customized URL for the landing pages created for specific Store Views (the UK store in this particular case).
Conditions
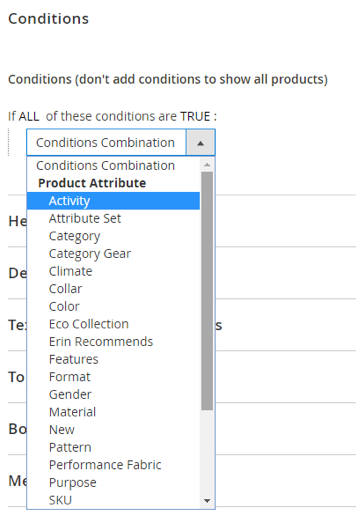
From here, the conditions can be set up to specify display options for the items on the landing page. You can create the landing page’s conditions for SKU, Activity, Attribute Set, Category or Category Gear, Climate, Collar, Color, Eco Collection, Material, New items, Purpose and more, or create your own customized conditions depending on the specific marketing purpose of the landing page.
You can combine different conditions to create landing pages that meet your business needs.
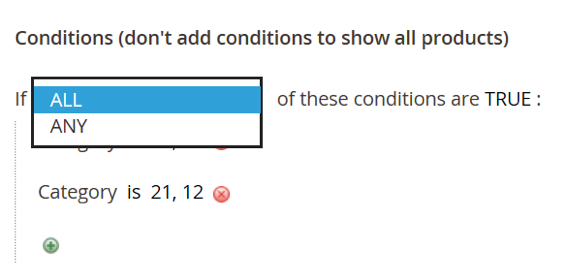
Also, you can choose between ALL and ANY variables to make you conditions true.
What’s more, for some of the conditions you can specify when they are true. The Is, is not, contains, does not contain, is one of, is not one of can be used here:
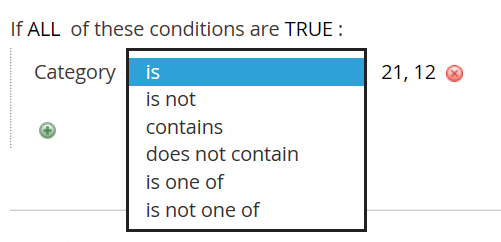
For example:
The Category is 21,12 means that the condition will be met for all the products that are in #21 and 12 Category attributes.
The Category is not 21,12 means that the condition will be met for all the products that are not in #21 and 12 Category attributes.
Another example:
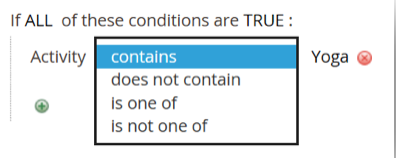
The Activity contains Yoga means that the condition will be met for all the products that have ‘Yoga’ in the Activity attribute.
The Activity does not contain Yoga means that the condition will be met for all the products that do not have ‘Yoga’ in the Activity attribute.
The Activity is one of Yoga means that the condition will be met for any of the ‘Yoga’ products in the Activity attribute.
The Activity is not one of Yoga means that the condition will be met for none of the ‘Yoga’ products in the Activity attribute.
Note that this sections should be left empty if you intend to show all the products.
Header
From here, you can specify H1 for your landing page.
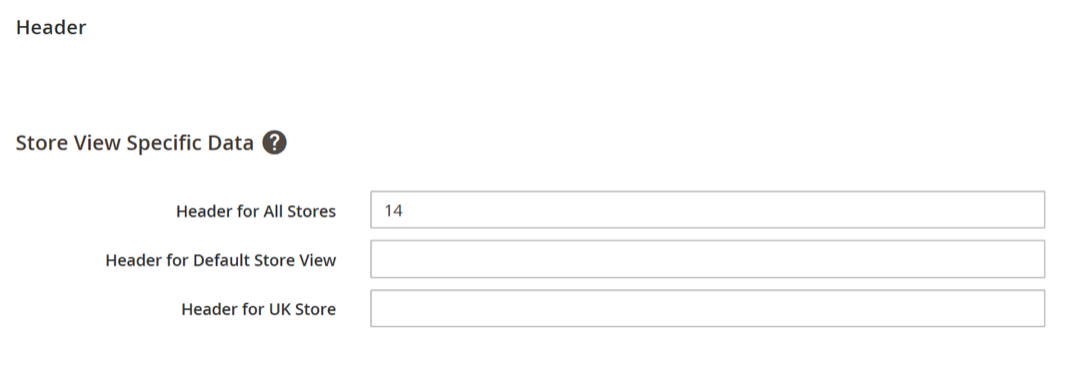
The Header for All Stores specifies the title of your landing page that will be equal for all the store views. It will be displayed on the frontend.
In the Header for Default Store View section, you enter the title to be used for the Default Store View, which will be shown on the frontend.
The Header for UK Store allows creating a customized header for landing pages that are created for specific Store Views. It will be displayed on the frontend.
Design
Customize the look and feel of the landing pages to fully correspond your business requirements.
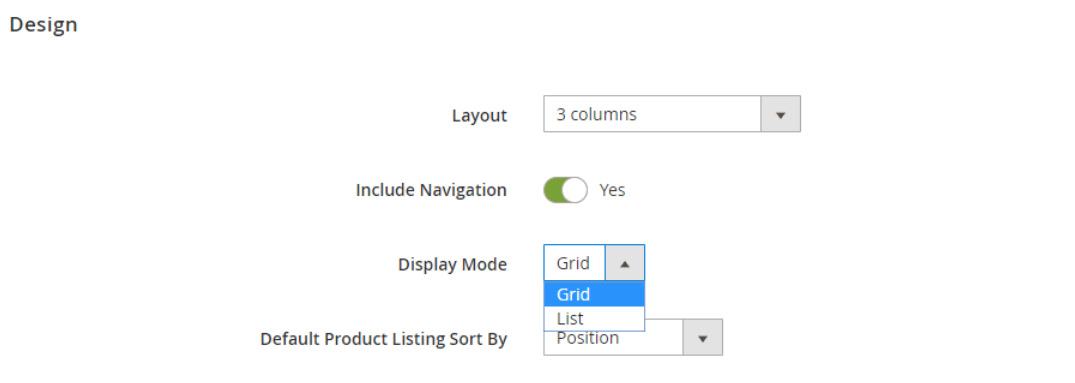
You can select the layout design from 5 following options: empty, 1column, 2 columns with the left bar, 2 columns with the right bar, and 3 columns.
The empty option allows you to create a tidy and clear web page layout for the promotion of the specific items/services. It doesn’t include the web page footer and header, as well as any bars on either side of the main page.
With navigation disabled, the landing page with the еmpty option will look as follows:
The 1 column option allows you to create a web page layout with the empty sidebars.
The landing page won’t include the Navigation section with categories when disabled.
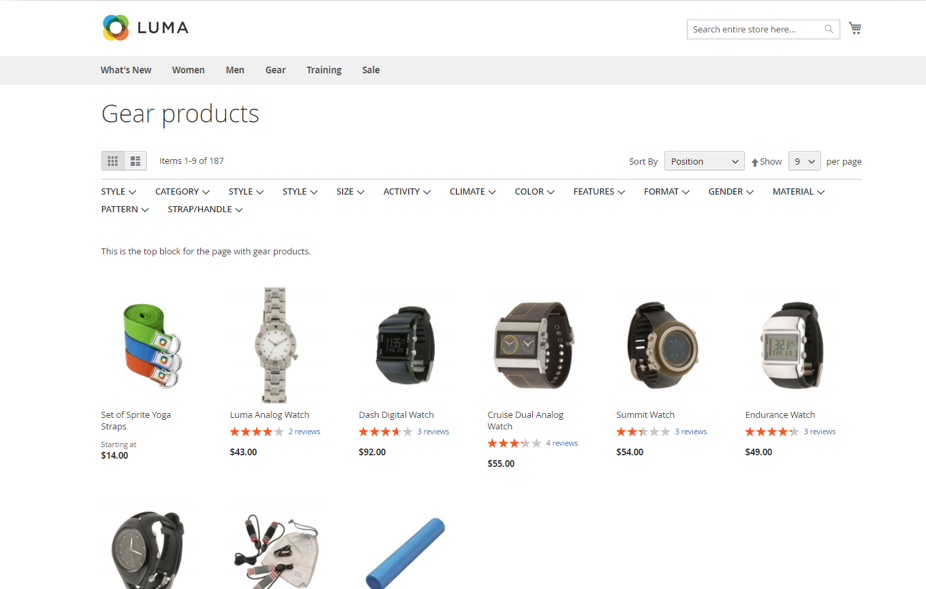
The 2 columns with left bar option with the Navigation section disabled creates a web page layout with 2 columns:
The navigation will be placed in the left bar when enabled.
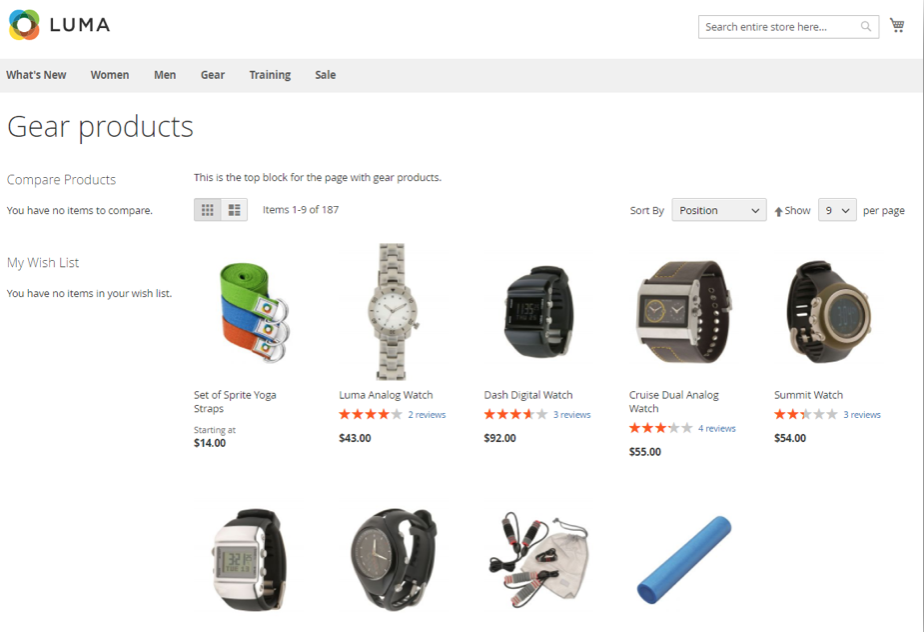
The look of the 2 columns with right bar option is similar to the one with the left bar but one of the columns is placed on the right side of the page.
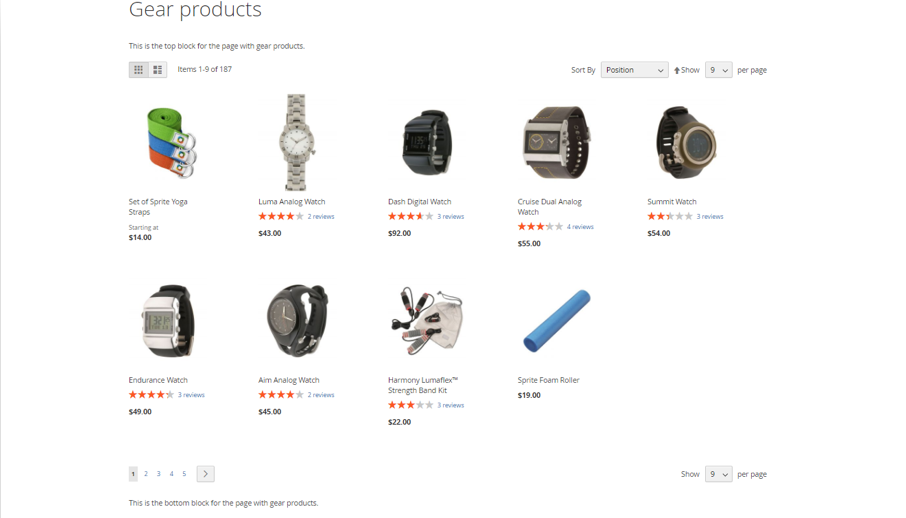
The 3 columns option creates the landing page that has three blocks in the layout.
When navigation is disabled, one out of the three columns will be left empty. This will let you bring more customization to the landing page’s look.
Texts for Top/Bottom Blocks
This section facilitates the process of adding text to the Top/Bottom Blocks of the landing page.

Enter the plain text to be used as a description for the Top/Bottom Blocks. Note that no HTML tags are required to use/enter here. Then copy-paste one of the [text_1], [text_2], [text_3] or [text_4] variables in the corresponding sections of the Top/Bottom Blocks to have the entered text displayed on the frontend.
For example, you entered plain text ‘Thanks for purchasing the Landing Pages extension from MageWorx’ in the Text #1 for All Stores. To have it displayed on the frontend of the landing page, copy-paste the [text_1] variable in the corresponding Top or Bottom Blocks. This section allows you to specify text for the All Stores, Default Store View, and/or Specific Store Views.
Top Block
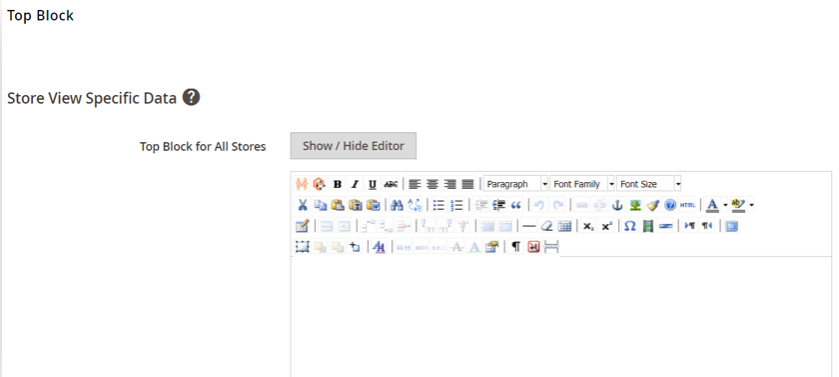
From here, you can customize the Top Block of your landing page either with the help of the WYSIWYG-editor or by copy-pasting one of the filled in [text] variables from the Texts for Top/Bottom Blocks section.
Specify text for the All Stores, Default Store View, and/or Specific Store Views in this section.
Bottom Block
The configuration logic for the Bottom Block is equal to the Top one.
Meta Title
Meta title serves as the title of any given webpage. The title tags should be no longer than 70 characters (with spaces).
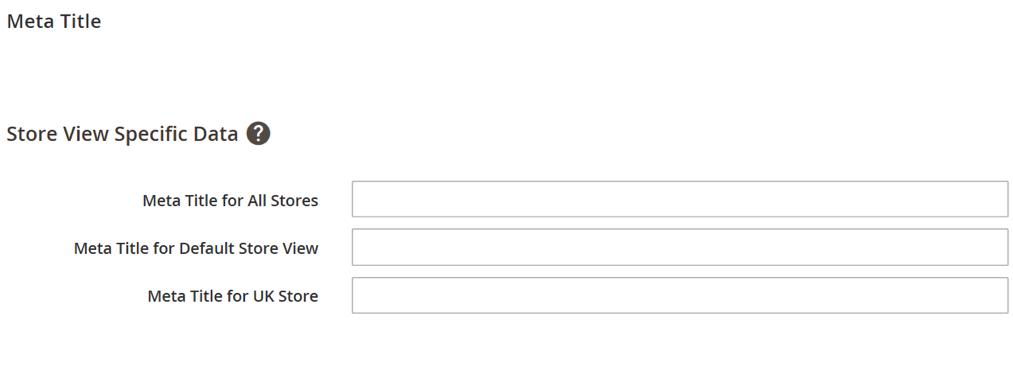
The Meta Title for All Stores specifies the meta title of your landing page that will be equal for all the store views. It will be displayed on the search engine results page.
In the Meta Title for Default Store View section, you enter the meta title to be used for the Default Store View, which will be shown on the search engine results page.
The Meta Title for UK Store allows you to create a customized meta title for the landing pages that are created for specific store views. It will be displayed on the search engine results page.
Meta Description
Meta descriptions describe the content on the webpage in greater detail. The content of the meta description is not a ranking factor. But it is vital to encourage users to click on the website URL. The meta description tags should be no longer than 280-320 characters with spaces.
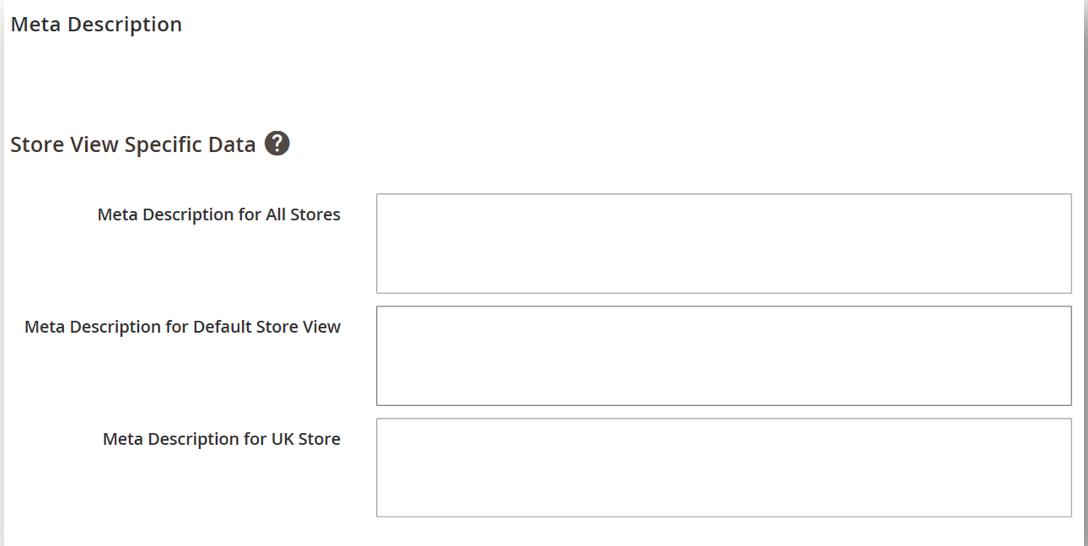
The Meta Description for All Stores allows generating the meta description for your landing page that will be equal for all the store views. It will be displayed on the search engine results page.
In the Meta Description for Default Store View section, you enter the meta description to be used for the Default Store View, which will be shown on the search engine results page.
The Meta Description for UK Store allows you to create a customized meta description for the landing pages that are created for specific store views. It will be displayed on the search engine results page.
Meta Keywords
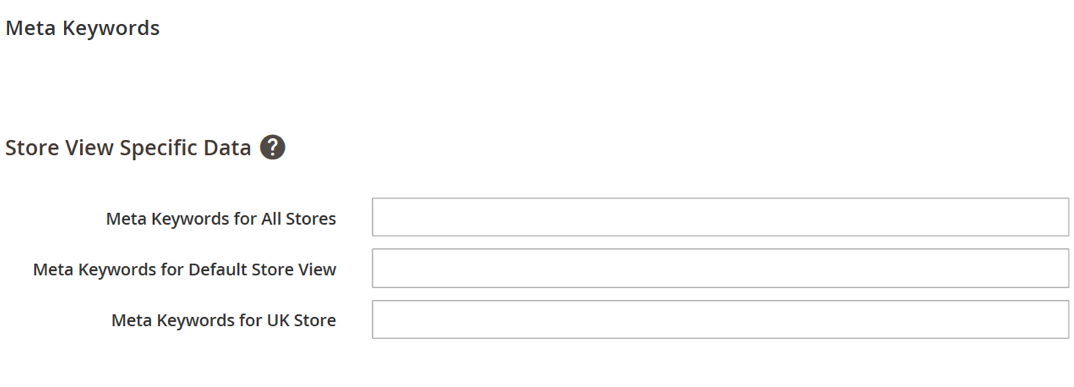
From here, the store owner can specify the Meta Keywords for the landing page, which can be different for the All Stores, Default Store View, and Specific Location (UK Store as an example in the screenshot above).
Meta Robots
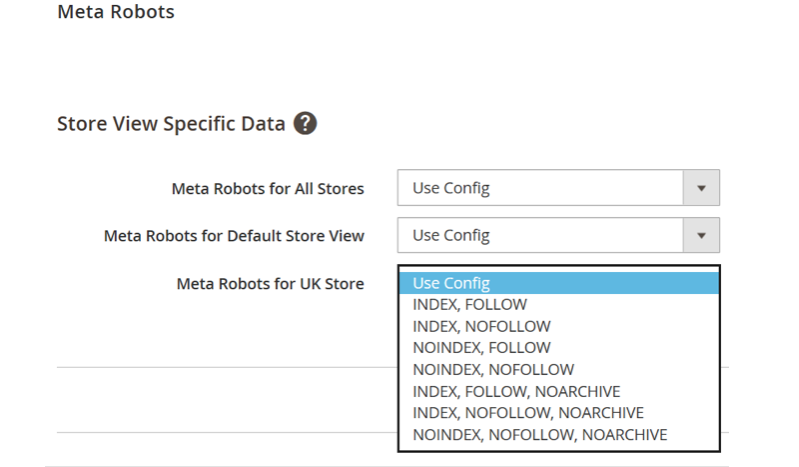
The robots meta tag allows utilizing a granular, page specific approach to the search engine indexation.
From here, you can set the Meta Robots for the landing page, and make adjustments that are specific for the certain Store Views
SEO
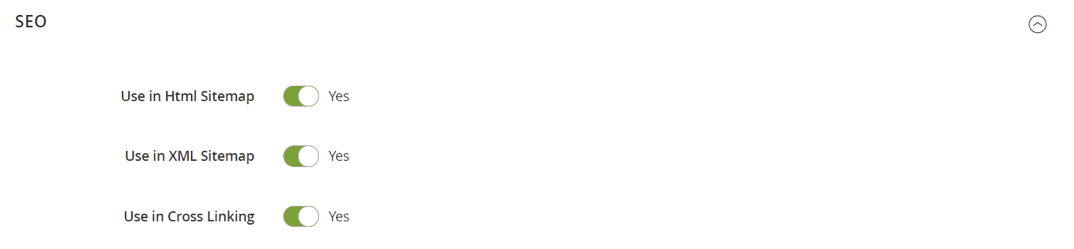
This section is solely available for the Magewor SEO Suite Ultimate extension owners, and allows you to exclude out-of-stock products from the XML sitemap, exclude basically any product, category and CMS page from the list, generate the XML sitemap right from Console, and much more.
Adding Landing Pages in Bulk
The extension allows for creating multiple landing pages. That may come in handy when you need to quickly generate several pages for different marketing campaigns.
There are 3 equally accurate ways to generate them. You can do it by:
-
uploading a CSV file with text data (a new page will be created for each row);
-
or by combining 2 of these methods.
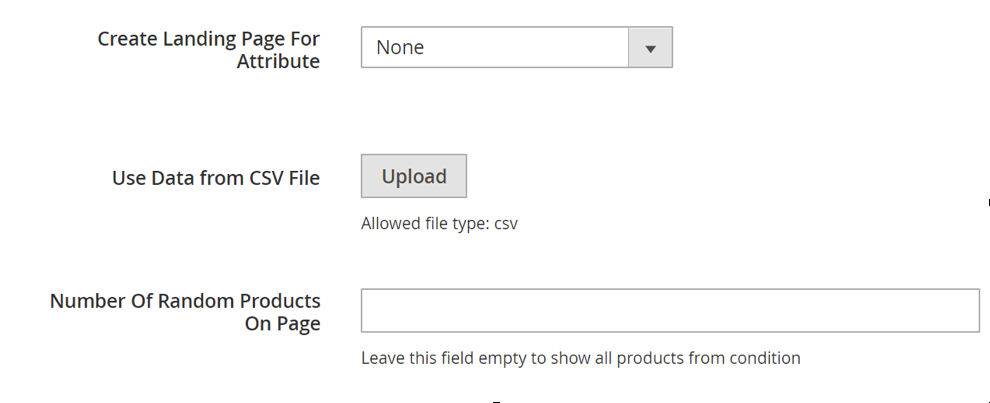
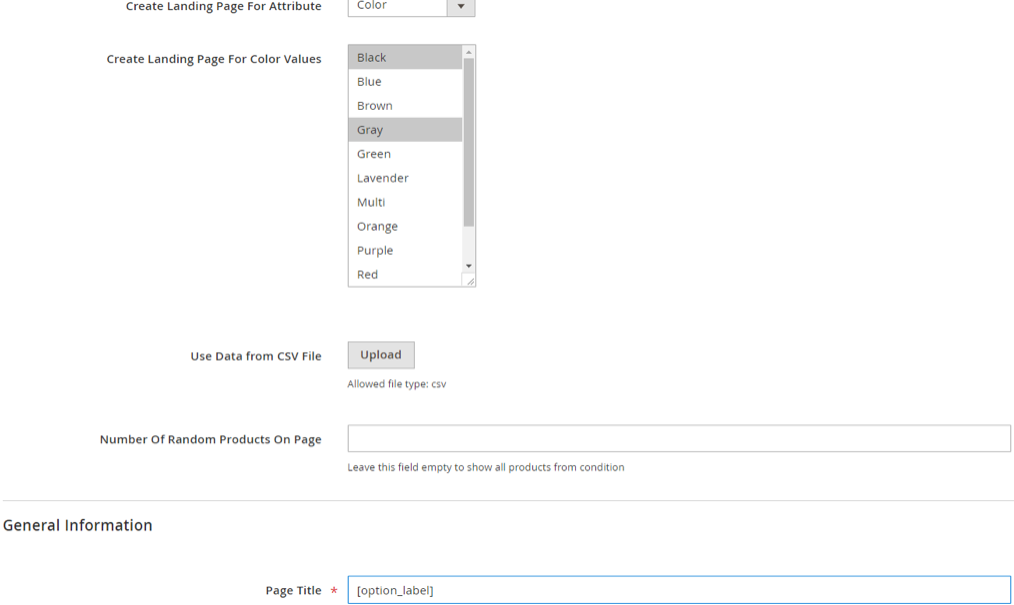
The Create Landing Page For Attribute allows specifying which attribute you’d like to create landing pages for.
The Use Data from CSV File allows for uploading a previously created CSV file to generate landing pages based on the manually entered data. The Number of Random Products On Page should be filled in if you need to specify the number of items to be shown. When left empty, all the products in your Magento 2 store that meet the condition will be listed on the landing page.
Method 1
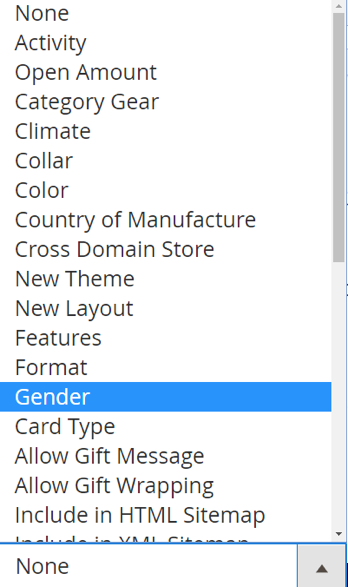
In the Create Landing Page For Attribute section, specify an attribute the landing pages will be created for from the drop-down menu:
To create content for your landing pages, you can copy-paste the following variables to autofill the necessary fields:
-
[attribute_code] - inserts code for the specified attribute.
-
[attribute_label] - inserts labels for the mentioned product attribute on the landing page.
-
[option_label] - inserts the specified product attribute value on the landing page.
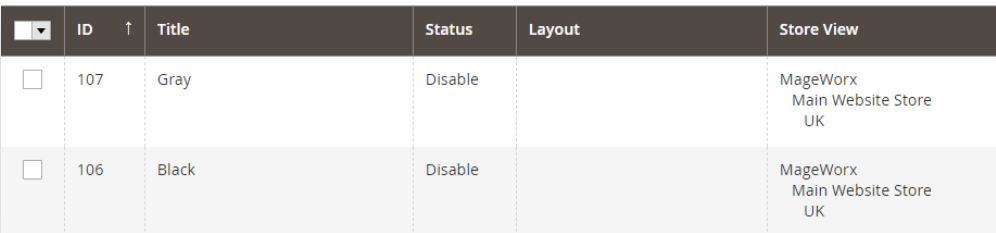
For example, when creating the title, you specify the attribute (Color in the example), and highlight the colors you’d like to create landing pages for. If you want the pages titles to include these options, insert [option_label] in the Page Title field in the General Information tab.
The titles of the newly created landing pages will solely include the selected color options names:
Or, for example, if you want the page title to include the attribute label for the specified options, you may want to add [option_label] [attribute_label]. Additional text can be entered as well:
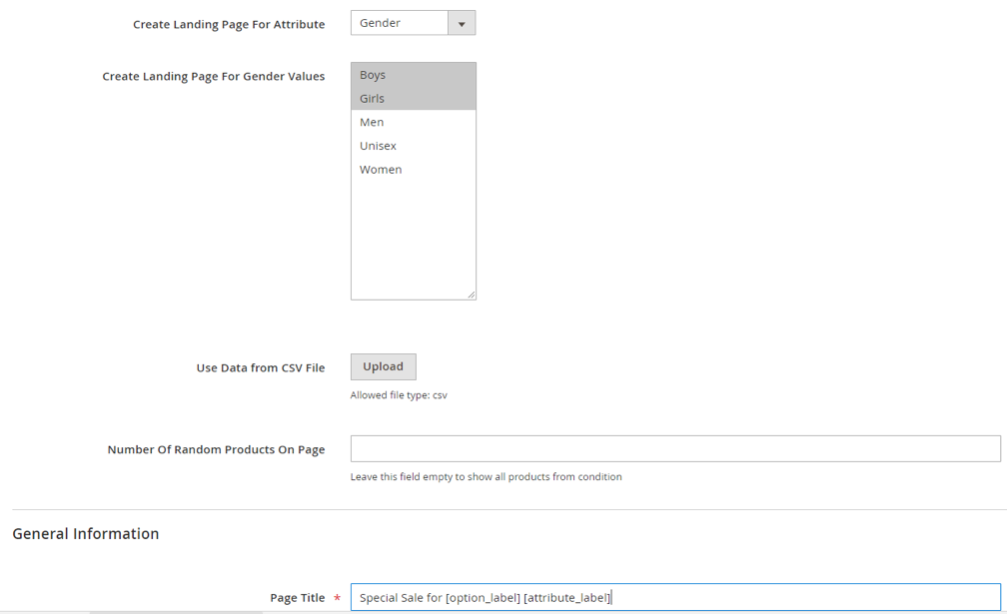
That’s how the titles for the newly created landing pages will look like:

Make sure to use [attribute_code] / [attribute_label] / [option_label] to autofill the necessary fields.
Method 2
Landing pages can be created by uploading a ready-to-use CSV file with text data. The CSV file sample can be downloaded from the Landing Pages Admin Demo.
Use [column_name_1] , [column_name_2] variables to insert data from the corresponding columns in the CSV file in the required fields of your landing pages. Here, you need to use text specified for the corresponding columns.
For example, we’ve uploaded a CSV file that looks as follows:

To create the title for 3 landing pages, you’ll need to enter the necessary text and the [title] variable, i.e. text from the column 1 in the Page Title field in the General Information tab.
After you select the Store View, the titles of the newly created pages be added from the CSV file and look as follows:
Note that small/capital letters used to fill in the variables should correspond the ones entered in the CSV file.
Method 3
You can also combine 2 of the above-mentioned methods. so that you can add the column "option_label" and fill it with the option labels to map rows with options.
For example, you can manually choose an attribute, specify the options, but also upload a CSV file and use variables from the both methods.
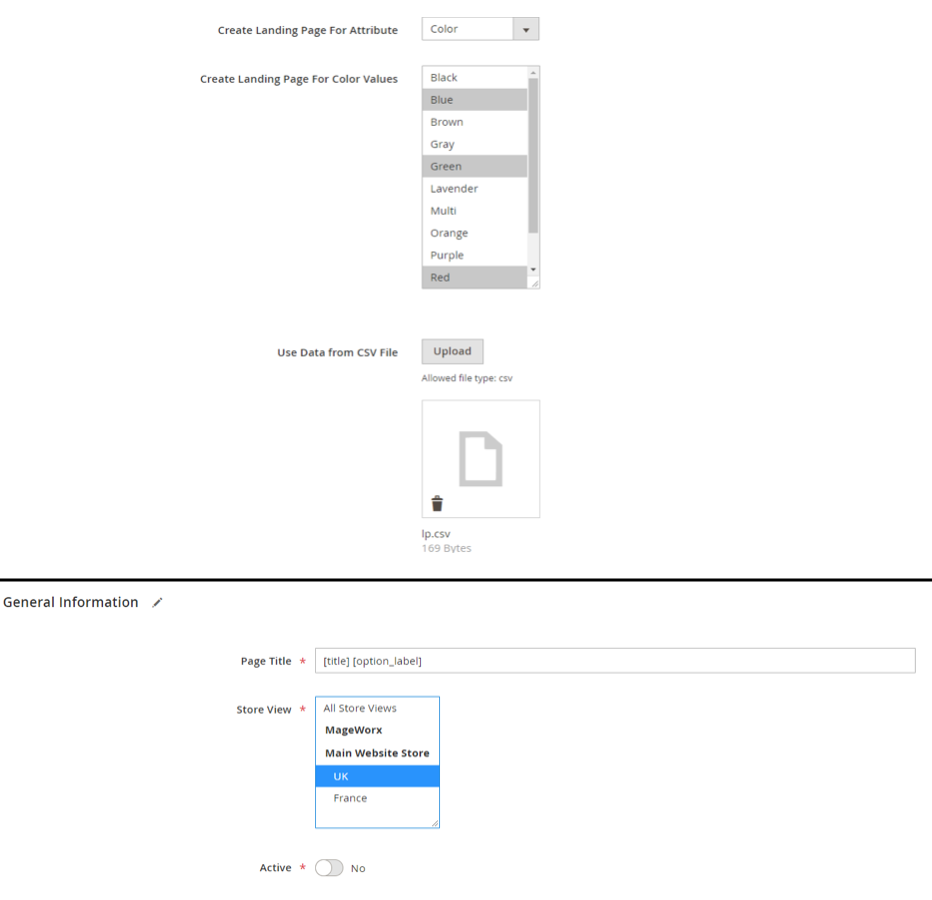
Thus, after entering [title] [option_label] in the Page Title field, the titles for three landing pages will look as follows:

The configuration algorithm for other sections of multiple landing pages is just the same.
Adding Non-Predefined Attributes
The extension allows you to add attributes that are not predefined. To do that, go to STORES ⟶ Attributes ⟶ Product.
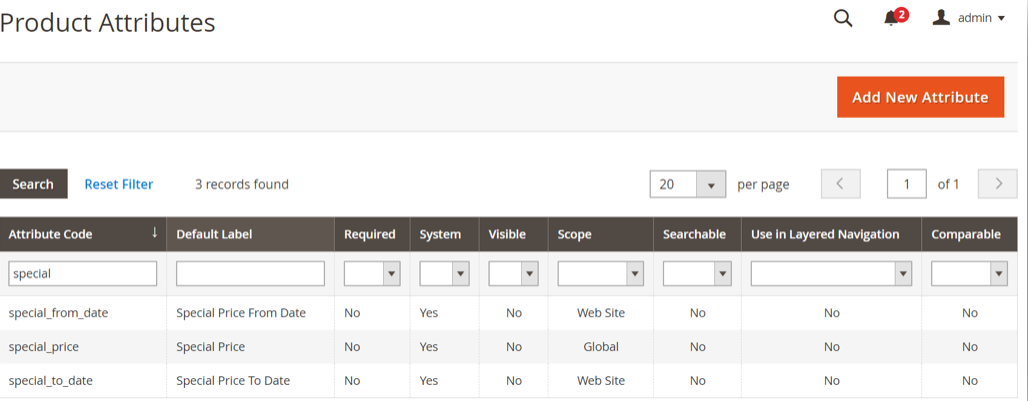
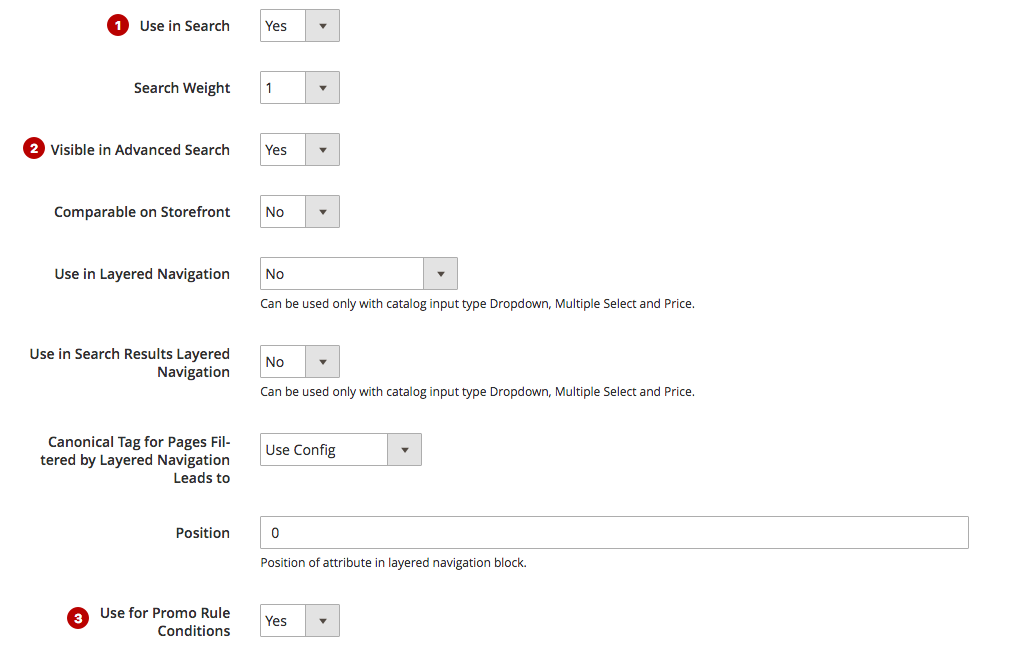
From here, use search to find and select the attribute you need. Open the Storefront Properties tab. Make sure you’ve got YES in the Use in Search, Visible in Advanced Search and Use for Promo Rule Conditions blocks:
Click the Save Attribute button.
Don’t forget to reindex Product EAV index and Catalog Search index:
sh
php bin/magento indexer:reindex catalog_product_attribute
php bin/magento indexer:reindex catalogsearch_fulltext
Click the Save Attribute button to add it to the list of attributes in the conditions tab and reindex once again.
SEO Settings for Custom Landing Pages
Seo
This section is for the Mageworx SEO Suite Ultimate extension owners. It tells how to combine the functionality of both extensions for better SEO results. Own our Landing Pages solution, but don’t have the SEO extension yet? Contact us to get a personal sweet discount on SEO Suite Ultimate!
If you had installed the Landing Pages extension prior to running SEO Suite Ultimate, you’ll discover a bunch of extra settings for your custom-created pages under STORES ⟶ Configuration ⟶ MageWorx ⟶ SEO.
If you have installed the SEO extension after installing the Landing Pages module, the extra settings will appear automatically.
Just make sure that you’re using the latest version of SEO Suite Ultimate (if your version is lower than the one mentioned on our website, go to your User Account - My Order section and download/install the latest version from there.
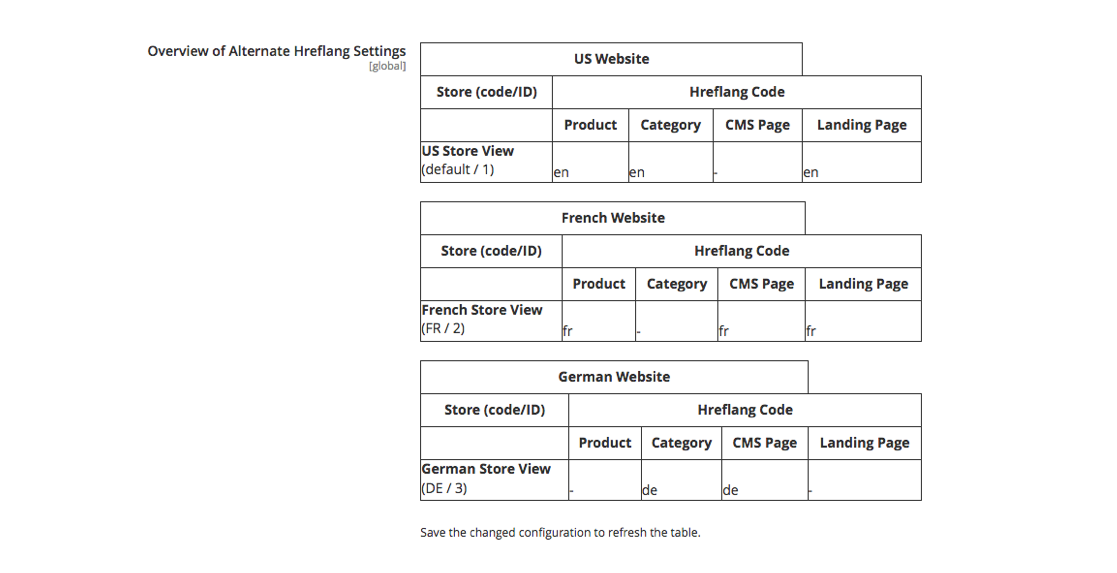
Hreflang Tags
This type of a tag is used to inform the search engine crawlers which version of your website to show for a specific location. This way, the correct language version of the site appears in the localized version of the search results and thus reaches the target audience.
What is more important, with hrefleng tag set up, the search engines don’t treat the localized content as duplicates. Note that you can set hreflang tags only globally. It means that you can assign them to websites, not to individual landing pages.
By means of our extension, the store owner can enable/disable these tags within a local website for any page type, including your custom landing pages.

To enable/disable the hreflang tag for the localized landing pages within a website, go to STORES ⟶ Configuration ⟶ MageWorx ⟶ SEO ⟶ Hreflang URL Settings and set Hreflang URLs Scope to Website.
Next, switch to the localized website view in the Store View - Default Config drop-down menu in the left upper corner.

For the chosen Website, under Hreflang URLs Settings, select the required option for your landing pages, and save the configuration.
To set the hreflang tag globally for all the localized websites, just select the Global option for the Hreflang URLs Scope.
Meta Settings
Under STORES ⟶ Configuration⟶ MageWorx ⟶ SEO ⟶ SEO Extended ⟶ Meta Settings, you can tweak some meta settings for your landing pages.
From here, you can set the Page Number Format for custom landing pages with pagination.
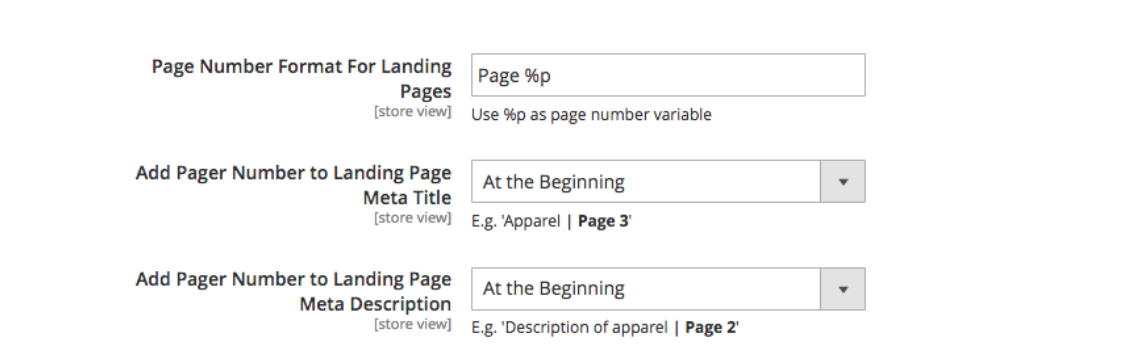
Note that this value is fully customizable — you can use %p as a page number variable, as well as modify the page’s name. As a result, you’ll get the following custom meta values:
Meta Title: Women’s tops | Summer Sale Page 2.
Meta Description: Check out hot summer deals on women’s tops! | Summer Sale Page 2
Also, from here, you can select how to add the pager number to the meta title and description (at the beginning or at the end of these meta values).
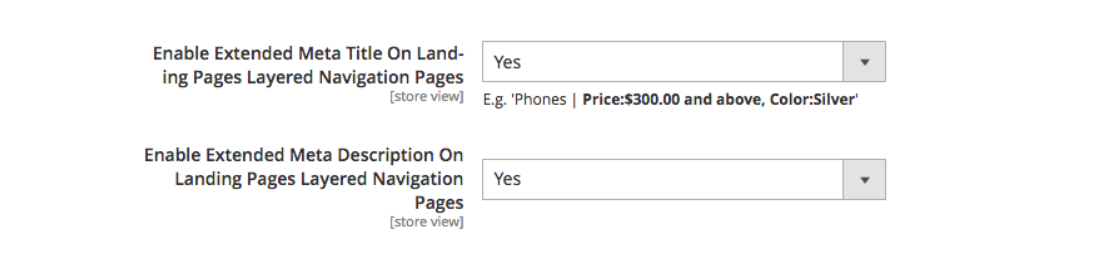
Besides, under these settings, you can enable the extended Meta Title and Description on landing pages filtered by layered navigation.
This way, you’ll auto-generate such meta values:
Meta Title: Women’s tops | Price:$50-300.00 and above, Color:Silver, Black, White.
Meta Description: Check out hot summer deals on women’s tops! Available throughout July-August | Price:$50-300.00 and above, Color:Silver, Black, White.
Markup / Structured Data
To make your custom landing pages stand out in the search engine results with rich snippets, you need to optimize structured data markup of your website.
With the extension, you can help the search engine crawlers identify what your custom landing pages are about.
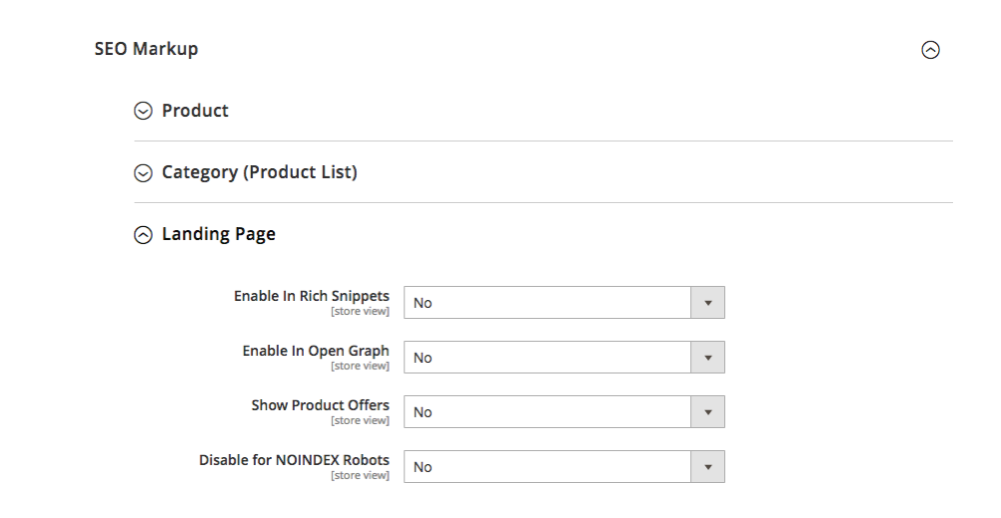
Under STORES ⟶ Configuration ⟶ MageWorx ⟶ SEO ⟶SEO Markup you can:
-
enable adding rich snippets on all custom-created pages (the snippets will be added with the JSON-LD method that entirely separates the markup data from the HTML code, so you won’t have to adjust any HTML code elements),
-
enable snippets for Open Graph, which allows the Facebook crawlers pick up the right title and description for each landing page,
-
add Product Offers tags to notify the search engines about the special product offers available via this page,
-
and disable markup tags for landing pages with NOINDEX Robots.
To test whether Google can access and understand your marked-up content, use this Google Structured Data analytical tool.
Cross links
Basically, crosslinks are the links that establish site linking architecture and help in spreading link equity among pages.
With SEO Suite Ultimate extension, it is possible to automate the process of creating internal links between product, category, CMS and custom landing pages.
Also, the extension enables you to equip any custom page with a link(-s) to external relevant sources.
To create a new link for a targeted landing page, go to MARKETING ⟶ MageWorx SEO Cross Links ⟶ Cross Links and hit the Add New Cross Link button in the right upper corner.
Follow this link to learn how to use the extension and create cross links in Magento 2.
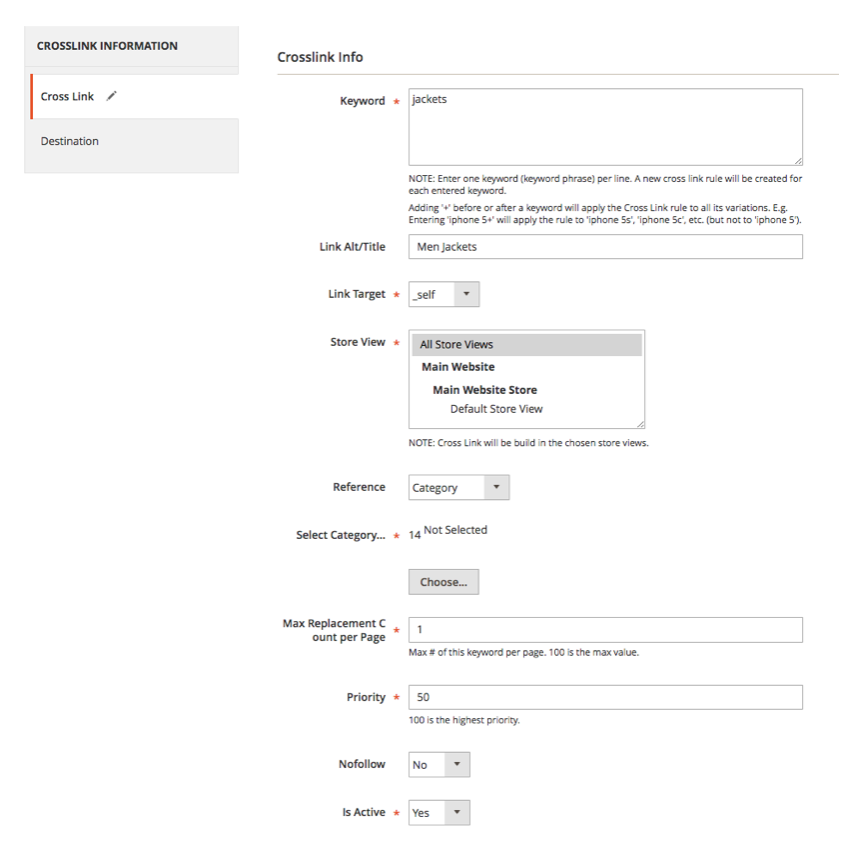
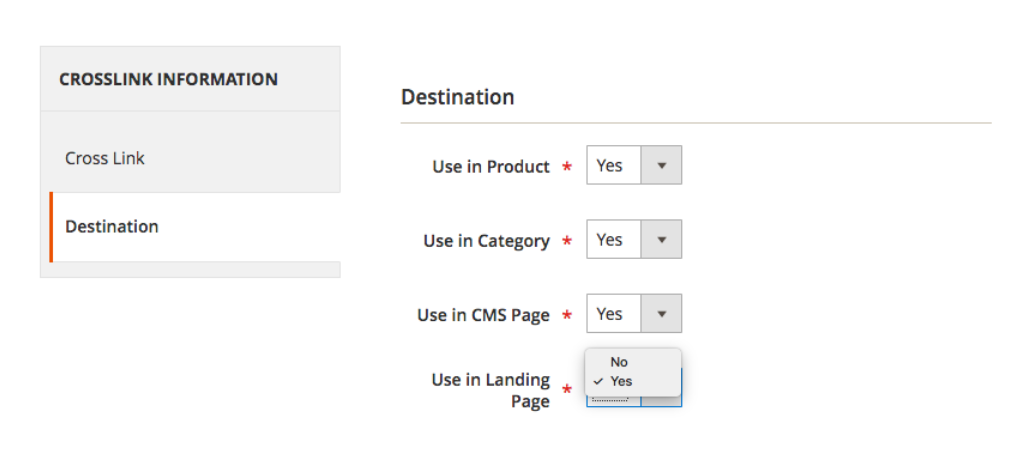
After you’ve filled in all these fields, jump to the Destination tab. In this tab, you can specify which pages cross links will appear on. To add them to your landing pages, select Yes next to the corresponding option.
Also, under STORES ⟶ Configuration - MageWorx - SEO - SEO Cross Links, you can specify:

Total Max Replacement Count for Landing Page — this is the maximum number of times a specified keyword will get equipped with a cross link per one page.
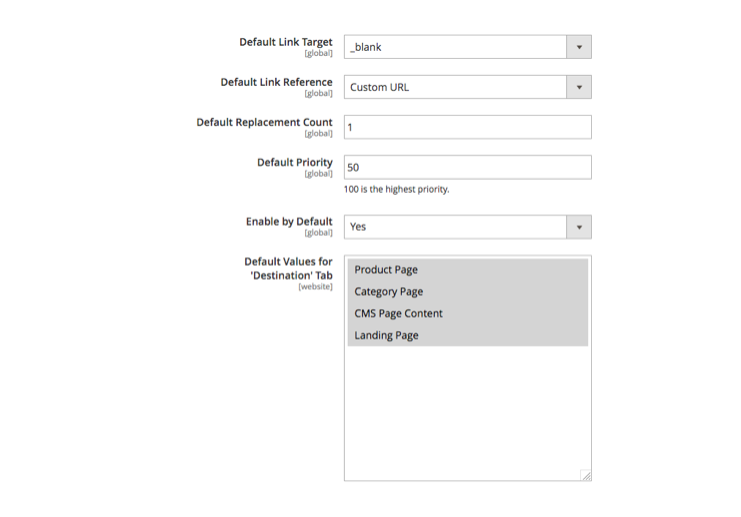
Default Values for the 'Destination' Tab for landing pages (link target and reference, replacement priority, etc.)
SEO Redirects
SEO Suite Ultimate extension enables you to set custom redirects for/to any landing page (follow this link to learn more about redirects in Magento 2).
To add a new redirect from/to a specific landing page, go to MARKETING ⟶ MageWorx SEO Redirects - Custom Redirects.
Hit the Add New Redirect button in the right upper corner.
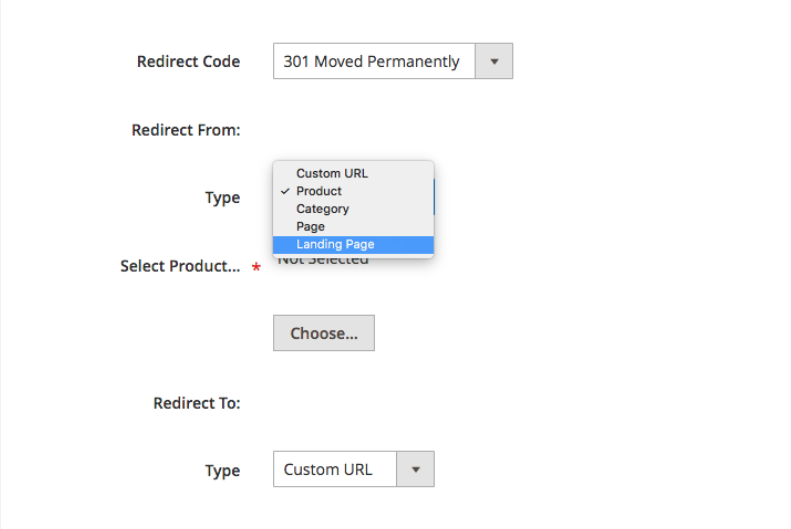
Next, select the stores to apply a redirect to, redirect type (301/302) in the Redirect From / Redirect To drop downs select Landing Page as the Type and specify the URLs of the pages you want to set redirects on/to.
SEO Meta Templates
With the extension, you can fully automate the process of optimizing meta data for your landing pages (follow this link to learn about the main meta SEO notions).
SEO Suite Ultimate enables you to generate custom SEO templates to generate unique meta values for each page title, description, keywords, URL keys and custom text for top/bottom sections (see the Texts for Top/Bottom Blocks section for more info).
To add a new template to the landing page, go to MARKETING ⟶ MageWorx SEO Templates - Landing Page Templates.
Hit the Add New Template button in the right upper corner.
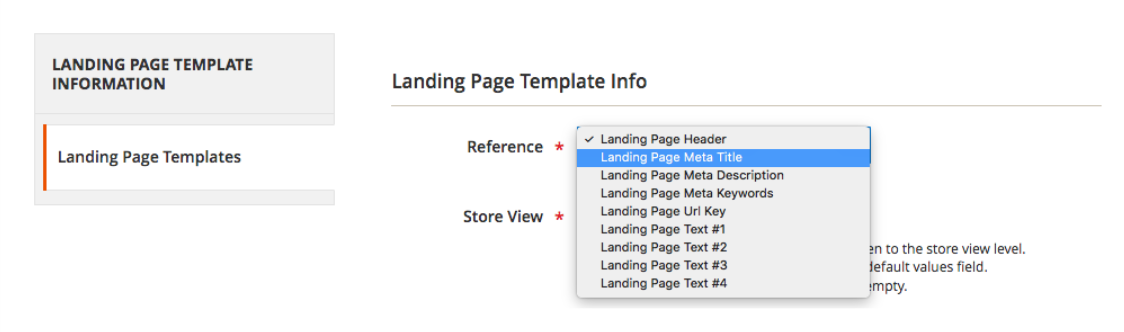
At the first step, in the Reference dropdown, select what you would like to generate a template for.
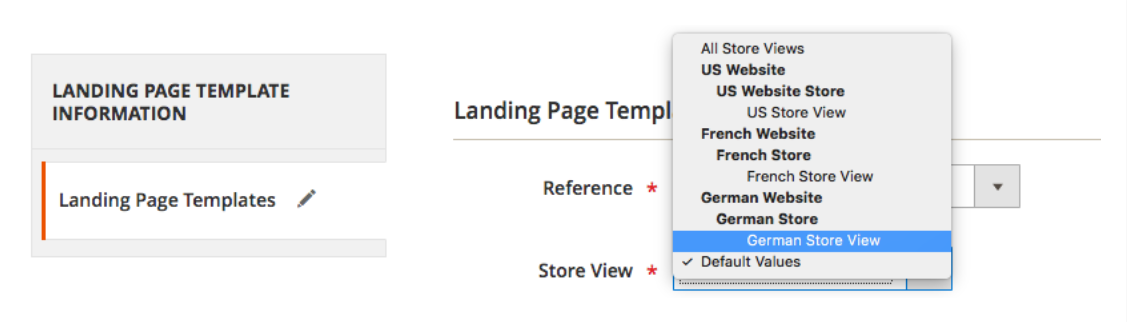
Next, select the Store Views to apply this template to.
Note if you select the All Store Views option, the template will be applied to all the available store views. If you opt for the Default Values, the template will be applied to the default values field. The default values are used if the store view values are empty.
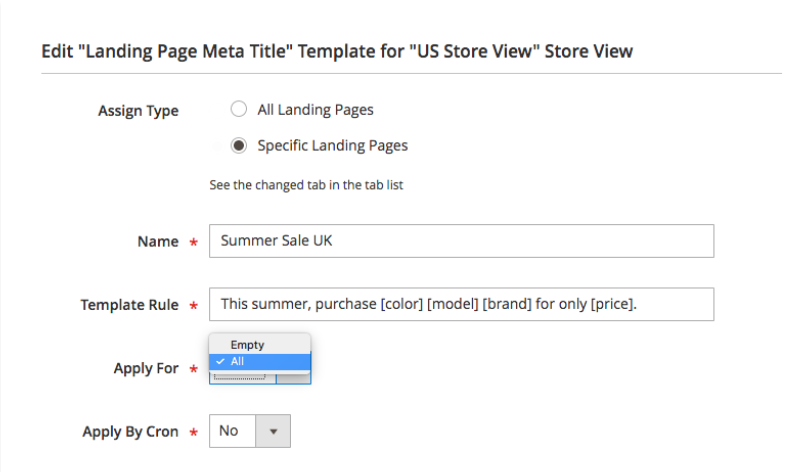
When done, you’ll get to the workspace, where you can specify the:
-
pages to apply the template to (can be applied to all pages at ones, or to the selection of pages),
-
template’s name and rule,
-
values (whether to apply the template to All landing pages or to the ones with the Empty values).
Also, here, you can tweak the Cron settings to auto-apply this template. To configure Cron in Magento 2, you can check these instructions.
Next, on the menu on the left, jump to the Landing Pages tab.

This is the place where you can select the pages to apply this template to. Use the filtering options to easily select the pages you target.
After a template is created, click the Save button.
The newly created template now can be found in the Landing Page Templates workspace.
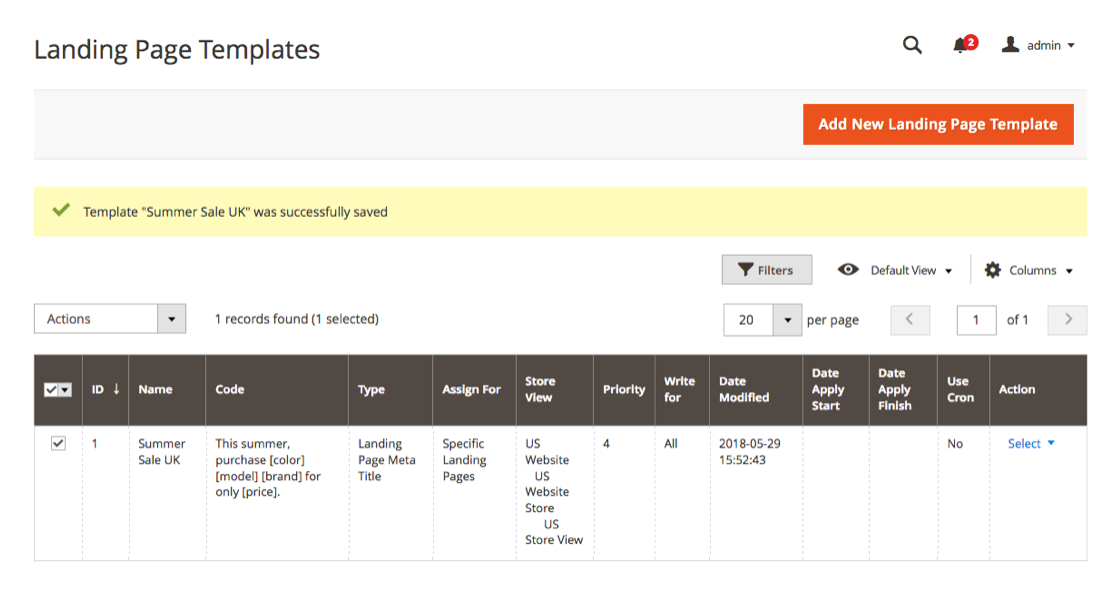
From there, you can test apply the template (to see how it actually works in a test mode), make extra modifications if needed, enable or delete it.
XML and HTML Sitemaps
SEO Suite Ultimate enables you to automatically include the URLs of new landing pages into sitemaps.
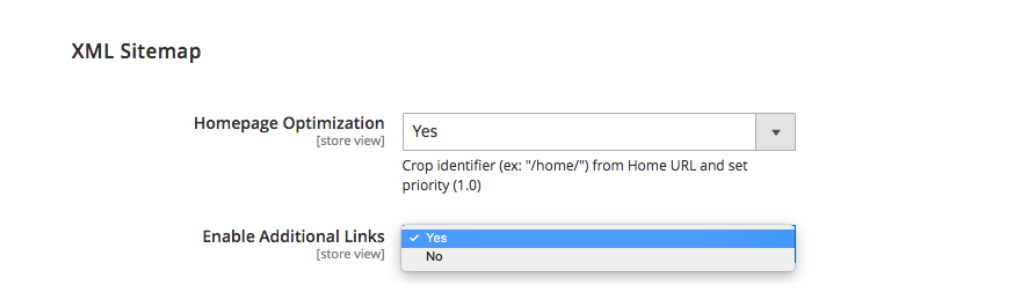
All you need to do to enable this feature is to select Yes for the Enable Additional Links setting under STORES ⟶ Configuration ⟶ MageWorx ⟶ SEO ⟶ XML / HTML Sitemaps.
Got Questions?
Need help with the extensions? Feel free submit a ticket from https://www.mageworx.com/support/
Mageworx offers outstanding services developing custom-tailored solutions for Magento platform to attain your eCommerce objectives. Our professional impassioned team provides profound and custom oriented development of your project in a short timeframe.