Magento 2 Sitemap Suite Manual

Introduction
Magento 2 Sitemap Suite lets merchants create and manage fully-fledged HTML and XML sitemaps. The HTML Sitemap is not provided in the default Magento 2 installation. By means of this extension the store owner can create separate HTML sitemaps for different Store Views, split all store links by categories, include CMS pages and any extra links, set the product sorting order etc. The XML Sitemap extends the basic functionality that is provided out of the box in Magento 2. It allows to create an extended XML sitemap, where it’s possible to exclude out-of-stock products from the XML sitemap, exclude basically any product, category and CMS page from the list, generate the XML sitemap right from Console, and much more.
Though sitemaps do not boost the search rankings, they help the search engines to better crawl your website.
Requirements and Installation
Sitemap Suite supports Open source (Community), Commerce (Enterprise) editions and Commerce cloud. The current version of the Magento installed on your website can be found in the lower right corner of any backend page.
Sitemap Suite has 3 separate ways of installation:
1) Copy the code (ready-to-paste package);
2) Use Mageworx Repository;
3) Use local Composer.
Extension Configuration
HTML Sitemap
To tweak the general HTML Sitemap settings, log into the Magento Admin panel and go to STORES ⟶ Configuration ⟶ MAGEWORX ⟶ SEO. The configuration of the extension is provided under the HTML Sitemap tab.
The description of the settings will be provided in small groups for convenience' sake.
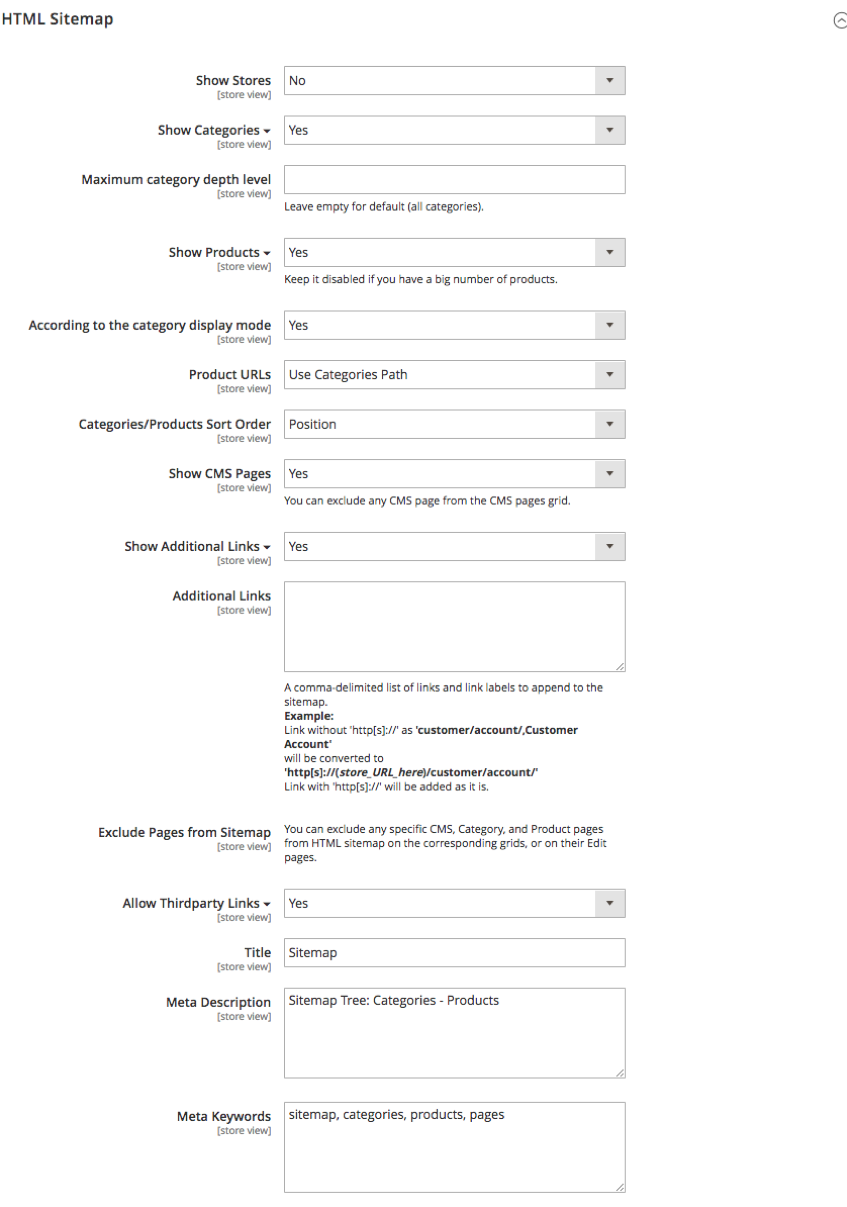
To include Store Views links into the main HTML sitemap, enable the Show Stores setting.
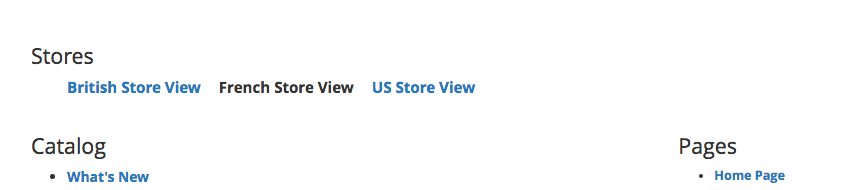
The Store Views showing on the Sitemap page. The French Store View is the current one.
Show Categories option switches on/off links display of the catalog categories.
If the categories are enabled, the setting Maximum category depth level appears. It manages the maximum depth of the categories to show. This setting may be important for the websites with the difficult category structure. The default (empty) value shows all subcategories.
Show Products option switches on/off links display of the catalog products in a hierarchical structure so that every product is being displayed under the appropriate category.
If the products are enabled, the setting According to the category display mode appears. It handles the situation when the category has the display mode Static Block Only.

In this case, the products that are assigned to this category won't be shown on the Sitemap page.
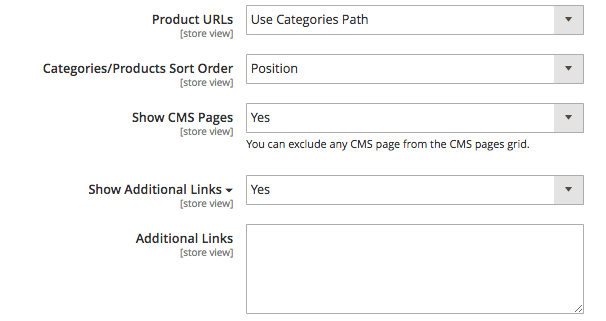
Product URL setting handles the URL structure of the product pages. If Use Categories Path is selected, then the URL will be formed like http://www.site.com/category1/subcategoryA1/product.html.
Otherwise, the URLs will be like http://www.site.com/product.html.
Categories/Products Sort Order specifies the way how the products are handled in the Sitemap. It can be either by Name (alphabetically) or By Position. The Position of the products is defined in the category settings. Go to PRODUCT ⟶ Inventory ⟶ Categories, select the desired category and go to the Products in Category tab.
If the Show CMS Pages setting is enabled, the sitemap will include the CMS pages on the Sitemap page.
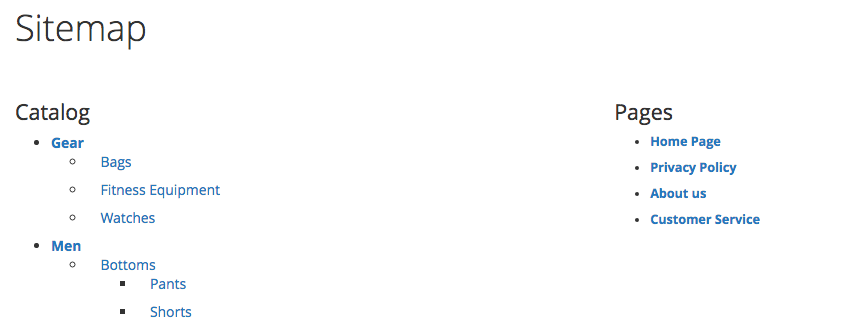
The view of the CMS pages on the Sitemap page.
If the Show Additional Links setting is enabled, the extra field Additional Links appear below this setting. This field support the comma-delimited list of links and link labels like http://www.mageworx.com,MageWorx.
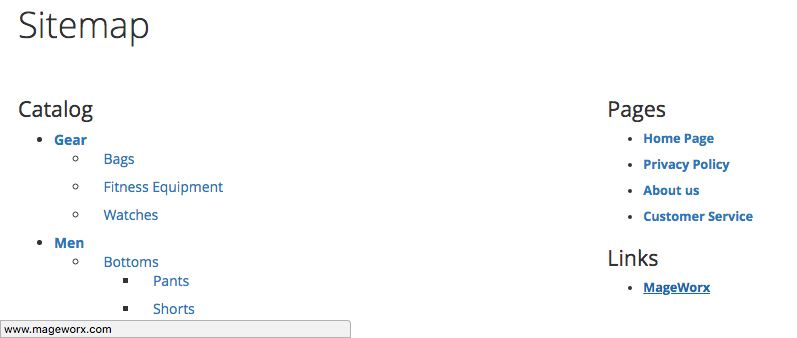
The way how the extra links are shown on the Sitemap page.
http:// is required in case the page is on some other website
Put the http:// before the URL. In case you put the www.mageworx.com,MageWorx, the link on the Sitemap page will lead to the http{s}://{your_current_store_URL_here}/www.mageworx.com
 ]
]
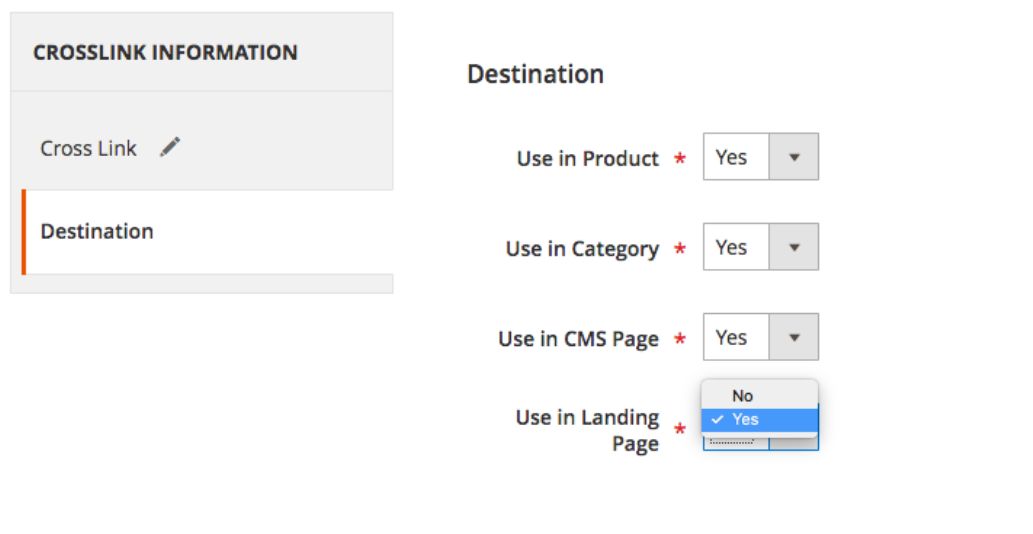
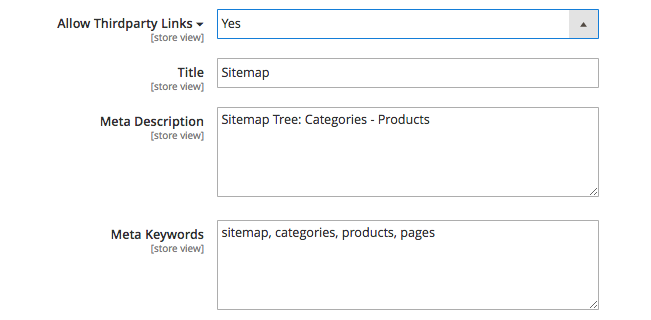
If Allow Thirdparty Links setting is enabled, then the third-party extensions that are compartible to our extension will be able to add their pages (like blogs etc.) to the Mageworx Sitemap.
Next, the store owner can specify the Meta Title, Meta Description and Meta Keywords. This may be useful in case you have separate store views as the setting allows to provide different meta information per different store.
XML Sitemap
To tweak the general XML Sitemap settings, log into the Magento Admin panel and go to STORES ⟶ Configuration ⟶ MAGEWORX ⟶ SEO. The configuration of the extension is provided under the XML Sitemap tab.

- Homepage Optimization - this feature allows to crop the identifier (like /home/) from the homepage URL and send its priority to the highest (1.0).
- Source for Product Images Links - this setting defines the images source in XML sitemap. The images can be taken either from Magento cache or added in the original sizes.
- Add Product Videos - this setting allows adding the product videos to XML sitemap.
- Add Category Images - this setting allows adding the category's image to XML sitemap.
- Enable Additional Links - if this setting is enabled, the extra field Additional Links appear below this setting, where you can add any custom links that should be added to the XML sitemap. This section is essential for the third-party extensions that generate some links (i.e. blog extensions, Store Locators or such)
- Frequency and Priority - these settings set the frequence and priority for the additional links.
- Exclude "Out of Stock" - this setting excludes the products that are currently out of stock.
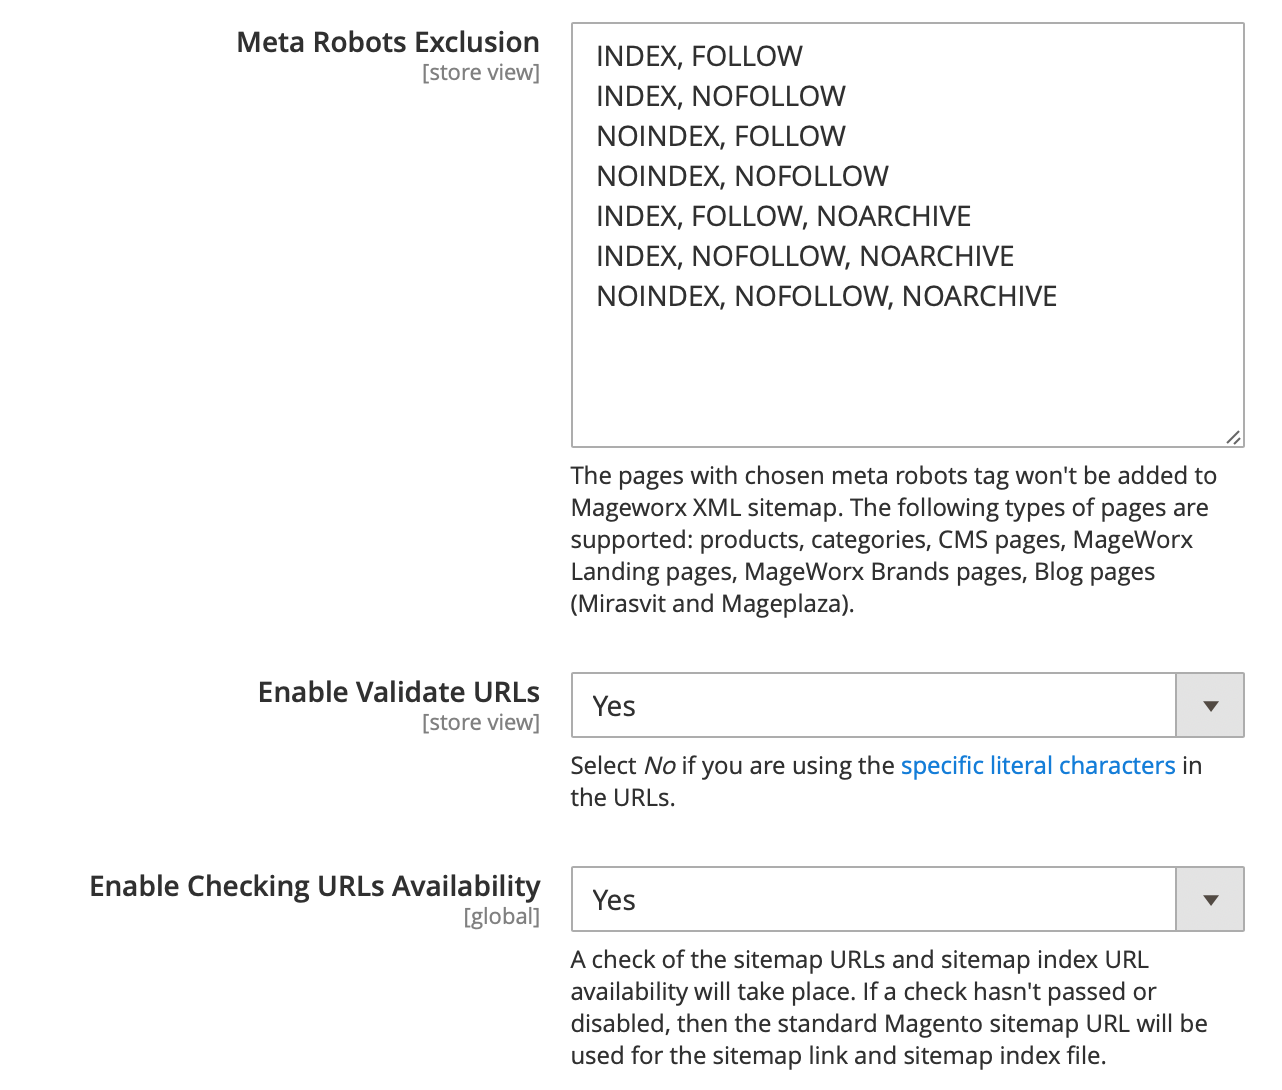
- Meta Robots Exlcusion - it allows you to hide the products with specific meta robots tag in XML sitemap.
- Enable Validate URL - it should be disabled in case the URLs have the specific literal characters.
- Enable Validate URL - this setting enables the URLs in XML sitemap validation.
- Enable Checking URLs Availability - this setting enables the XML sitemap validation before generating it. If this validation fails, the native Magento XML sitemap will be used.
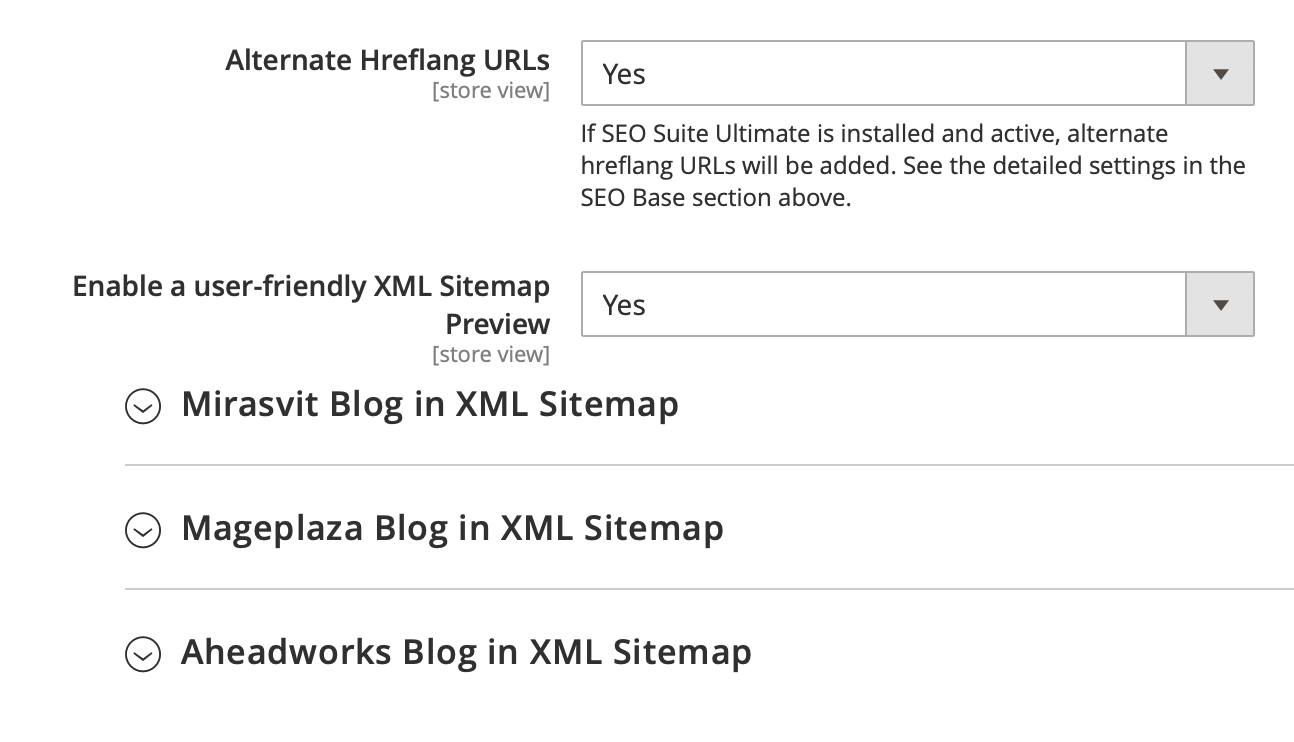
- Alternate Hreflang URLs - this setting adds the alternate URLs to XML sitemap.
- Enable a user-friendly XML Sitemap Preview - this setting enables the user-friendly preview of XML sitemap in the browser if the alternate URLs are added.
Magento 2 provides the built-in basic settings for the XML Sitemaps. They can be found in STORES ⟶ Configuration ⟶ CATALOG ⟶ XML Sitemap. The settings are described in our document. The Sitemaps generated by means of Sitemap Suite extension share the same settings.
Common Settings For Sitemaps
The Common Section for Sitemaps allows to tweak the links in the sitemaps. To edit them, log into the Magento Admin panel and go to STORES ⟶ Configuration ⟶ MAGEWORX ⟶ SEO. The configuration of the extension is provided under the Common Section for Sitemaps tab.
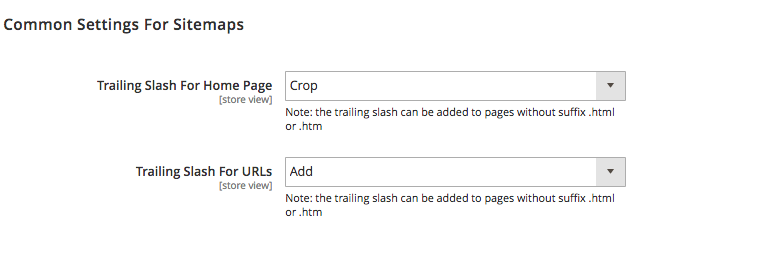
These settings provide the possiblity to crop or add the Trailing slash for home page and for other URLs.
The trailing slash can be added only in case the page doesn't have the .htm or .html setting.
Individual Settings
Additionally, the store owner can tweak both HTML and XML sitemap settings for each product and category individually.
Categories
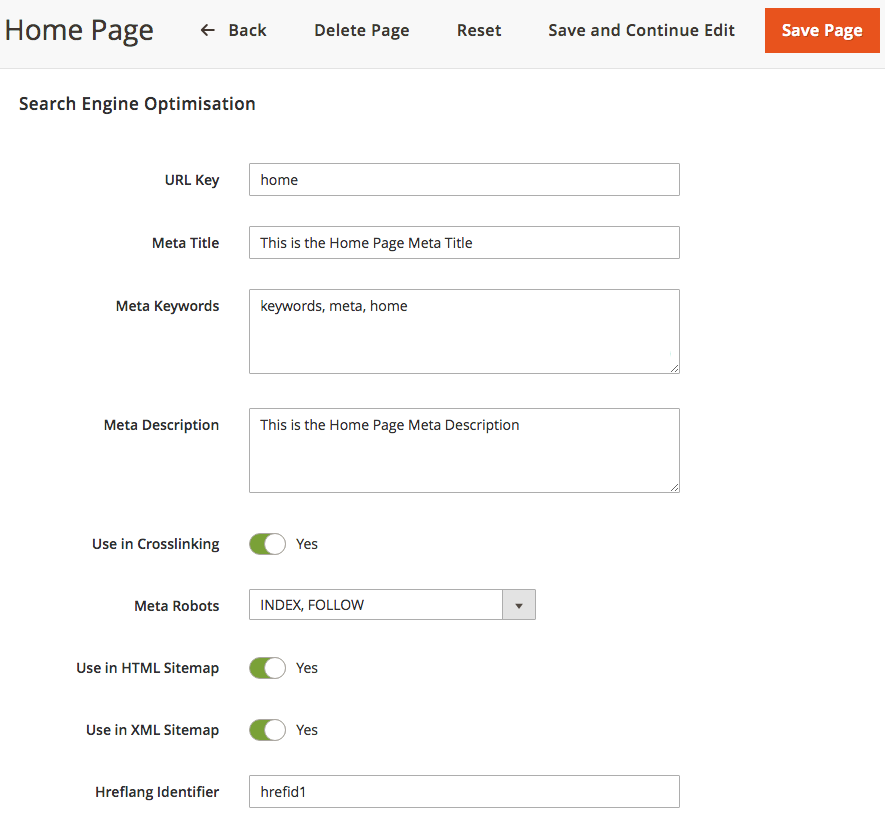
For the categories settings, go to PRODUCTS ⟶ Inventory ⟶ Categories, select the desired Category and open the Search Engine Optimization tab.
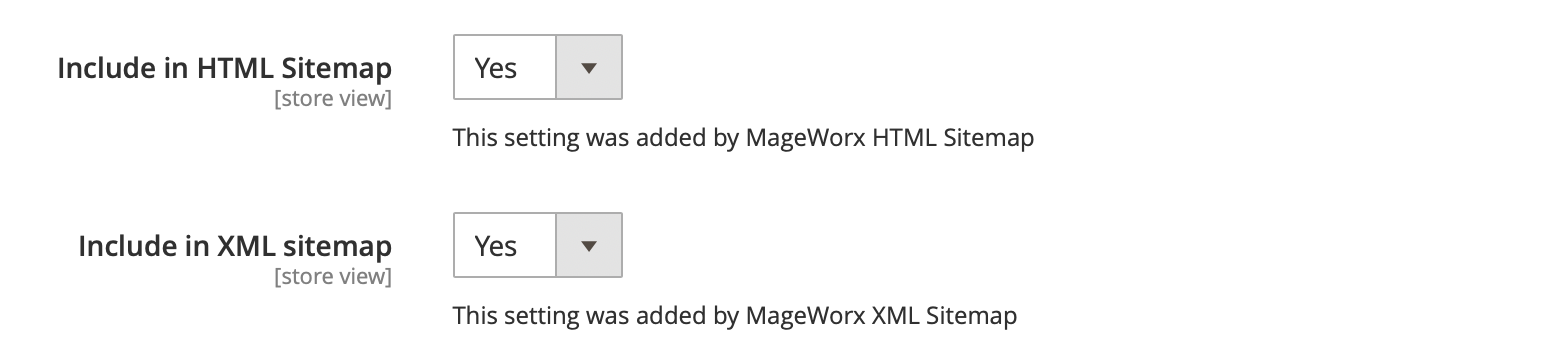
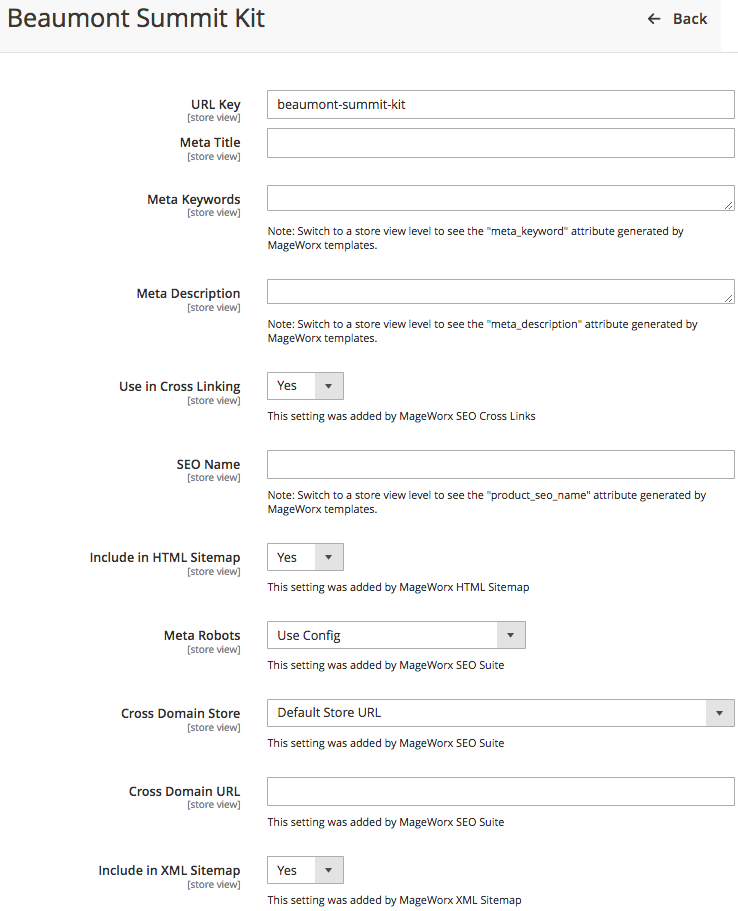
If the Include In HTML Sitemap or Include In XML Sitemap are disabled, the category won't appear in HTML or XML sitemaps.
This can be done on the Category Grid as well.
Products
For the products settings, go to PRODUCTS ⟶ Inventory ⟶ Catalog, select the desired Product and open the Search Engine Optimization tab.
If the Include In HTML Sitemap or Include In XML Sitemap are disabled, the product won't appear in HTML or XML sitemaps.
CMS Pages
For the CMS pages settings, go to CONTENT ⟶ Elemets ⟶ Pages, select the desired CMS page and open the Search Engine Optimization tab.
If the Include In HTML Sitemap or Include In XML Sitemap are disabled, the CMS page won't appear in HTML or XML sitemaps.
Manage XML Sitemaps
To add and observe the sitemaps generated by means of our extension, go to MARKETING ⟶ SEO & Search ⟶ Sitemap by Mageworx.
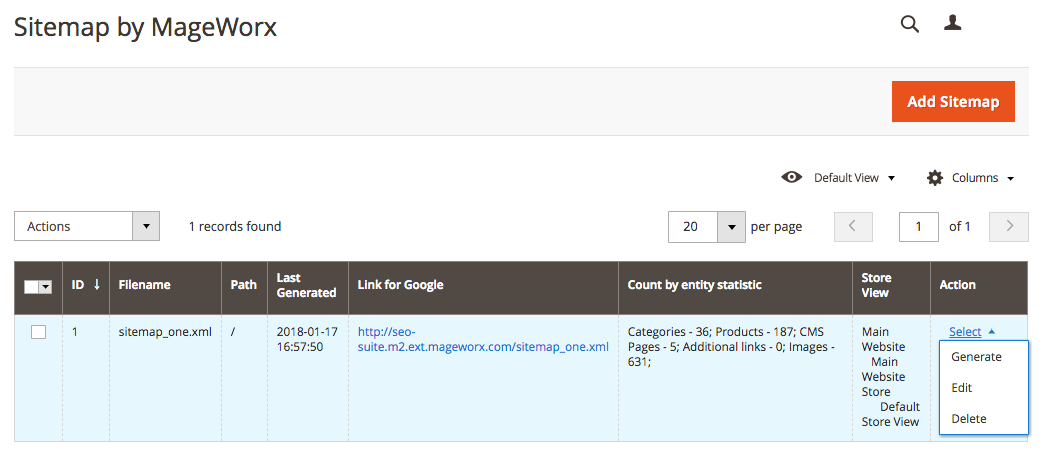
The Sitemap can be generated by using the Generate link in the Action tab.
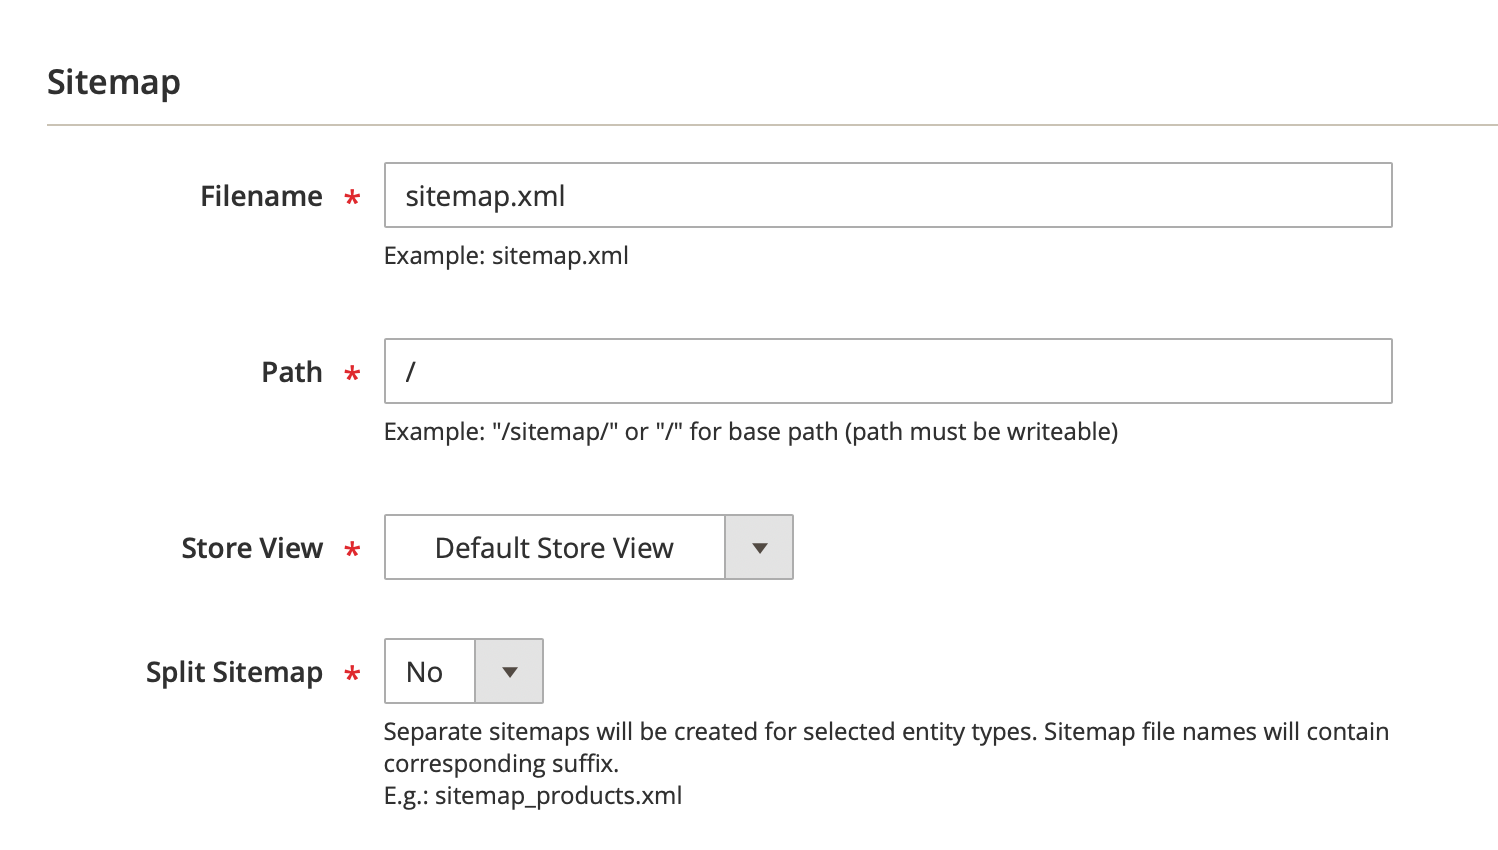
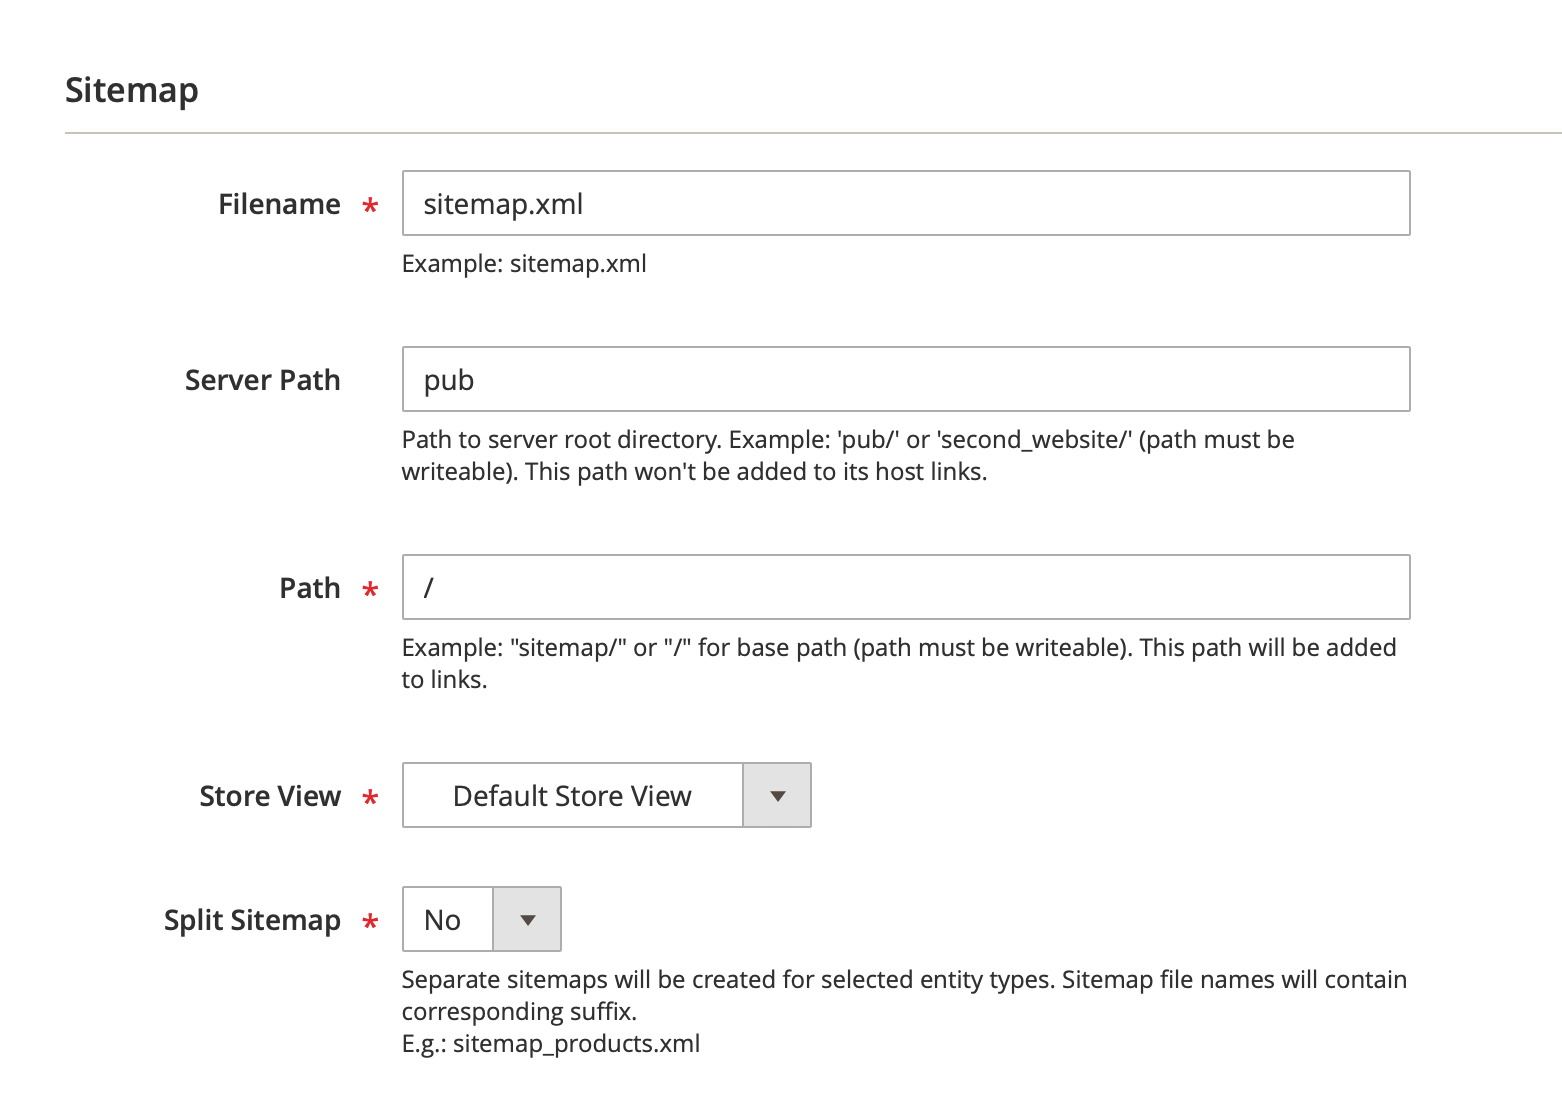
To create a new sitemap, click the Add Sitemap button.
-
Filename - this settnig defines a file name of XML sitemap.
-
Path - you can specify a path in your Magento 2 installation, where XML sitemap should be generated. Add "/" to generate XML sitemap in Magento root folder.
-
Store View - you can choose a store view to generate XML sitemap for.
-
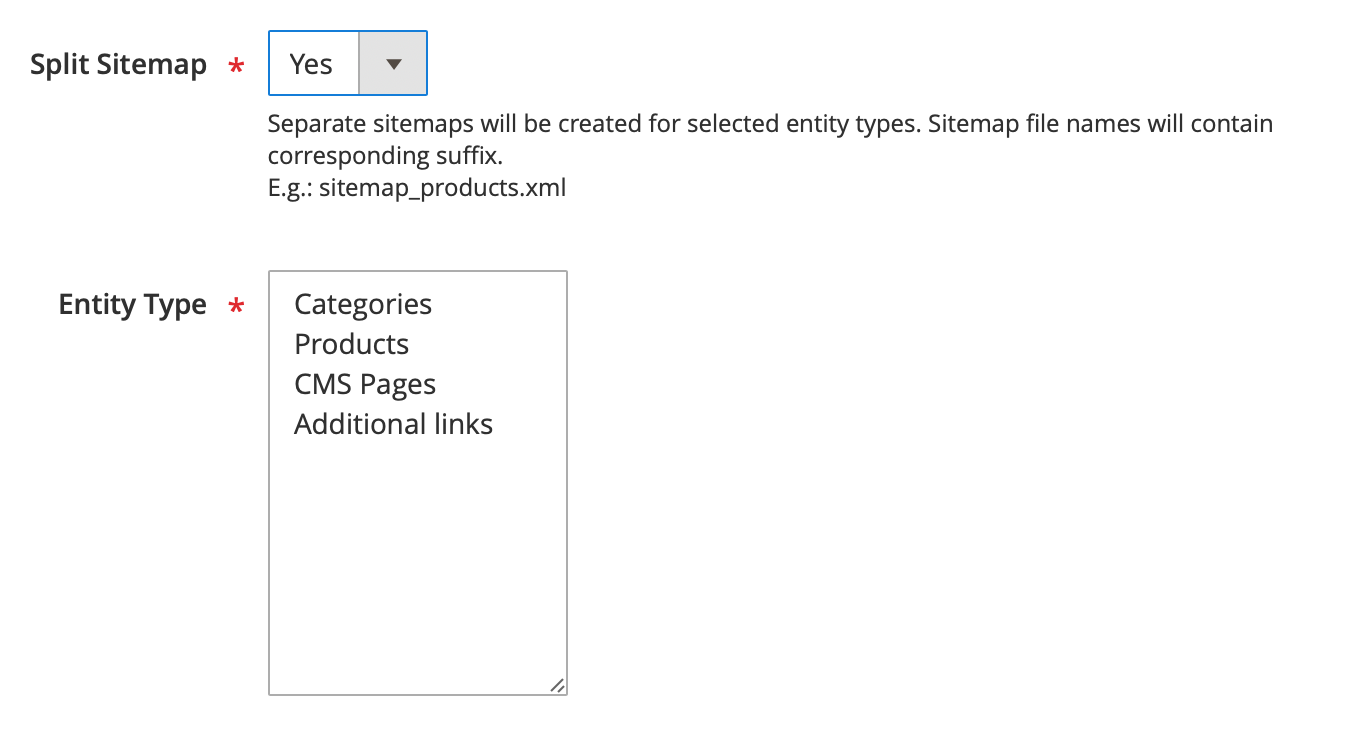
Split Sitemap - this setting allows you to generate XML sitemap files for each page entity. I.e. you can generate a separate XML sitemap for the products, a separate file for categories etc. If you enable this setting, the new field for choosing the entity types will appear. Separate XML sitemaps will be generated for each chosen type.
Generating XML Via Console
It is possible to generate the sitemaps via console.
For this, via SSH, navigate to the root Magento folder and perform the command:
c
php bin/magento xmlsitemap:generate {id}
Here the {id} variable is the ID of the Sitemap. It can be found on the sitemap grid. Alternatively, to obtain the sitemap's ID it is possible to execute:
c
php bin/magento xmlsitemap:generate
without the ID. The list of the sitemaps will be shown with their corresponding IDs.
3rd party blogs
Our XML sitemap is developed the way to include all 3rd party pages, which are added correctly to Magento 2 XML sitemap. I.e. if a 3rd party module adds its own custom pages to the native Magento 2 XML sitemap, these pages will be automatically added to our XML sitemap. Moreover, we have the extended compatibility with Mirasvit Blog, Mageplaza Blog and Aheadworks Blog modules. The compatibility addons should be installed from Mageworx Github:
Mirasvit: https://github.com/mageworx/module-mirasvitblog-seo-compatibility
Mageplaza: https://github.com/mageworx/module-mageplazablog-seo-compatibility
Aheadworks: https://github.com/mageworx/module-aheadworks-seo-compatibility
Once it is done, you should enable the appropriate settings in Mageworx Sitemap extension and configure the priority & frequency settings for the URLs of these blogs (if required).
Glossary
HTML Sitemap
An HTML sitemap allows the store visitors to quickly navigate a website using a properly organized text version of the store menu. Providing clients with a well-structured sitemap you'll increase customer satisfaction. So basically, the HTML Sitemap provides the full list of the website's pages in the logical order and is created for the real clients.
XML Sitemap
An XML sitemap is written for the search bots. Magento 2 websites have hundreds or even thousands of pages so using a Sitemap is essential to help the search bot index the products pages including those that might have been ignored otherwise. Adding images to the sitemap is another feature that is quite important for better search results as images can bring you more traffic when search bot indexes them.
Frequency setting adjusts the general information to search bots and may not correlate exactly to how often they really crawl these particular pages. This setting shows mostly how often the page is likely to change. The Always value means that the page content will differ each time they are accessed. The value Never is used for the archived URLs like some old blog posts or such. Please note that this is just the proposed value not the mandatory one and it’s always up to search bot to decide when these pages should be recrawled.
Priority feature is designed to sort the pages on your store according to their importance. Please note that the priority of each page is set in relation to the other URLs on your Magento 2 website. Putting the high priority wouldn’t affect your site rankings and help them grow in search results pages. The priority is a relative value, so putting the highest priority on all the pages wouldn’t help.
FAQ
Does Mageworx XML sitemap include the pages added by 3rd party modules?
Our XML sitemap is developed the way to include all 3rd party pages, which are added correctly to Magento 2 XML sitemap. I.e. if a 3rd party module adds its own custom pages to the native Magento 2 XML sitemap, these pages will be automatically added to our XML sitemap. Moreover, we have the extended compatibility with Mirasvit Blog, Mageplaza Blog and Aheadworks Blog modules. See this section for more details.
Sitemap.xml when docroot is set to /pub
When using /pub as docroot, the full path to your XML sitemap without SEO Suite will be yourstore/pub/sitemap.xml. There are several ways to resolve this:
1) 'Server path' field
Our extension manages to handle this case correctly and generate the URL without the "pub". For this, we added the "Server path" field for each XML sitemap. If your Magento is installed in the "pub" folder, you should enter "pub" into the "Server path" field:
In this case, our extension will check the availability of this sitemap.xml file on your server and if the sitemap.xml is accessible by this path, the extension will generate the sitemap URL without the "pub" folder.
Note
If your store is http-protected, our extension won't be able to validate the availability of such sitemap files and it will generate the URL with the "pub" folder. In this case, you should simply re-generate the XML sitemap, when the http-authorization is removed.
2) Use Nginx Configuration
Add the following code lines to nginx config for your website:
php
location ~ ^/(sitemap.*\.xml)$ {
        alias <your Magento install dir>/$1;
}
3) Use Symlinks
This will fail if a symlink already exists.
1) To create a new symlink, complete the following actions:
sh
ln -s <your Magento install dir>/sitemap.xml <your Magento install dir>/pub/sitemap.xml
2) To create or update a symlink, complete the following actions:
sh
ln -sf <your Magento install dir>/sitemap.xml <your Magento install dir>/pub/sitemap.xml
When using clauses number 1 and 2, the symlink ownership will remain the same as in the source file.
You can use chown to change the symlink’s ownership manually. To change the ownership of a symlink, complete the following actions:
sh
cd <your Magento install dir>/pub
chown -h <Magento file system owner>:<owner group> sitemap.xml
Got Questions?
Mageworx offers FREE lifetime support and updates for any extension developed for Magento. Need help with the extensions? Feel free submit a ticket from https://www.mageworx.com/support/
Mageworx offers outstanding services developing custom-tailored solutions for Magento platform to attain your eCommerce objectives. Our professional impassioned team provides profound and custom oriented development of your project in a short timeframe.